The Anchorage
Personal website of Gregory K. Maxey, Commander USN (Retired)
The Anchorage
Personal website of Gregory K. Maxey, Commander USN (Retired)
The information, illustrations and code contained in my "Microsoft Word Tips" are provided free and without risk or obligation.

However, the work is mine. If you use it for commercial purposes or benefit from my efforts through income earned or time saved then a donation, however small, will help to ensure the continued availability of this resource.
If you would like to donate, please use the appropriate donate button to access PayPal. Thank you!
As many Word users (perhaps only the old timers now) are painfully aware, the masters at Microsoft radically changed the user interface in Word 2007 with the introduction of the ribbon. Making matters worse they practically eliminated the ability to change and customize the interface without resorting to third party add-ins or doing your own programming.
While alleviating the problem somewhat with the introduction of limited customization capability in Word 2010, this Microsoft Word Help & Tips page can still be beneficial and will show you how to use VBA to customize the Word shortcut (aka right-click) menus both programmatically using VBA or with RibbonXML.
Believe it or not, Command Bars and their popup menus and controls have not been completely relegated to history. They form the invisible framework for the ribbon interface and they remain visible in the form of the shortcut menus that you see when you right click text.
![]() For a fast as simple method using RibbonXML see: Customize a ContextMenu w/RibbonXML and my tips on ribbon customization at Customize the Ribbon (It doesn't take Rocket Science).
For a fast as simple method using RibbonXML see: Customize a ContextMenu w/RibbonXML and my tips on ribbon customization at Customize the Ribbon (It doesn't take Rocket Science).
Many of the methods presented here aren't new. The ability to customize the Word menus and toolbars programmatically is available in earlier versions of Word. However, most users never had a need for it since these menus and toolbars were easily customized through the user interface.
While I can't cover every customization possibility, I am going to present few examples which will demonstrate:
For a recent practical example, see Word 2013-2016 AutoCorrect Restored
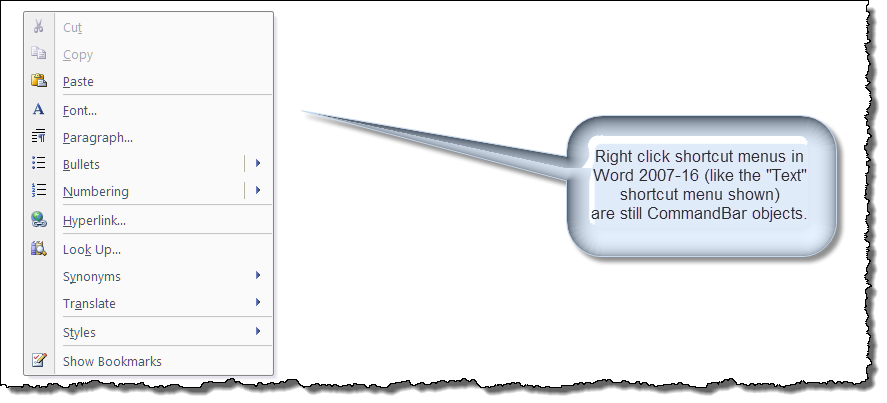
![]() Note: The "Text" shortcut menu is probably the most prevalent when users right click their mouse. However, as the shortcut menus are contextual, there are situations when it will be replaced by another menu and not be displayed.
Note: The "Text" shortcut menu is probably the most prevalent when users right click their mouse. However, as the shortcut menus are contextual, there are situations when it will be replaced by another menu and not be displayed.
To develop and describe these procedures, I have created a global template add-in file named Customize Shortcut Menu.dotm. You can download this file which contains all of the code used to create the examples using the link at the end of this tips page.
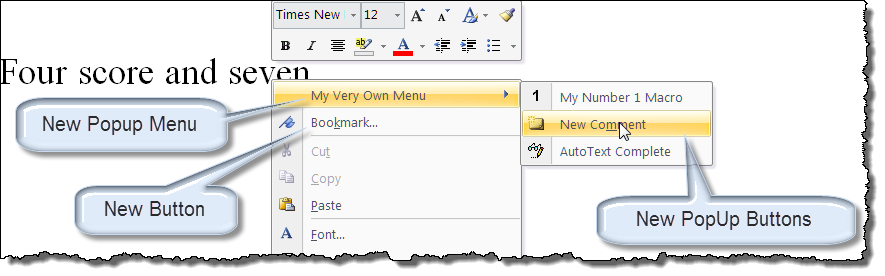
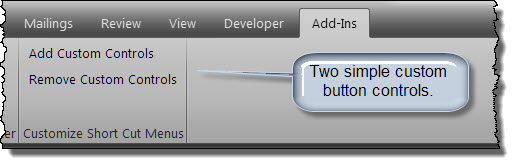
The illustration below shows the PopUp menu and new commandbar controls added at the top of the "Text" shortcut menu.
Word's built-in CommandBar "Text" can be customized using VBA procedures as shown below:
Option Explicit
Dim oPopUp As CommandBarPopup
Dim oCtr As CommandBarControl
Sub BuildControls()
Dim oBtn As CommandBarButton
  'Make changes to the Add-In template
  CustomizationContext = ThisDocument.AttachedTemplate
  'Prevent double customization
  Set oPopup = CommandBars.FindControl(Tag:="custPopup")
  If Not oPopup Is Nothing Then GoTo Add_Individual
  'Add PopUp menu control to the top of the "Text" short-cut menu
  Set oPopUp = CommandBars("Text").Controls.Add(msoControlPopup, , , 1)
  With oPopUp
   .Caption = "My Very Own Menu"
   .Tag = "custPopup"
   .BeginGroup = True
  End With
  'Add controls to the PopUp menu
  Set oBtn = oPopUp.Controls.Add(msoControlButton)
  With oBtn
    .Caption = "My Number 1 Macro"
    .FaceId = 71
    .Style = msoButtonIconAndCaption
    'Identify the module and procedure to run
    .OnAction = "MySCMacros.RunMyFavMacro"
  End With
  Set oBtn = Nothing
  'Add a Builtin command using ID 1589 (Co&mments)
  Set oBtn = oPopUp.Controls.Add(msoControlButton, 1589)
  Set oBtn = Nothing
  'Add the third button
  Set oBtn = oPopUp.Controls.Add(msoControlButton)
  With oBtn
    .Caption = "AutoText Complete"
    .FaceId = 940
    .Style = msoButtonIconAndCaption
    .OnAction = "MySCMacros.MyInsertAutoText"
  End With
  Set oBtn = Nothing
Add_Individual:
  'Or add individual commands directly to menu
  Set oBtn = CommandBars.FindControl(Tag:="custCmdBtn")
  If Not oBtn Is Nothing Then Exit Sub
  'Add control using built-in ID 758 (Boo&kmarks...)
  Set oBtn = Application.CommandBars("Text").Controls.Add(msoControlButton, 758, , 2)
  oBtn.Tag = "custCmdBtn"
  If MsgBox("This action caused a change to your Add-In template." _
     & vbCr + vbCr & "Recommend you save those changes now.", vbInformation + vbOKCancel, _
     "Save Changes") = vbOK Then
    ThisDocument.Save
  End If
  Set oPopUp = Nothing
  Set oBtn = Nothing
lbl_Exit:
  Exit Sub
End Sub
![]() See: Installing Macros for instructions on how to set up and use the macros provided in this Microsoft Word Help & Microsoft Word Tips page.
See: Installing Macros for instructions on how to set up and use the macros provided in this Microsoft Word Help & Microsoft Word Tips page.
In the example, I added four button controls. Two built-in Word button commands and two custom buttons controls. Both of the custom controls (i.e., controls that aren't assigned a built-in Id) references an "On Action" procedure. The "On Action" procedures are the procedures that you provide and set to run when the user clicks on the control.
The two I used in are shown below:
Sub RunMyFavMacro()
  MsgBox "Hello " & Application.UserName & ", this could be the results of your code."
lbl_Exit:
  Exit Sub
End Sub

Sub MyInsertAutoText()
  On Error GoTo Err_Handler
  'Mimics pressing F3 key to create an autotext/buildingblock
  Application.Run MacroName:="AutoText"
  Exit Sub
Err_Handler:
  Beep
  Application.StatusBar = "The specified text is not a valid AutoText\BuildingBlock name."
End Sub
Once the controls are added and your add-In template is saved you really have no further need of the code that builds the controls. However, if after building the custom controls you should want to edit them, you first have to delete the custom controls with VBA and run your own revised version of the BuildControl procedure to create new controls. The code to remove the custom controls is shown below:
Sub RemoveContentMenuItem()
  'Make command bar changes in Add-In template
  CustomizationContext = ThisDocument.AttachedTemplate
  On Error GoTo Err_Handler
  Set oPopUp = CommandBars("Text").Controls("My Very Own Menu")
  'Delete individual commands on the PopUp menu.
  For Each oCtr In oPopUp.Controls
    oCtr.Delete
  Next
  'Delete the PopUp itself.
  oPopUp.Delete
  'Delete individual custom commands on the Text menu.
Reënter:
  For Each oCtr In Application.CommandBars("Text").Controls
    If oCtr.Caption = "Boo&kmark..." Then
      oCtr.Delete
      Exit For
    End If
  Next oCtr
  If MsgBox("This action caused a change to your Add-In template." _
      & vbCr + vbCr & "Recommend you save those changes now.", vbInformation + vbOKCancel, _
      "Save Changes") = vbOK Then
    ThisDocument.Save
  End If
  Set oPopUp = Nothing
  Set oCtr = Nothing
  Exit Sub
Err_Handler:
  Resume Reenter
End Sub
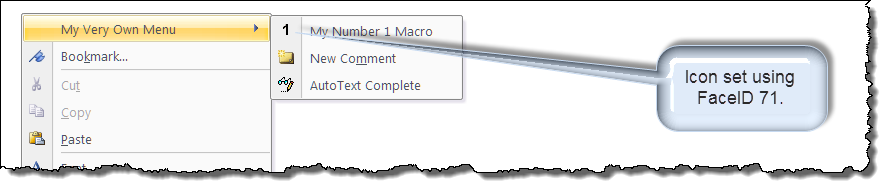
You may have noticed that I used the FaceId property of the CommandBar controls in several instances. The FaceId defines the look, not the function, of a CommandBar button. You can select from hundreds of FaceId numbers which are referenced in the FaceId.dot template that you can download here: FaceId.dot
When you open the FaceId.dot template in Word 2007 and higher, the FaceIds are populated on the ribbon Add-Ins tab. Simply hove the mouse over the control image you are considering to use and read the ID in the popup.
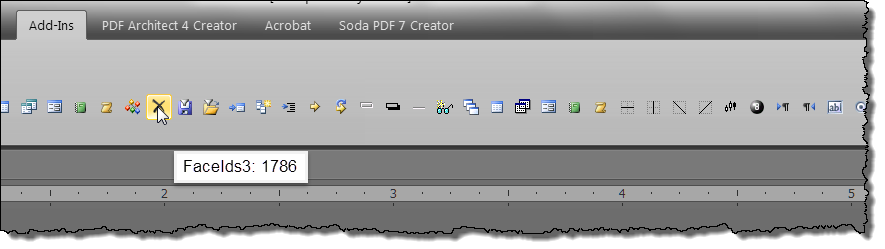
![]() Note: According to Word MVP Dave Rado, who developed FaceID.dot, there are over 3000 FaceIds, but only 1707 actually have an associated image, and fewer still have an associated image discernable as unique. The FaceID.dot template provides only those that Dave considered "unique."
Note: According to Word MVP Dave Rado, who developed FaceID.dot, there are over 3000 FaceIds, but only 1707 actually have an associated image, and fewer still have an associated image discernable as unique. The FaceID.dot template provides only those that Dave considered "unique."
A control ID on the other hand determines the built-in action for that control. In this example, I used the built-in Id "1589" for the "Insert Comment" control and "758" for the "Add Bookmark" control. These are the same control Ids as used for the menu Insert>Comment and Insert>Bookmark commands in Word 2003. I have included a list of control Ids here: Control Ids.
I added some basic Ribbon customization to the global template add-in. When the add-in loads a new group with a couple of command buttons are placed on the Add-Ins tab. You can use these commands to quickly and easily fire the procedures that build your custom menu controls or delete those controls. For more on customizing the ribbon see Customize the Ribbon (It doesn't take Rocket Science).
![]() There is an inconsistent issue with this AddIn that I haven't been able to eliminate. Sometimes when you run the BuildControls procedure for the first time (either initially or for after making modifications) the controls are either not built or don't function properly. Each time that this has happened, I have just deleted the controls and run the BuildControls procedure a second time and it works perfectly. As the little icon indicates, I have given up.
There is an inconsistent issue with this AddIn that I haven't been able to eliminate. Sometimes when you run the BuildControls procedure for the first time (either initially or for after making modifications) the controls are either not built or don't function properly. Each time that this has happened, I have just deleted the controls and run the BuildControls procedure a second time and it works perfectly. As the little icon indicates, I have given up.
![]() For more on template add-ins and how to load them, see: Organizing Your Macros/Template Add-ins at: Installing Macros
For more on template add-ins and how to load them, see: Organizing Your Macros/Template Add-ins at: Installing Macros
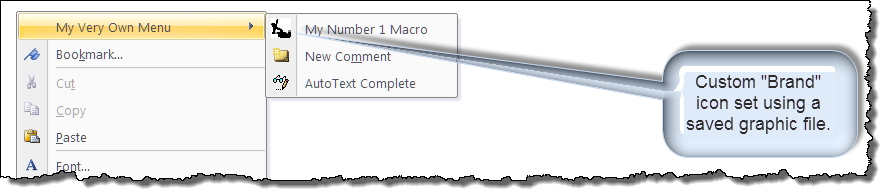
In situations where for reasons of branding or when one of the 1707 FaceIds just isn't enough, you can create and apply a custom image to the face of your CommandBar controls.
In the examples that follows, I will show you two VBA methods for replacing the FaceId of the "My Number 1 Macro" control with a custom face defined by a graphic image file. Depending on your view point, this may be heady or heavy stuff.
![]() Note
Note
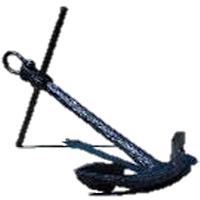
You get what you pay for. I don't claim or pretend to be a graphic designer as my clumsy attempt to apply my "unsuitable" Resting Anchor graphic illustrates.
To use a custom graphic file to a apply a custom "face" to CommandBar control we must use the control objects method ".PasteFace"
As the method name implies. .PasteFace simply pastes a copy of an image file from the clipboard and applies it to set the control "face."
The easiest method and one well suited for a static CommandBar icon, is to simply insert a "suitable" external graphic into a document, copy it, and paste it to the control face.
The following VBA procedure inserts a defined graphic file into a Word document and copies it as a picture to the clipboard:
Sub CopyExternalAsPictureToClipboard(strFileName)
Dim oShp As Shape
Dim oDoc As Document
  'Create temporary document.
  Set oDoc = Documents.Add(, , , False)
  'Insert the graphic
  Set oShp = oDoc.Shapes.AddPicture(strFileName)
  'Select it
  oShp.Select
  'Copy it.
  Selection.CopyAsPicture
  'Kill the tempory document.
  oDoc.Close wdDoNotSaveChanges
lbl_Exit:
  Set oShp = Nothing: Set oDoc = Nothing
End Sub
Now it is just a matter using a button controls .PasteFace method to apply the picture to the control:
Sub PasteMyFace()
Dim oPopUP As CommandBarPopup
Dim oCtr As CommandBarControl
Dim oBtn As CommandBarButton
  'Put a picture on the clipboard.
  CopyShapeAsPicture "D:\My Pictures\Miscellaneous Pictures\RestingAnchor.png"
  For Each oCtr In CommandBars("Text").Controls
    If oCtr.Caption = "My Very Own Menu" Then
      Set oPopUP = oCtr
      Set oBtn = oPopUP.Controls(1)
      'Paste it to the control face.
      oBtn.PasteFace
      If MsgBox("This action caused a change to your Add-In template." _
           & vbCr + vbCr & "Recommend you save those changes now.", _
           vbInformation + vbOKCancel, "Save Changes") = vbOK Then
        ThisDocument.Save
      End If
      Exit For
    End If
  Next
lbl_Exit:
  Set oPopUP = Nothing: Set oBtn = Nothing
  Exit Sub
End Sub
![]() Notes:
Notes:
1. For best results, you graphic should be 16 x 16 pixels using a transparent background color.
2. For tips on using the Word 2003 Button Editor or other graphics editors to create/customize a suitable graphic file to apply to CommandBar controls, see my: Ribbon Custom Icons.
3. For additional information on how to employ Word 2000/2003 toolbars in Word 2007/10/13/16 applications see Word MVP Graham Mayor's: Use Word 2003 Toolbars in Word 2007 and Later
In the days of old (pre-Word 2007), you could create one or more controls on a dummy toolbar bar (one you kept disabled and hidden) and apply custom image faces to each of them manually or using the method above. You could then use the .CopyFace method together with the .PasteFace method to apply one of those graphics to your working CommandBar. For example:
To make the final example interesting, I am going to use an actual image file that is saved (embedded) in the documents OpenXMLFormat file package.
First I am going to create a "dummy" ribbon tab, group and button control. I will keep this tab from document users by setting its "visible" property = false. Next I will apply add and apply an external .png format graphic file to the dummy button control image attribute.
Detailed steps for doing this is beyond the scope of this tips page. See: Customize the Ribbon and my series on ribbon images and labels.
The RibbonXML that creates the dummy tab (as well as the two controls mentioned above) is shown here:

At this point the template global add-in file contains a physical copy of the graphic file stored in the templates OpenXMLFormat file.

The final steps include:
While it may appear complicated, with VBA it happens in the twinkle of an eye. The process requires some rather advanced VBA techniques that are too complicated to spell out here. Just download the Short Cut Menu template file using the link at the end of the tips page to see and explore the required code.
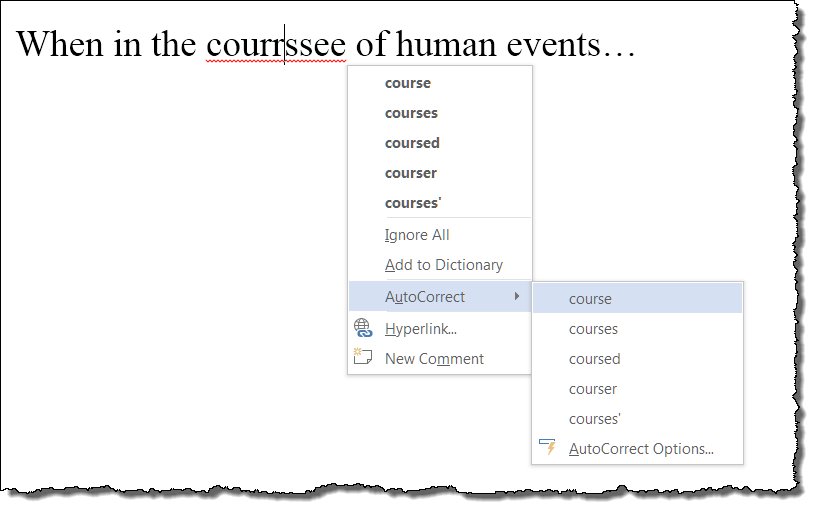
NOTE - Do to constant tinkering by Microsoft, this section may or may not be relevant. As of October 2020, Microsoft has apparently "once again" restored The AutoCorrect shortcut in the Office 365 (and perhaps other versions) of Word. If you see "Add to AutoCorrect" on the right click menu for a misspelled word without the add-in loaded, then of course you don't need it. If you have been using the add-in with Office 365 and Word responds sluggishly, then you should stop using the add-in and remove it from your startup folder.
Prompted by activity in various Word support forums, I've put together a method for restoring the "AutoCorrect" command on the spelling error context menu in Word 2013\2016. While not perfect, if you have come to rely on this feature and if you can tolerate a slight occasional flicker of the mouse pointer then this method might ease your pain.
![]() Note: Microsoft can't seem to get it right. First they violated good sense ("If it isn't broken, don't fix it") and removed the feature. Then they broke (twice) my attempts to fix what they should have left alone in the first place.
Note: Microsoft can't seem to get it right. First they violated good sense ("If it isn't broken, don't fix it") and removed the feature. Then they broke (twice) my attempts to fix what they should have left alone in the first place.
Their most recent interference occurred with a Word 2016 update in May 2016. I don't know if this is a sign that they are trying to restore this feature but it appears that they have tried to add an additional control to this menu captioned "Proofing." Well they failed, but their attempts caused an indexing error to appear in my process. Accordingly, I've modified the code to handle that error and confirmed the add-in functions in the current versions (as of May 2016) of Word 2013 and 2016.
You can download the template here and put it in Word's startup folder or load it manually.
AutoCorrect Restored Again.
![]() Note: If/when Microsoft tinkers in this area I may have to revise the code again. Check back for updates if you experience issues. As of November 2016, Microsoft began releasing updates that restored this feature, albeit in a different manner. Jury is still out as to how it is received and how widespread the distribution will be.
Note: If/when Microsoft tinkers in this area I may have to revise the code again. Check back for updates if you experience issues. As of November 2016, Microsoft began releasing updates that restored this feature, albeit in a different manner. Jury is still out as to how it is received and how widespread the distribution will be.
![]() Note: To see the red squiggly line under misspellings, ensure the option "Check spelling as you type" is checked in File>Options>Proofing>When correcting spelling and grammar in Word.
Note: To see the red squiggly line under misspellings, ensure the option "Check spelling as you type" is checked in File>Options>Proofing>When correcting spelling and grammar in Word.
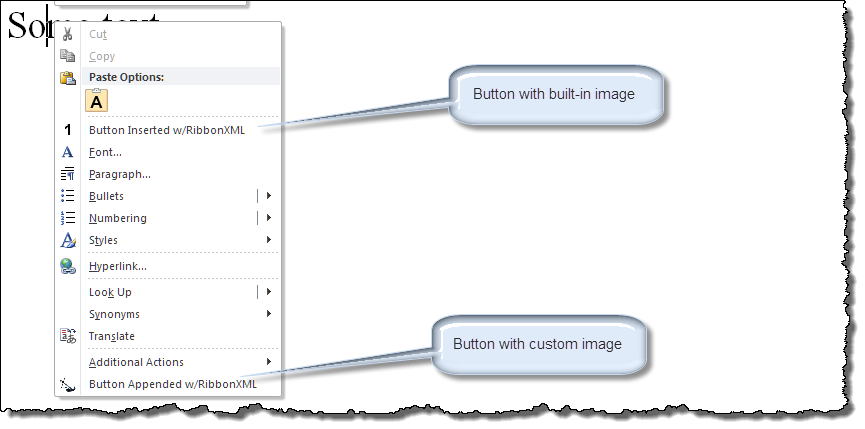
One is never too old to learn new tricks. After nearly 10 years of creating custom ribbons for my own personal use and for others, I learned through Charles Kenyon and MVP Beth Melton that the subject ContextMenus discussed in this tips page can also be customized (and in most cases much easier) simply using RibbonXML.
In a previous illustration, I showed you a snippet of RibbonXML that I used to store a document imbedded image. Follows is the complete RibbonXML which now also adds two buttons to a clean (otherwise unaltered) "Text" context menu.
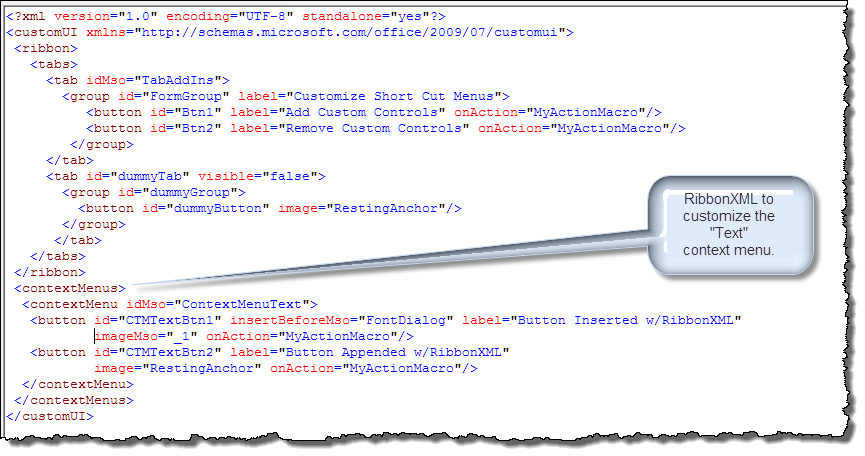
As you should see, the RibbonXML inserts the first button labeled "Button Inserted w/RibbonXML" before the built-in "Font..." control and appends a second button labeled "Button Appended w/RibbonXML" at the bottom of the menu. Both buttons use a VBA "onAction" callback named "MyActionMacro." The first button shows a built-in image "_1" and the second shows the custom "Resting Anchor" image discussed previously.
That's it! I hope you have found this tips page useful and informative. You can download the template add-in I used in this Microsoft Word Help & Microsoft Word Tips page here: Customize Shortcut Menu.
The information, illustrations and code contained in my "Microsoft Word Tips" are provided free and without risk or obligation.
However, the work is mine. If you use it for commercial purposes or benefit from my efforts through income earned or time saved then a donation, however small, will help to ensure the continued availability of this resource.
If you would like to donate, please use the appropriate donate button to access PayPal. Thank you!
This page was last updated on
March 09, 2021
Website
Privacy Statement
Back to top ![]() Back to
Word Tips
Back to
Word Tips