The Anchorage
Personal website of Gregory K. Maxey, Commander USN (Retired)
The Anchorage
Personal website of Gregory K. Maxey, Commander USN (Retired)
The information, illustrations and code contained in my "Microsoft Word Tips" are provided free and without risk or obligation.

However, the work is mine. If you use it for commercial purposes or benefit from my efforts through income earned or time saved then a donation, however small, will help to ensure the continued availability of this resource.
If you would like to donate, please use the appropriate donate button to access PayPal. Thank you!
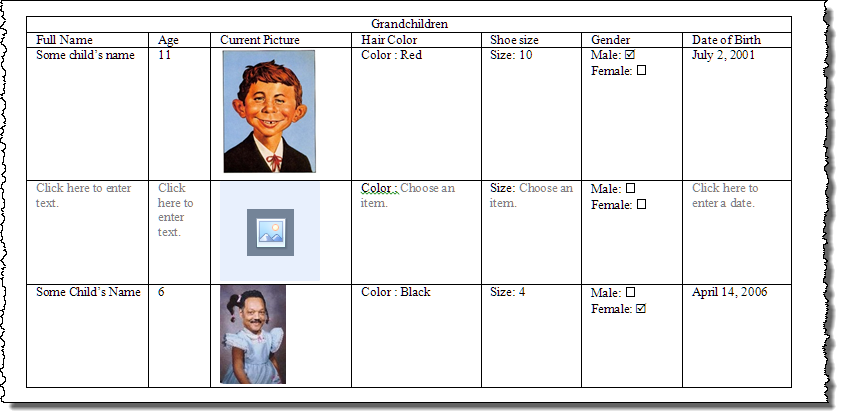
The purpose of this Microsoft Word Tips & Microsoft Word Help page is to provided and explain an automated method that you can use to insert or append new rows or columns in a Word table, while duplicating the content of the selected row/column in the new column. This feature will be useful when you have a table that your document user needs to list or define several items with similar properties. For example, consider the following table, where the document user is asked to provide information on his grandchildren:
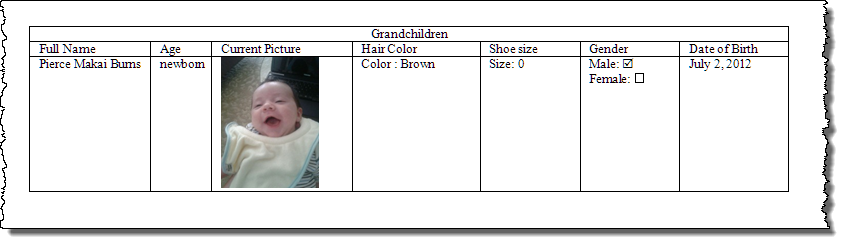
The table contains seven cells. Each cell contains for one or more content controls for entering variable data. I've included demonstrations of the seven content controls available in Word 2010 for displaying data; rich text, plain text, picture, combo box, dropdown list, date and checkbox. Just for the purpose of demonstration, the cells containing the combo box and dropdown list also contain fixed text.
Like the caption says, easy for me. However, other users may require two, three, or even two dozen table rows to provide the information requested. As the document designer, you are faced with the decision of how many rows to provide. Not enough can frustrate your users, and too many can look unprofessional or add work (deleting unused rows) for you or the document users.
You probably won't find much enthusiasm for providing just a couple of rows and asking your users to copy and paste new rows if required. In this case, unless your users are Word power users and knowledgeable of certain buggy behavior Word, you certainly won't get good results!
Here is why. Each of the content controls in the demonstration table have their property "Content control cannot be deleted" set. This setting results in some odd behavior in Word. To demonstrate, perform the following:
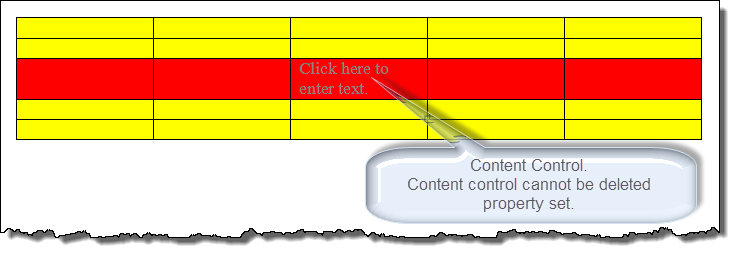
While users can't insert rows or columns, copy and paste will still work.
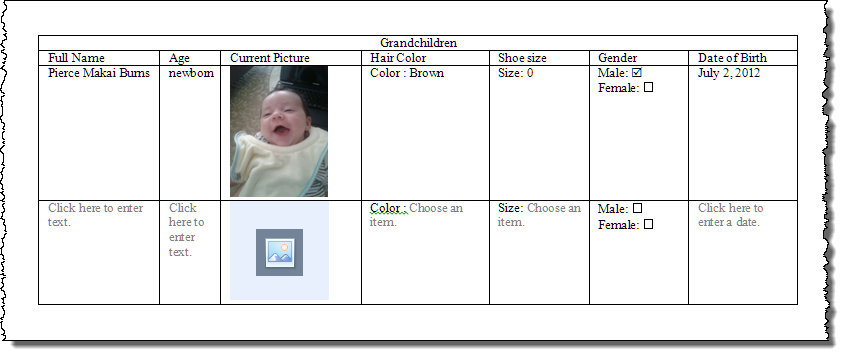
What you and your user really need is an automated method of appending or inserting a new row or columns, complete and ready to be filled out afresh by the user.
While unlikely to be as useful and not illustrated here, I've also developed an automated process to insert or append a new column to the right of a selected table column. Both processes are fully demonstrated in the demonstration document that you can download:
Add Table Row\Column with Content.
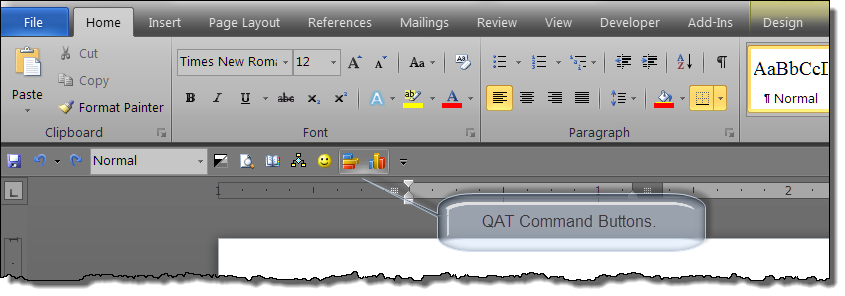
To facilitate inserting or appending rows, I've added a command buttons to the quick access toolbar (QAT) in the document. The user simply places the cursor in the table and clicks the command button to insert or append a row in the table.
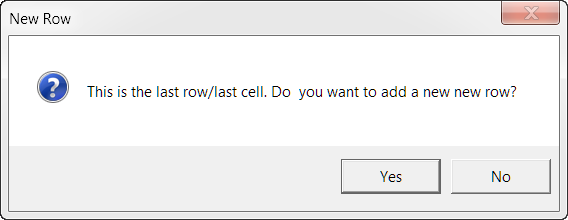
Additionally, I've added code to the document ContentControlOnEnter event that queries the user if a new row is needed when the user enters the content control located in the last cell of the last table row. If the user selects yes, the new row is automatically appended in the table.
![]() Note: This tips page, illustrations and examples were developed using Word 2010. It is wholly functional with Word 2013 and 2007. Note: The checkbox controls demonstrated in Word 2010 will be converted to rich text controls and lose their ability to be toggled between states.
Note: This tips page, illustrations and examples were developed using Word 2010. It is wholly functional with Word 2013 and 2007. Note: The checkbox controls demonstrated in Word 2010 will be converted to rich text controls and lose their ability to be toggled between states.
That's it! I hope you have found this tips page useful and informative.
The information, illustrations and code contained in my "Microsoft Word Tips" are provided free and without risk or obligation.
However, the work is mine. If you use it for commercial purposes or benefit from my efforts through income earned or time saved then a donation, however small, will help to ensure the continued availability of this resource.
If you would like to donate, please use the appropriate donate button to access PayPal. Thank you!
This page was last updated on
March 09, 2021
Website
Privacy Statement
Back to top ![]() Back to
Word Tips
Back to
Word Tips