
The Anchorage
Personal website of Gregory K. Maxey, Commander USN (Retired)
The Anchorage
Personal website of Gregory K. Maxey, Commander USN (Retired)
The information, illustrations and code contained in my "Microsoft Word Tips" are provided free and without risk or obligation.

However, the work is mine. If you use it for commercial purposes or benefit from my efforts through income earned or time saved then a donation, however small, will help to ensure the continued availability of this resource.
If you would like to donate, please use the appropriate donate button to access PayPal. Thank you!
The purpose of this Microsoft Word Tips & Microsoft Word Help page is to published and describe my frmDatePicker, a custom VBA calendar. Intended as a replacement for Microsoft's DTPicker and Month View controls, frmDatePicker is a product of my extensive review, adaptation and modifications to "CalendarForm," another VBA calendar form developed by Trevor Eyre. CalendarForm is a superb, self-contained VBA userform which renders a nearly perpetual calendar.
Specifically I want to illustrate how easily frmDatePicker can be used in a Word project environment to replace the DTPicker control.
You might be wondering why you should care about a custom VBA calendar form if you use or have used Microsoft's built-in VBA DTPicker control in the past.
If you have it, there isn't anything more simple than the DTPicker control that previously shipped with Microsoft Office. I've used it on hundreds of forms in the past.
 Point, click |
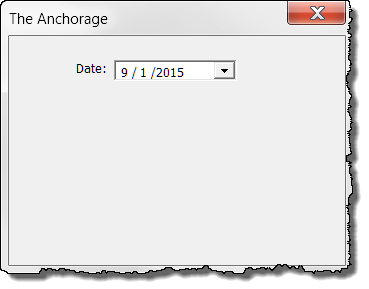 Voilà! |
The problem is if you have it, there is a good chance that many of your potential users won't! Unfortunately, it is no longer included with newer Office application suites and even if your users can obtain and register the proper DLL files, those files can and are often subsequently wiped by Office updates.
Therefore it is futile, if not reckless, to develop or continue supporting a VBA solution for wide distribution that relies on the Microsoft DTPicker control.
The demise of the DTPicker compels us to find a reliable and easy to use custom alternative. I think Trevor Eyre initially provided that. Either my frmDatePicker or Trevor's CalendarForm more than makes up for the DTPicker control. After reviewing this tips page and the demonstrations in the supporting template, I think many of you will agree.
Before demonstrating frmDatePicker, I want to say a few words about why I modified Trevor's CalendarForm; something which I have already described as superb.
Well I am a tinkerer pure and simple. I can rarely refrain from looking at VBA code without trying to see if I can take it apart and put it back together in a better way. I do that with code I see on the internet all the time. I did it with Trevor's code, and I even tinker with my own code that I've not looked at in awhile. I explained this to Trevor and it seems that I am not alone. Trevor confessed that he is a lot like me in that respect.
I also have a particular, if not peculiar, coding style and tend to favor brevity in my commenting. When I read and study code, I can usually understand it better after converting it to my own style.
While I did spot, correct and inform Trevor of a very few minor errors in his process, the vast majority of the numerous changes I've made are either cosmetic, done to consolidate Trevor's code, or to expand the already extensive calendar form customization options Trevor had already provided.
I provided Trevor a full description of all errors and my corrections, notes on my modifications as well as an advanced copy of the demonstration template. Trevor graciously received my feedback with enthusiasm. He stated that he would not only fix the errors I identified but likely incorporate some of my modifications and enhancements into his own CalendarForm.
It was very interesting to see how Trevor had wrestled the bear of developing a functional calendar control and won. You might not fully appreciate the complexity of coding a process that will instantly render a calendar months or years in the future or past with the click of a button. I feel that I can say, and with a good degree of certainty, that it was no walk in the sun.
You can download Trevor's CalendarForm from a link in the demonstration template frmDemo user interface. Who knows, with the passage of time you might not see much of a difference between his form and mine.
The demonstration template is packaged in a zip file you can download here: Demo Template. After downloading the zip file, extract and save the DatePicker Custom Calendar Form template file to a convenient location.
![]() Note: The demonstration template contains userforms and code. You may elect to save the demonstration template to a trusted location. In which case, content will be enabled automatically when you open the template. Otherwise you will have to enable content when you open the template.
Note: The demonstration template contains userforms and code. You may elect to save the demonstration template to a trusted location. In which case, content will be enabled automatically when you open the template. Otherwise you will have to enable content when you open the template.
For the demonstration you should OPEN the demo template file either through Word's file open interface or by right clicking the file icon and selecting "Open."
![]() Note: If you dbl-click on the file icon you will NOT open the template. Instead you will create a new document based on the template. That is not what you want to do here.
Note: If you dbl-click on the file icon you will NOT open the template. Instead you will create a new document based on the template. That is not what you want to do here.
When the template opens it appears as with a single highlighted line of text and renders a new single icon to the Quick Access Toolbar (QAT).
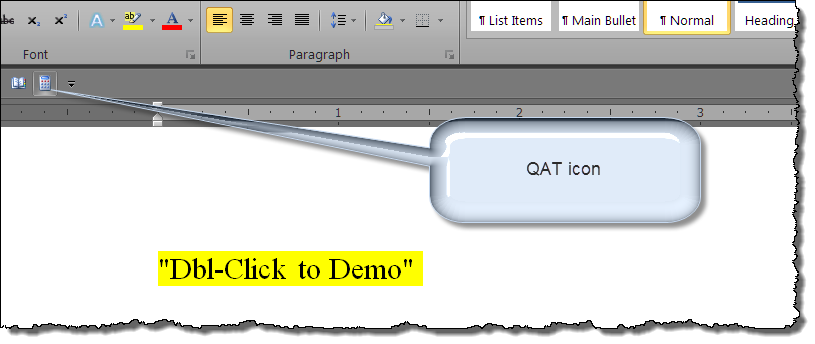
Lets leave the QAT icon to itself for awhile and fisrt dbl-click the highlighted text. This action will call and display the frmDemo "Custom DatePicker Demos" user interface.
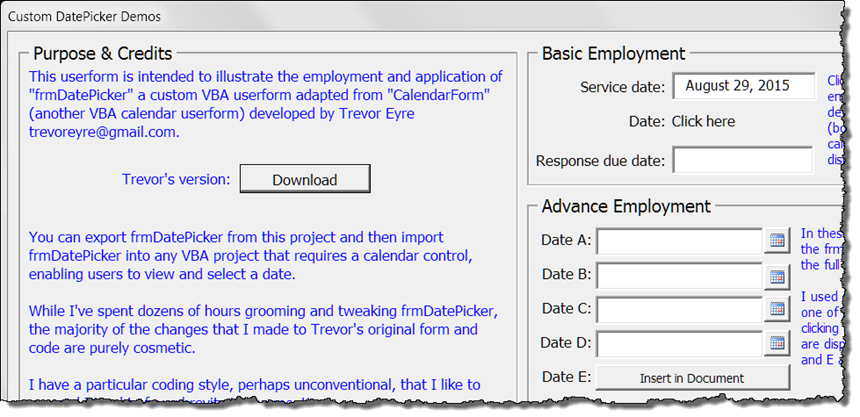
![]() Note: Unfortunately, frmDemo is a large form so I can only show you about half of it here and at a slightly reduced scale.
Note: Unfortunately, frmDemo is a large form so I can only show you about half of it here and at a slightly reduced scale.
However, in this partial view, all of the important elements are visible. Those being the six textboxes (2 basic/4 advanced), the label control "Click here" in the basic section, the four command buttons with a calendar icon in the advanced section, and the command button "Insert in document" in the advanced section. The rest of the form is just static label text which you can read at your own leisure.
The one thing I rigorously preserved while adapting Trevor's code is frmDatePicker remains completely self-contained with no reliance on other code modules or class objects. All it needs to completely meet the primary objective of replacing Microsoft's defunct DTPicker control is a call (or request) from an external procedure to render and return the date picked by the document user.
In the first demonstration, "Service date" text field's "txtDateOfService_MouseUp" event provides this call and displays the default calendar. To trigger the event and execute the call simply mouse click in the text field.
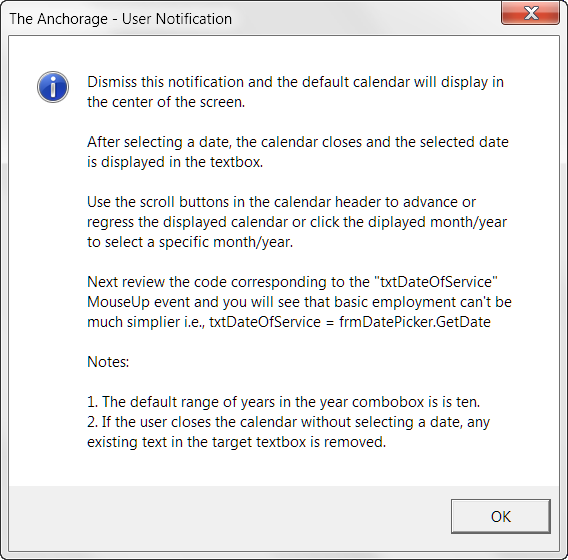
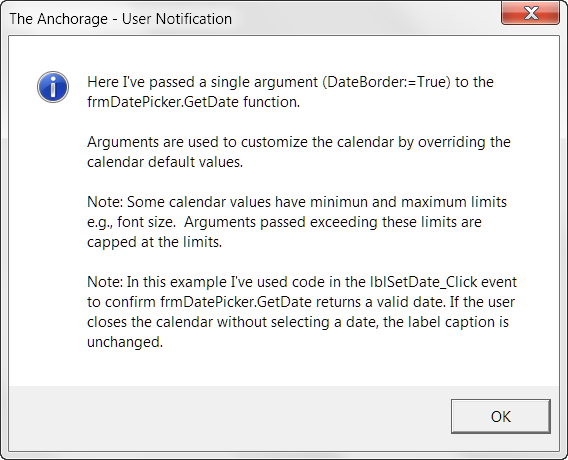
![]() Note: For demonstration purposes, in all three basic demonstrations, I intercept the basic call to frmDatePicker and display information regarding what you can expect to see with other tips on employment. Read the information provided and then dismiss the form.
Note: For demonstration purposes, in all three basic demonstrations, I intercept the basic call to frmDatePicker and display information regarding what you can expect to see with other tips on employment. Read the information provided and then dismiss the form.
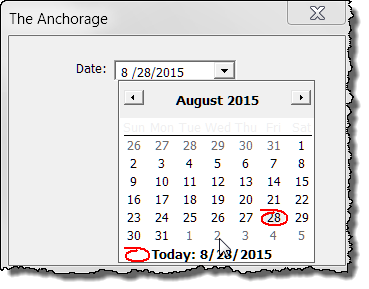
After dismissing the form, the Date Picker is displayed:
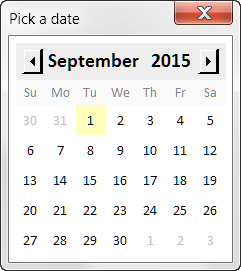
The calendar you see is the frmDatePicker default user interface. At this point, it performs very much like the DTPicker previously supplied by Microsoft. Just click on (or navigate to and click on) any enabled calendar date and the picked date is populated to the txtDateOfService textbox.
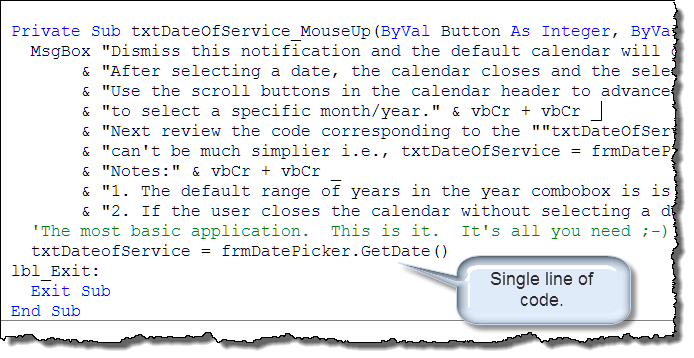
The code to create this consists of the calling procedure and a single line of code:
Private Sub txtDateOfService_MouseUp(ByVal Button As Integer, ByVal Shift As Integer, _
                                     ByVal X As Single, ByVal Y As Single)
  txtDateofService = frmDatePicker.GetDate
End Sub
It really is that simple!
![]() Note: For the example above, the actual code in the txtDateOfService_MouseUP procedures includes the extraneous code needed to display the user information and my peculiar procedure exit statements. The fact remains that the call is a simple single line of code.
Note: For the example above, the actual code in the txtDateOfService_MouseUP procedures includes the extraneous code needed to display the user information and my peculiar procedure exit statements. The fact remains that the call is a simple single line of code.
The frmDatePicker.GetDate function can take any combination of up to forty (40) arguments. These arguments are used to redefine the function's default parameters making frmDatePicker extremely versatile in both function and appearance.
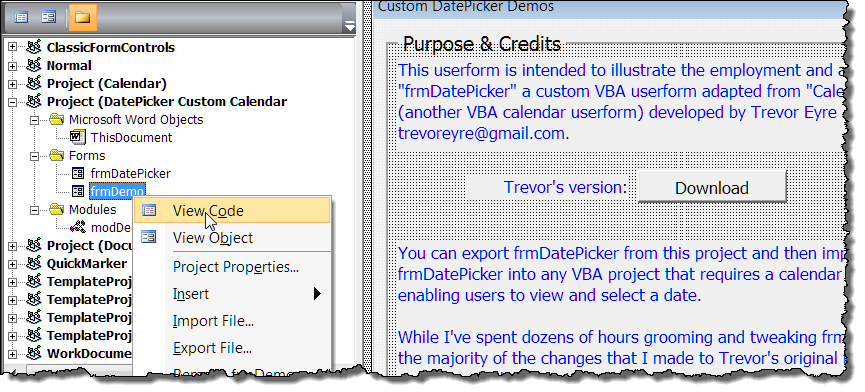
In the user information message associated with the demonstration, I suggested that you look at the actual code in the demonstration template. If you are reading this page it is likely that you already know how to do that; for the sake of thoroughness I'll provide the basic steps.
![]() Note: The standard module modDemo and form frmDemo are necessary to demonstrate external calls to frmDatePicker.GetDate and for further processing the returned picked date only.
Note: The standard module modDemo and form frmDemo are necessary to demonstrate external calls to frmDatePicker.GetDate and for further processing the returned picked date only.
![]() Note: The code in the frmDatePiker and modDemo modules can and should be reviewed in a similar manner.
Note: The code in the frmDatePiker and modDemo modules can and should be reviewed in a similar manner.
The second demonstration, "Click here" illustrates an alternate method of returning the frmDatePicker.GetDate picked date information. The picked date can be returned practically anywhere in a Word document or userform. You've already seen it returned to a form textbox. Here it is returned to a form label caption.
Demonstration two also illustrates the process of passing a single argument to redefine one of the frmCalendar default parameters.
Click on the label to display the calendar.

To create variations of the default calendar, you simply pass one or more named arguments with appropriate values in the call.
Private Sub lblSetDate_Click()
Dim strDatePicked As String
  'Pass single named argument DateBorder
  strDatePicked = oFrm.GetDate(DateBorder:=True)
  If IsDate(strDatePicked) Then
    With lblSetDate
      .Caption = strDatePicked
      'Size label to fit content.
      .Width = frmBasic.Width
      .AutoSize = True
    End With
  End If
End Sub
![]() Note: Observe that while there is considerably more code used in this example, the actual call is very similar to the call used in the first demonstration. Here we return the GetDate result to a string variable (vice textbox) for subsequent validation and then pass the single named argument "DateBorder" and its value.
Note: Observe that while there is considerably more code used in this example, the actual call is very similar to the call used in the first demonstration. Here we return the GetDate result to a string variable (vice textbox) for subsequent validation and then pass the single named argument "DateBorder" and its value.
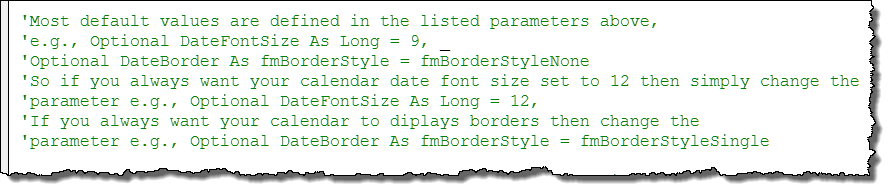
If you always want the date borders displayed your calendar, you can change the parameter default in the frmDatePicker.GetDate function and thereby eliminate the need to pass the named argument.

![]() Note: This tip and similar useful employment tips are included in the frmDatePicker code module.
Note: This tip and similar useful employment tips are included in the frmDatePicker code module.
The following illustration depicts the calendar called from the "Response due date" MouseUp event (demo 3). As before, you will see a user information message before the form is displayed.
Review the calling procedure in the frmDemo code module to see how the calendar was rendered with a custom caption and how dates prior to a specific date are identified and restricted.
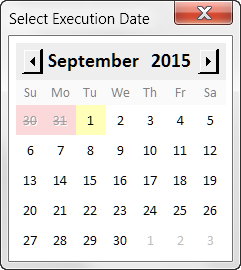
![]() Note: After reviewing the code you will most likely understand if the result you see in the demo are slightly different than the result shown here.
Note: After reviewing the code you will most likely understand if the result you see in the demo are slightly different than the result shown here.
In the basic employment demonstration each of the calendars were displayed in the default position center screen. To alter that position, the desired position location must be determined and passed as two named arguments "PositionTop" and "PositionLeft" in the calling procedure.
Using advanced employment methods you will see how to position the calendar precisely under a respective text field.
The advance employment demonstrations will also illustrate the use of most of the remaining calendar customization parameters.
![]() Note: While performing the advanced demonstrations, refer to the associated notes on the frmDemo. I have not intercepted the calls to provide additional information.
Note: While performing the advanced demonstrations, refer to the associated notes on the frmDemo. I have not intercepted the calls to provide additional information.
To initiate the advanced demonstrations you can 1) Click the associated command button adjacent to the text field, 2) Enter one of the target date text fields or 3) Dbl-click in a text fields.
The control event procedures for these three methods are shown in the frmDemo. I have also incorporated a common QueryDatePicker procedure in frmDemo. This helps to consolidate and minimize redundant code in the project.
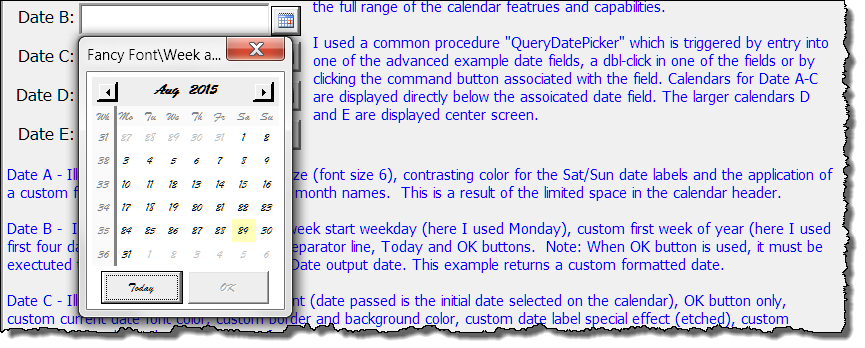
Entering the Date A text field displays the following modified calendar positioned under the field. This illustrates the minimum calendar size (font = 6) and the introduction of the Title bar (show\hide) and Cancel button (show\hide) properties introduced in version 1.4.
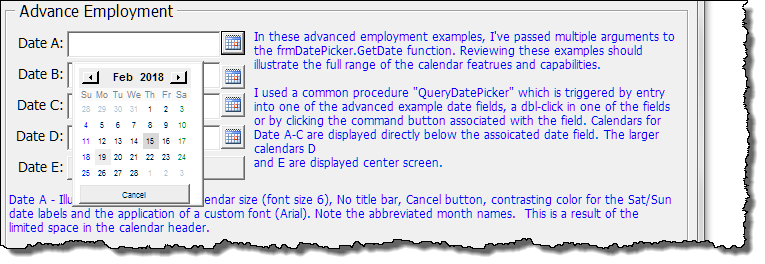
This demonstration illustrates the minimum calendar size. Overall calendar size is controlled by the font size used to define the date labels. In the previous demonstration the font size used was the default font size (9). Here I have passed the named argument DateFontSize:=6 and several other arguments to render the calendar shown.
![]() Note: The calendar DateFontSize parameter is limited to the range 6 to 30.
Note: The calendar DateFontSize parameter is limited to the range 6 to 30.
Here is a representation of the call used to render the calendar. You should readily see that in addition to passing the DateFontSize:=6 argument, I have passed named arguments to alter the default position (top and left), the Saturday and Sunday day label colors and the calendar form caption.

![]() Note: When using named arguments, you must include the characters ":=" between the argument name and value. Arguments must be separated using a comma and lines continued (if required) using the line continuation character "_"
Note: When using named arguments, you must include the characters ":=" between the argument name and value. Arguments must be separated using a comma and lines continued (if required) using the line continuation character "_"
Clicking the command button adjacent to the Date B text field displays the following calendar.
In this example, I tweaked the DateFontSize argument (passed 7 instead of 6) to render the calendar size to more closely match the associated field.
![]() Note: Since font size is defined using a long data type (6, 8, 12, etc.) exact sizing is not possible. However, you can always adjust the field width to match the calendar width.
Note: Since font size is defined using a long data type (6, 8, 12, etc.) exact sizing is not possible. However, you can always adjust the field width to match the calendar width.
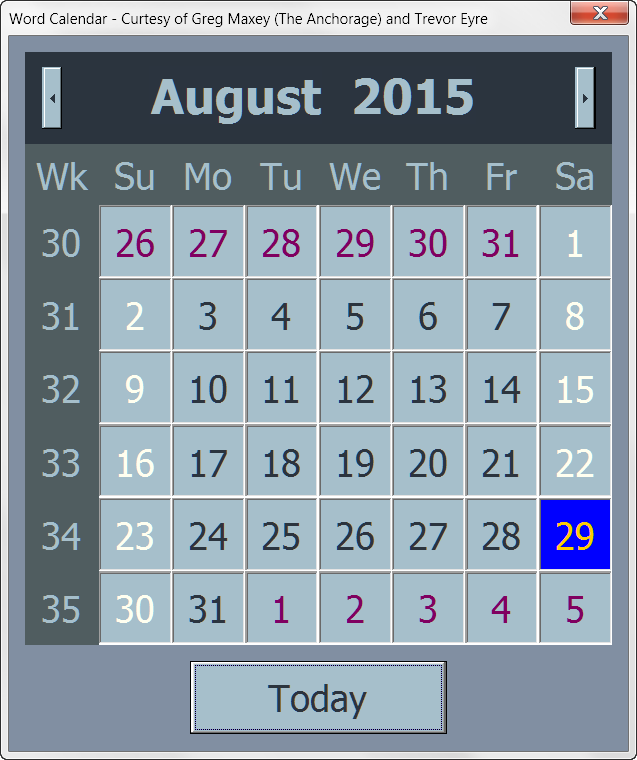
You should also notice the addition of week labels, a week label/date label separation line, and two command buttons. Perhaps less obvious is the calendar week weekday start day (Monday vice Sunday), and the argument changing how week numbers are calculated.
Here is a representation of the call used to render this calendar. Again, I am simply passing additional named arguments to create the calendar function and look I am after.

![]() Note: The order of which named arguments are passed is not important. In this demonstration I started with the DateFontSize and then reversed the order of PostionTop and PositionLeft.
Note: The order of which named arguments are passed is not important. In this demonstration I started with the DateFontSize and then reversed the order of PostionTop and PositionLeft.
The Today and OK buttons increase ease of use and user control over the calendar. The buttons can be displayed as a pair (shown here) or independently. Precisely how they function is determined by how they are displayed and the value of a third parameter discussed later.
Displayed as a pair:
Displayed by itself, clicking the Today button functions in the exact manner as clicking the current date label on the calendar. It picks the current (today's) date and the GetDate function automatically returns the picked date and closes the form.
Displayed by itself, the OK button performs the same as when display as a pair with the Today button.
Enter the Date C text field or click the adjacent command button to display the following calendar.
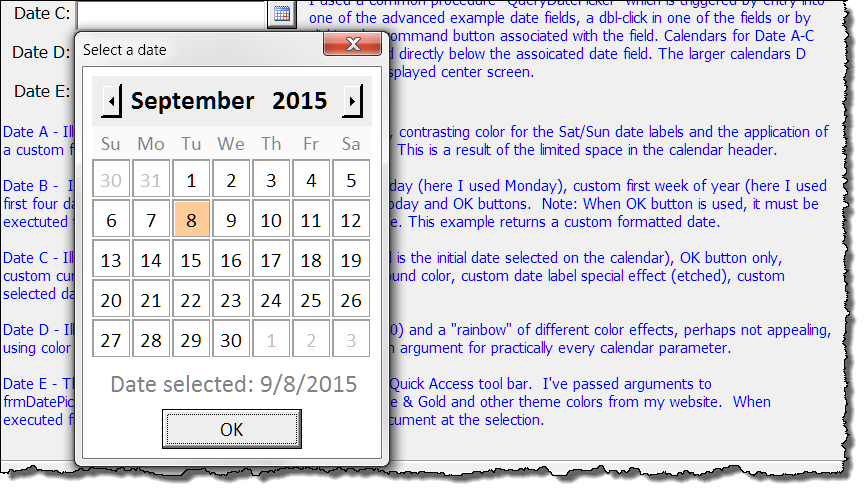
In this demonstration you see a calendar larger than the default size, showing the OK only button, date label special background effects (those are not borders), and initialized with a specific date picked. Here is the code used to render this calendar.
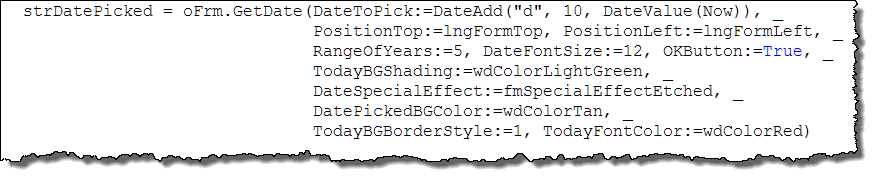
The DateToPick argument, when passed, determines which specific date label has "focus" in the calendar when the calendar is rendered and displayed. In this physical example that date is September 8, 2015. It is that date because I wrote this tips page and created that image on 29 August, 2015. Notice that DateToPick in the example is a calculated date. I used the VBA DateAdd function to define a date 10 days advanced from the current date.
I could have just as easily passed a fixed value (e.g., "12/31/2015").
DateToPick performs two roles depending on the visibility of the OK button. If the OK button is displayed, the DateToPick argument renders the calendar to and "physically" picks the date passed and enables the OK button. If the OK button is not displayed, the DateToPick argument renders the calendar to and "highlights" date passed. To do otherwise of course would logically result it the GetDate function automatically returning the picked date and closing the form.
![]() Notes:
Notes:
1. Only values that resolve to a specific date should be assigned assigned and passed with the DateToPick argument. Calculated dates as demonstrated and fixed text dates, like discussed above, are fine. However, everyday phrases such as tomorrow, today, yesterday, your birthday or "a pickle sandwich" are not. If you pass value that VBA can't resolve as a date the GetDate function will interpret that value as the current date.
2. The DateSpecialEffect and DateBorder arguments should not be used together. Doing so will result in abnormalities in the rendered calendar.
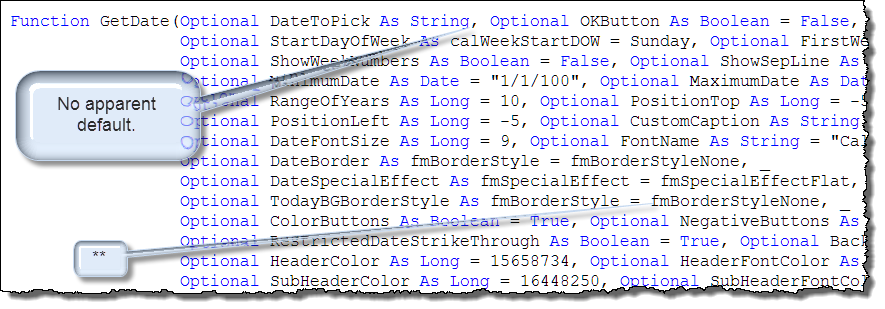
![]() Bonus Tip: Notice that is the calling procedure that the TodayBGBorderSytle argument is set = 1. However, notice that in the GetFunction procedure (See balloon with ** in image below) in the TodayBGBorderSytle parameter takes a fmBorderStyle data type with the default value fmBorderStyle. This works because fmBorderStyle is simply an enumeration. There are only two enumeration in this case
0 = fmBorderStyleNone and 1 = fmBorderStyleSingle. In a similar manner the call illustrates using enumerations (constants) for assigning the long color values in several arguments.
Bonus Tip: Notice that is the calling procedure that the TodayBGBorderSytle argument is set = 1. However, notice that in the GetFunction procedure (See balloon with ** in image below) in the TodayBGBorderSytle parameter takes a fmBorderStyle data type with the default value fmBorderStyle. This works because fmBorderStyle is simply an enumeration. There are only two enumeration in this case
0 = fmBorderStyleNone and 1 = fmBorderStyleSingle. In a similar manner the call illustrates using enumerations (constants) for assigning the long color values in several arguments.
If technical stuff bores you then you can skip this sidebar material. However, If you have already looked at the code module associated with frmDatePicker and the GetDate function you may have noticed, and you may be wondering why, the DateToPick parameter is the only parameter without a default value assigned and why its data type (a string) doesn't seem to match its intended function (to define a date).
The explanation for this, as best as I can provide, is pretty heady.
Firstly, while there doesn't appear to be a default value assigned, there is an inherent one assigned. A string variable which is not initialized is a null string. So by extension, a null string is what we are using as the default value. The logic being, to pass an actual date it has to resolve to a date value, so if you pass a null string you aren't passing a date and we evaluate this specific case as "No Date."
When "No Date" is passed the calendar renders to the month and year of the current date and the current date (day) label and background is rendered using either their parameter default values or values defined in passed arguments.
Secondly, with respect to a date data type, I changed Trevor's date variable to a string variable because I wanted to expand Trevor's original default minimum date parameter. With a date variable type, there no such thing as "No date."
For reasons incomprehensible to me, the developers at Microsoft decided to (or continued to) reference all dates (past, present and future) from "12/30/1899 00:00:00 AM." This means that dates after this reference can be represented with an ever increasing positive number and dates before this reference (back to 1\1\100) can be represented with an ever decreasing negative number.
![]() Note: VBA interprets 1\1\99 equivalent to 1\1\1999 so 1\1\100 has been set as the MinimumDate parameter.
Note: VBA interprets 1\1\99 equivalent to 1\1\1999 so 1\1\100 has been set as the MinimumDate parameter.
Accordingly a simple date declaration by itself defines a date. That date is 12/30/1899. The following VBA procedure is intended to illustrate:
Sub RiddleMeThis()
'A basic Word macro coded by Greg Maxey to
Dim oDate As Date
  MsgBox Month(oDate) & "/" & Day(oDate) & "/" & Year(oDate) '12/30/1899
  MsgBox CDbl(CDate("1/1/100 00:00:00 AM")) 'A large - value and earliest date
                                            'accurately returned.
  MsgBox CDbl(CDate("12/29/1899 4:00:00 PM")) 'A small - value close to the reference
  MsgBox CDbl(CDate("12/30/1899 12:00:00 AM")) '0 reference point for all past
                                               'and future dates
  MsgBox CDbl(CDate("12/31/1899 04:00:00 AM")) 'A small + value close to the reference
  MsgBox CDbl(Date) 'A large positive value today's date
  MsgBox CDbl(CDate("12/31/2999")) 'A larger positive value\future date
  MsgBox CDate("12/29/1899 4:00:00 PM") 'Returns a valid date value
  MsgBox CDate("12/31/1899 04:00:00 AM") 'Returns a valid date value
  MsgBox oDate 'Returns a dog's breakfast
  MsgBox CDate("12/30/1899 12:00:00 AM") 'Returns a dog's breakfast
lbl_Exit:
  Exit Sub
End Sub
Suffice to say that this issue complicated extending the calendar's lower range beyond 1899 (something a history major might appreciate). To simplify the code, for me at least, I changed and proposed to Trevor to use a string variable vice date variable for the DateToPick parameter.
![]() Notes:
Notes:
1. Any value passed as the DateToPick argument that does not resolve to a date and is NOT the default null string is interpreted as the current date.
2. So, if you want to the current date to actually be picked (i.e., rather than just identified) when the calendar is initialized you could just pass "Today," but that is cheating! The correct way is to pass the VBA method Date as the DateToPick argument.
3. The picked date attributes (i.e., caption font color, background color) takes precedents of Today's date attributes.
Here, I've pulled all the stops to render a delightful and appealing calendar for all ages. You should realize at this point that the range of customizations is fairly broad.
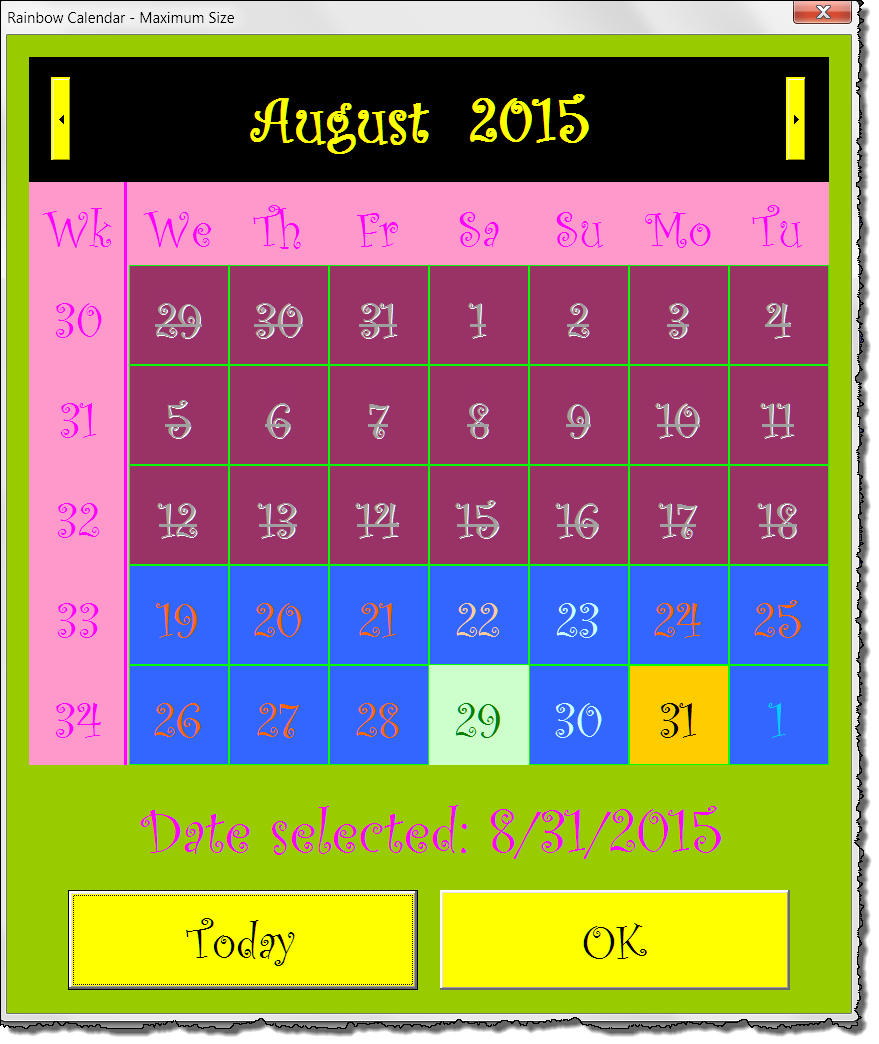
Whimsical? Yes. Ugly? Definitely. I wanted to use this demo to illustrate the calendar maximum size DateFontSize:=30 and the introduce the arguments ColorButtons and NegativeButtons.
As the calendar became larger, Trevor and I both realized that the unaltered form buttons, especially the scroll buttons in the calendar headers started looking odd. Trevor simply limited their growth at a certain fixed height. I decided to take it a step further. The following two images show the other possible rendering of the scroll buttons for this calendar. Hopefully you will agree that I choose the more appealing of the three for this calendar.
The ColorButtons argument applies the calendar header backcolor to the button back color and the calendar header forecolor to the button forecolor. The default parameter ColorButtons is true because that value compliments the other parameter default values.
Conversely, when ColorButtons is set = True, NegativeButtons reverses the color scheme.


I'm sure that if you are this far you have already read the frmDemo labels and probably already clicked all the buttons. So lets close the frmDemo (if I'm wrong, the go ahead and look at Demo D).
Maybe you have forgotten about the QAT icon. If so, click it now to display the final project calendar. Unlike the three basic demonstrations and the Date A - D demonstrations where the GetDate function returned a value applied in a userform, this calendar returns GetDate value directly in the document at a collapsed insertion point.
If you need to insert a date in you document simply click the icon and click a date. If you want to insert today's date simply click the Today button!
![]() Bonus Tips:
Bonus Tips:
1. The easiest way to make the Word Calendar shown above available in all of your documents is to simply move the demonstration template file to your Word Startup folder.
2. For more on template add-ins and how to load them, see: Organizing Your Macros/Template Add-ins at: Installing Macros
2. Rendering this calendar, like the Date D demonstration, required the use of most of the color arguments. Unlike the Date D demonstration, here I used actual long values to define the various colors rather than the color constants (e.g., wdColorRed, wdColorWhite, etc.). Determining the long values for a particular color may appear daunting. It is really quite simple though. Using one of the color dialogs (e.g., Font Color>More Colors>Custom) use cand determine the RGB values of any color in the rainbow. Using the QueryColor procedure in the demo template modDemo procedure and passing the Red, Green, Blue value as argument to the fcnExtractLongFromRBG function in the modDemo module you can determine the long value practically any number.
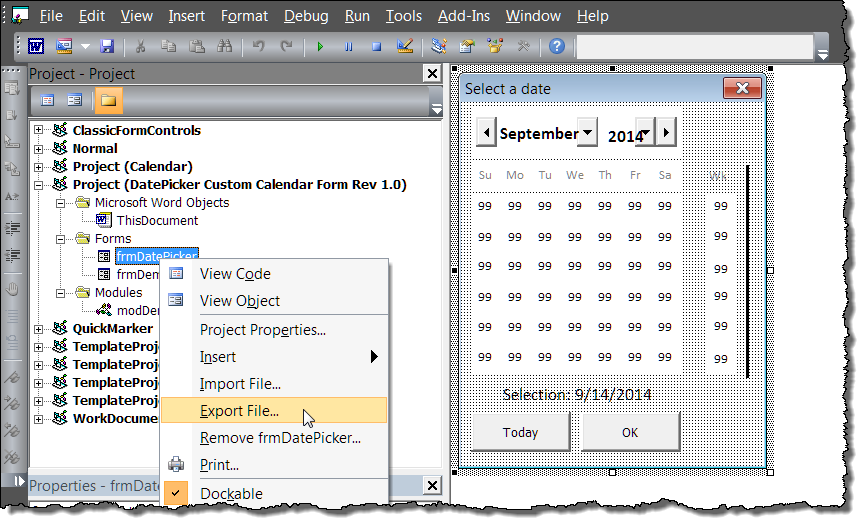
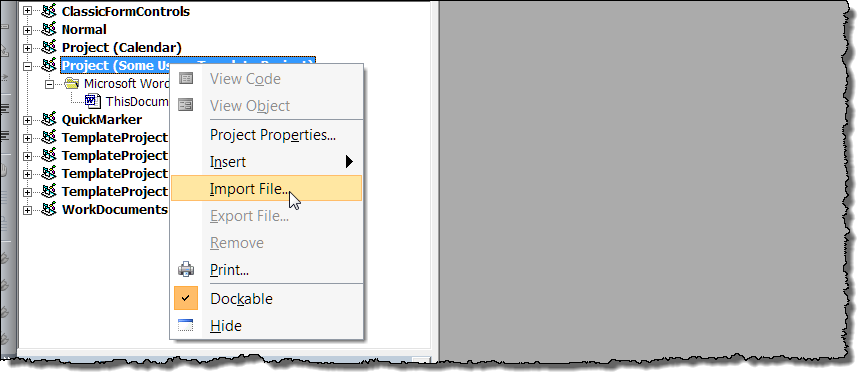
To export and import the frmDatePicker userform class into your own project, perform the folloiwng:
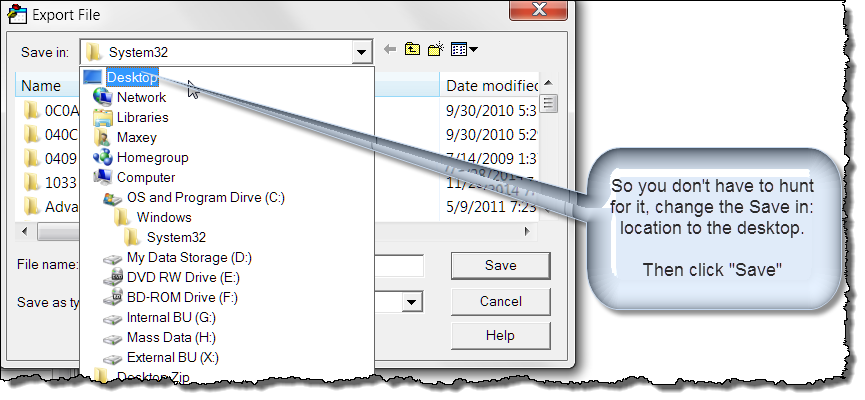
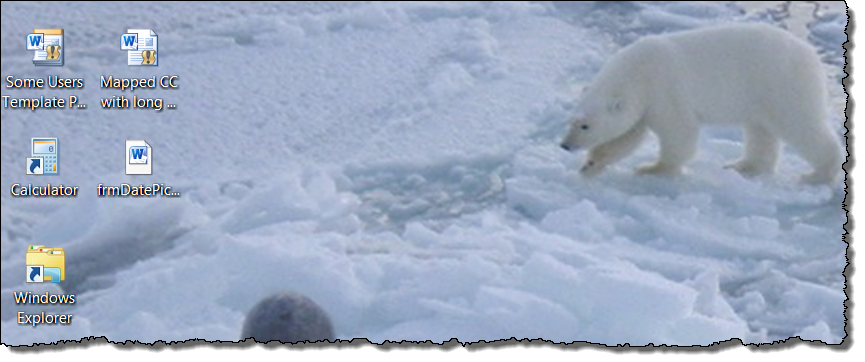
The frmDatePicker.frm file will now appear on your desktop.
The import process is performed in a similar manner.
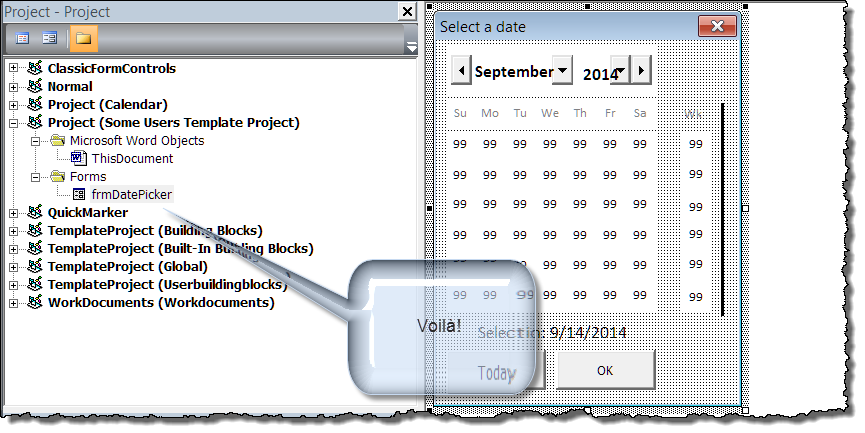
You are now ready to employ frmDatePicker using some of the methods illustrated here.
The demonstration template is packaged in a zip file you can download here: Demo Template. After downloading the zip file, extract and save the DatePicker Custom Calendar Form template file to a convenient location.
That's it! I hope you have found this tips page useful and informative.
The information, illustrations and code contained in my "Microsoft Word Tips" are provided free and without risk or obligation.
However, the work is mine. If you use it for commercial purposes or benefit from my efforts through income earned or time saved then a donation, however small, will help to ensure the continued availability of this resource.
If you would like to donate, please use the appropriate donate button to access PayPal. Thank you!
This page was last updated on
March 09, 2021
Website
Privacy Statement
Back to top ![]() Back to
Word Tips
Back to
Word Tips