
The Anchorage
Personal website of Gregory K. Maxey, Commander USN (Retired)
The Anchorage
Personal website of Gregory K. Maxey, Commander USN (Retired)
The information, illustrations and code contained in my "Microsoft Word Tips" are provided free and without risk or obligation.

However, the work is mine. If you use it for commercial purposes or benefit from my efforts through income earned or time saved then a donation, however small, will help to ensure the continued availability of this resource.
If you would like to donate, please use the appropriate donate button to access PayPal. Thank you!
The purpose of this Microsoft Word Tips & Microsoft Word Help page is to introduce and review some of the versatile capability available in Word to insert specialized data in your documents by using fields. I'll cover the basic methods for inserting fields into your document and some advanced VBA methods for updating and working with field code.
![]() Note: This tips page, illustrations and examples were developed using Word 2003. Most of the material remains relevant in Word 2007/2010.
Note: This tips page, illustrations and examples were developed using Word 2003. Most of the material remains relevant in Word 2007/2010.
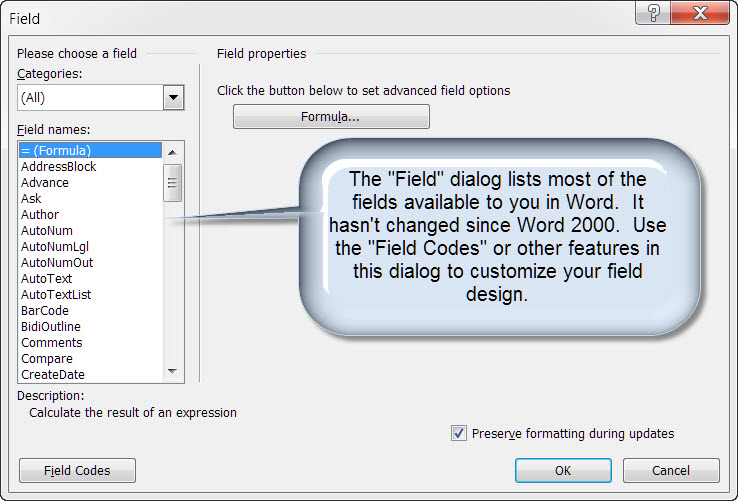
Click the menu "Insert>Field..." command (Word 2007/2010 use Insert>QuickParts>Field...) to open the "Field" dialog and listing of most of the fields available in Word.
There are three simple user interface methods for inserting fields in your document.
To illustrate each of these methods we will use a pair of Word fields in a document footer to display the current page number and total number of document pages. The illustration below contains plain text and two fields (a "Page" field and a "NumPages" field).

![]() Note: The fields used in this tips page are identified in a document with light grey shading as shown. Using the Word options dialog of your applicable installation you can choose to always show fields, show fields when selected, or never show fields.
Note: The fields used in this tips page are identified in a document with light grey shading as shown. Using the Word options dialog of your applicable installation you can choose to always show fields, show fields when selected, or never show fields.
Fields can be presented in two states. The result as shown in the illustration above or the field code as shown in the illustration below.

![]() Bonus tip: Use Alt+F9 anytime you want to toggle document fields between states or select an individual field, right click and select "Toggle Field Codes" to toggle as single field state.
Bonus tip: Use Alt+F9 anytime you want to toggle document fields between states or select an individual field, right click and select "Toggle Field Codes" to toggle as single field state.
Using the field dialog you can create this construction with four easy steps:
Word includes several pre-defined (AutoText/Building Blocks) entries that use fields. The Page X of Y construction can be quickly inserted using the entry provided for this purpose.
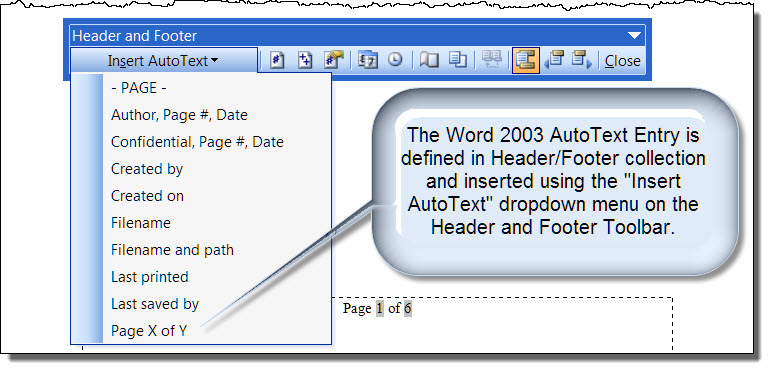
![]() For some inexplicable reason, the Word developers removed this construction from the vastly superior collection of building blocks introduced with Word 2007. It is a simple matter to create your own building block. For more on Building Blocks see my:
For some inexplicable reason, the Word developers removed this construction from the vastly superior collection of building blocks introduced with Word 2007. It is a simple matter to create your own building block. For more on Building Blocks see my:
Building Blocks & AutoText
For most field entries I prefer the direct entry method using the function keys and keyboard. While this method may not be the most efficient in this case, knowing how to do it will allow you to enter many complex or nested fields that can not be entered using the methods previously described. The next steps will show you how.
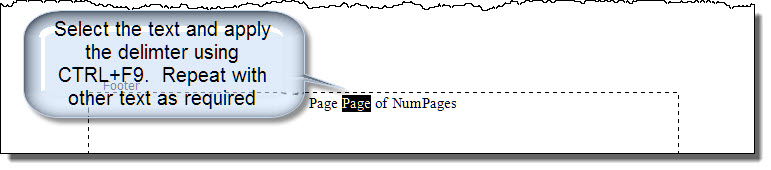
![]() Bonus Tip: An alternate, if not easier now that you've seen the construction, method is to simply type out all the text, then select the field code text and apply the delimiters.
Bonus Tip: An alternate, if not easier now that you've seen the construction, method is to simply type out all the text, then select the field code text and apply the delimiters.
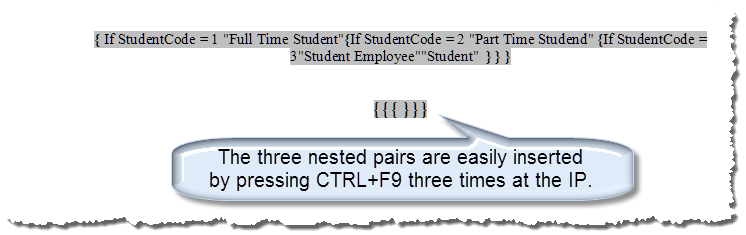
The direct entry method is especially useful for constructing complex or nested fields. Consider the following nested IF field used to evaluate and display information about a student. Here the IF fields are nested like Chinese eggs. While this construction can be performed with the menu interface, with practice it is much easier to simply press CTRL+F9 three times to create the nested fields and then fill in the data with the keyboard.
Remember that Word is a word processor and not a spreadsheet. Unlike Excel and other spreadsheet applications, most fields used in Word will not be updated automatically simply by changing a variable. In fact, some fields don't update at all without specific user action.
![]() For more on field update behavior see: Microsoft Knowledge Base Article 21169:
For more on field update behavior see: Microsoft Knowledge Base Article 21169:
Let's look at a simple formula field for summing the results of a pair of cells in a table. In the illustration below, column 1 illustrates the formula field construction for calculating the sum of the variable in cells A2 and A3. Column 2 shows the results of a similar formula field calculating B2 and B3. Column 3 is shows the result of a similar formulas for calculating C2 and C3. The value is C3 was changed subsequent to updating the fields.

In simple Word documents a user action is required after a variable is changed in order of fields to be updated and display accurate results. Methods that users may employ to update fields include:
![]() Note: Your printer option may need to be set to ensure that fields are updated when print/print preview is executed.
Note: Your printer option may need to be set to ensure that fields are updated when print/print preview is executed.
Public Sub UpdateAllFields()
Dim rngStory As Word.Range
Dim lngValidate As Long
Dim oShp As Shape
  lngValidate = ActiveDocument.Sections(1).Headers(1).Range.StoryType
  For Each rngStory In ActiveDocument.StoryRanges
    'Iterate through all linked stories
    Do
      On Error Resume Next
      rngStory.Fields.Update
      Select Case rngStory.StoryType
        Case 6, 7, 8, 9, 10, 11
          If rngStory.ShapeRange.Count > 0 Then
            For Each oShp In rngStory.ShapeRange
              If oShp.TextFrame.HasText Then
                oShp.TextFrame.TextRange.Fields.Update
              End If
            Next
          End If
        Case Else 'Do Nothing
      End Select
      On Error GoTo 0
      'Get next linked story (if any)
      Set rngStory = rngStory.NextStoryRange
    Loop Until rngStory Is Nothing
  Next
End Sub
![]() See: Installing Macros for instructions on how to set up and use the macros provided in this Microsoft Word Help & Tips page.
See: Installing Macros for instructions on how to set up and use the macros provided in this Microsoft Word Help & Tips page.
![]() Bonus Tip: For a more extensive treatment of macros dealing with the field collection, see my: Field Macros Microsoft Word Help & Tips page.
Bonus Tip: For a more extensive treatment of macros dealing with the field collection, see my: Field Macros Microsoft Word Help & Tips page.
Sometimes users wish to enter data based on a field value and then break the link with that value. A good example and common source of frustration is the { DATE } field that is inserted by default whenever the menu option Insert>Date and Time is used. Go ahead and try it. Click Insert>Date and Time and select a format (Note: for my example I am using the format "MMMM, d, yyyy"). Now toggle the field code (ALT+F9). The result shown below is a field code based on the system date.

The { Date } fields is one of several Word fields that will update automatically when the document is opened. If you save and close your practice document and open it next week or next year or next century, the displayed date will automatically update to the system date on that date!! A nightmare and great source of frustration as most users that want a dated document want that date to remain fixed.
When you generate data based on a field code like the { Date } field, you can break the link with the field value and convert the result to plain text by selecting the field and pressing the keyboard command CTRL+SHIFT+F9.
![]() Bonus Tip: An alternative method for inserting the current date (and making it stick) is to uncheck "Update automatically" in the Insert Date and Time dialog box. This results in a plain text date stamp being inserted instead of a { Date } field or you can insert a { CreateDate } field.
Bonus Tip: An alternative method for inserting the current date (and making it stick) is to uncheck "Update automatically" in the Insert Date and Time dialog box. This results in a plain text date stamp being inserted instead of a { Date } field or you can insert a { CreateDate } field.
There are countless examples and applications for using Word field code. For more on special formatting in Word fields see Word MVP Graham Mayor's Special Formats for Word Fields.
That's it! I hope you have found this tips page useful and informative.
The information, illustrations and code contained in my "Microsoft Word Tips" are provided free and without risk or obligation.
However, the work is mine. If you use it for commercial purposes or benefit from my efforts through income earned or time saved then a donation, however small, will help to ensure the continued availability of this resource.
If you would like to donate, please use the appropriate donate button to access PayPal. Thank you!
This page was last updated on
March 19, 2023
Website
Privacy Statement
Back to top ![]() Back to
Word Tips
Back to
Word Tips