
The Anchorage
Personal website of Gregory K. Maxey, Commander USN (Retired)

The Anchorage
Personal website of Gregory K. Maxey, Commander USN (Retired)
The information, illustrations and code contained in my "Microsoft Word Tips" are provided free and without risk or obligation.


However, the work is mine. If you use it for commercial purposes or benefit from my efforts through income earned or time saved then a donation, however small, will help to ensure the continued availability of this resource.
If you would like to donate, please use the appropriate donate button to access PayPal. Thank you!
The purpose of this Microsoft Word Tips & Microsoft Word Help page is to show you a basic method to install and employ the many various VBA procedures (macros) that you will find in my collection of tips or in other Microsoft Word Help forums.
The VBA procedure (procedure, routine or macro) shown below performs the common and often requested task of updating document fields. It can be used in all versions of Word (Word 97 through 2013). We will use it as a representative example macro in the discussion that follows.
Public Sub UpdateAllFields()
Dim rngStory As Word.Range
Dim lngValidate As Long
Dim oShp As Shape
Dim oToc As TableOfContents, oTOA As TableOfAuthorities, oTOF As TableOfFigures
lngValidate = ActiveDocument.Sections(1).Headers(1).Range.StoryType
  For Each rngStory In ActiveDocument.StoryRanges
    'Iterate through all linked stories
    Do
      On Error Resume Next
      rngStory.Fields.Update
      Select Case rngStory.StoryType
        Case 6, 7, 8, 9, 10, 11
          If rngStory.ShapeRange.Count < 0 Then
            For Each oShp In rngStory.ShapeRange
              If oShp.TextFrame.HasText Then
                 oShp.TextFrame.TextRange.Fields.Update
              End If
            Next
          End If
        Case Else
          'Do Nothing
      End Select
      On Error GoTo 0
      'Get next linked story (if any)
      Set rngStory = rngStory.NextStoryRange
    Loop Until rngStory Is Nothing
    'Special Cases
    For Each oToc In ActiveDocument.TablesOfContents
      oToc.Update
    Next oToc
    For Each oTOA In ActiveDocument.TablesOfAuthorities
      oTOA.Update
    Next
    For Each oTOF In ActiveDocument.TablesOfFigures
      oTOF.Update
    Next
  Next
lbl_Exit:
  Exit Sub
End Sub
To use this or any VBA procedure (i.e., macro) it must be installed in a VBA project that is available to the document. To install and employ this macro perform the following steps:
![]() Note: If the code you have copied from a support forum or other source is just a snippet (i.e., not a complete named procedure) then simply type in any meaningful name for the macro you create.
Note: If the code you have copied from a support forum or other source is just a snippet (i.e., not a complete named procedure) then simply type in any meaningful name for the macro you create.
![]() Note: Macros you intend to use for a specific document type (e.g., invoice, letterhead, etc.) should be stored it your template that you create those documents from. General macros that you want to be available to all documents should be stored in a global template. Here, and for the purpose of this example only, I have suggested the Normal template. See the section Organizing Your Macros/Template Add-Ins below for more information.
Note: Macros you intend to use for a specific document type (e.g., invoice, letterhead, etc.) should be stored it your template that you create those documents from. General macros that you want to be available to all documents should be stored in a global template. Here, and for the purpose of this example only, I have suggested the Normal template. See the section Organizing Your Macros/Template Add-Ins below for more information.
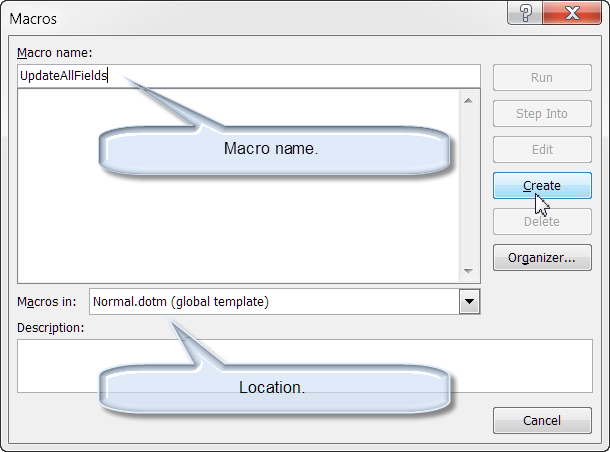
![]() Note: In this example I am using Word 2007. The dialog is similar in all Word versions.
Note: In this example I am using Word 2007. The dialog is similar in all Word versions.
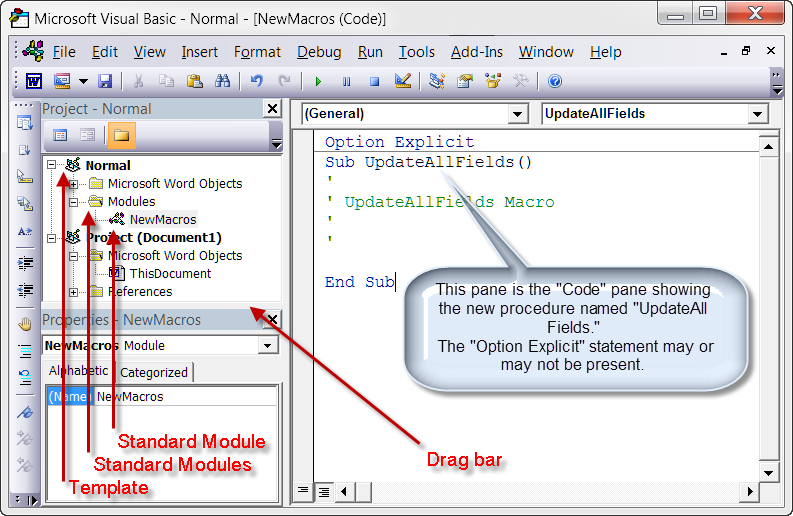
![]() Notes:
Notes:
1. If not displayed, press CTRL+r (or use the VBE "View" menu and select "Project Explorer") to display the top left "Project" pane.
2. If not displayed, press F4 to do display the bottom left "Properties" pane.
3. Use the drag bar between the panes to adjust as appropriate.
4. The large white panel on the right is the "Code" pane.
5. The macro is created in a new standard module "New Macros." The module is stored in the modules folder as part of the Normal template. As you realize the benefits of macros and install more or begin creating your own you will want to organize your macros for more efficient management. See the section Organizing Your Macros/Template Add-Ins below for more information.
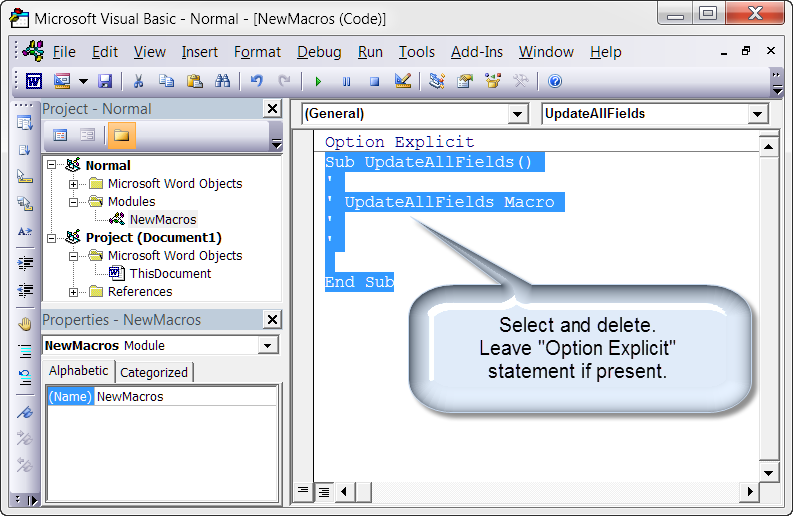
![]() Note: If the code you have copied from a support forum or other source is just a snippet (i.e., not a complete procedure) then paste your snippet in between the procedure type/name declaration statement and the End Sub statement.
Note: If the code you have copied from a support forum or other source is just a snippet (i.e., not a complete procedure) then paste your snippet in between the procedure type/name declaration statement and the End Sub statement.
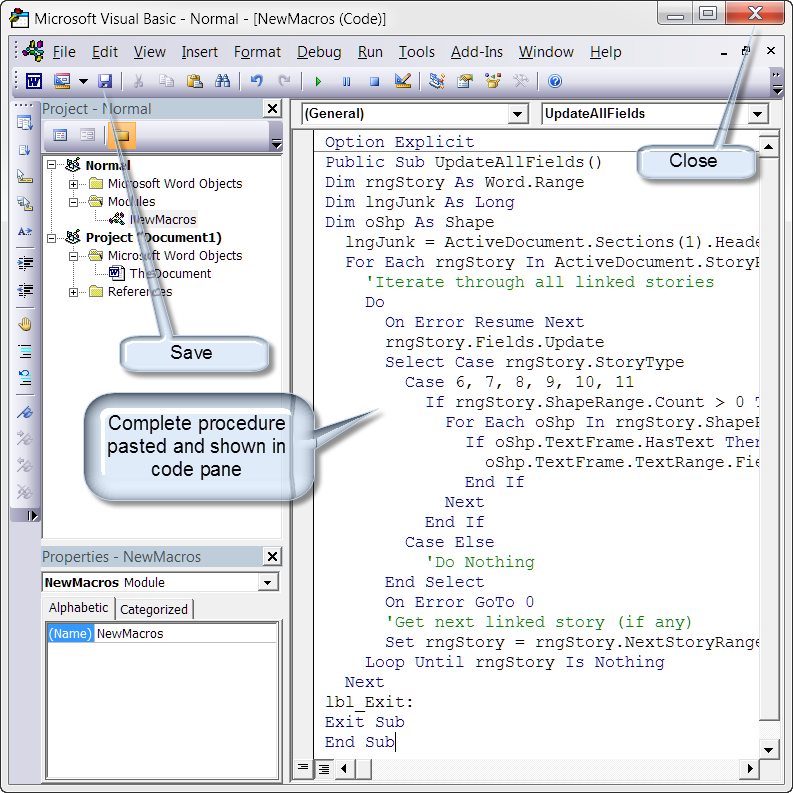
![]() Note: The purpose of the "Option Explicit" statement is beyond the scope of this tips page. If it is there leave it, if it is not don't worry about it. If you are like me and just have to know what it is all about then see: Declaring Variables/Constants
Note: The purpose of the "Option Explicit" statement is beyond the scope of this tips page. If it is there leave it, if it is not don't worry about it. If you are like me and just have to know what it is all about then see: Declaring Variables/Constants
It didn't work! I followed all of your steps but when I pasted the macro code in the code window the result looks something like this:

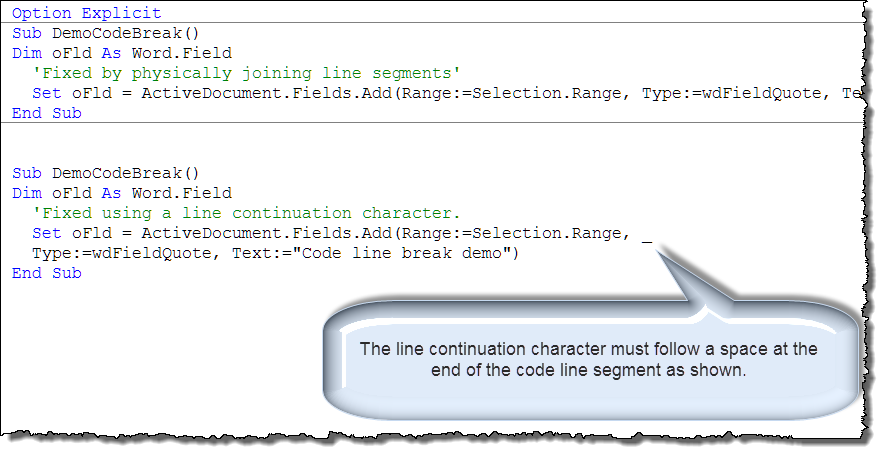
After pasting code, any lines that appear in red are usually an indication that one or more lines of code has broken prematurely. This can result from line wrapping in the e-mail editor or other source editor.
This issue can be fixed by joining the broken line in one of two methods:
Both methods are illustrated below. The line continuation character is often used to minimize run on code lines and make code easier to read:
There is almost always more than one way to skin a cat. The basic method should be fool proof, but as you gain familiarity with the VBE you will discover other methods. For example, I typically bypass the "Macros" dialog (ALT+F8) altogether and go straight to the VBE using the shortcut ALT+F11. From there:
Now that your macro is installed to a global template it is ready for immediate use whenever you want to initiate it. Macros can be initiated in several ways. The most basic method is to use the same "Macros" dialog used to create the macro.
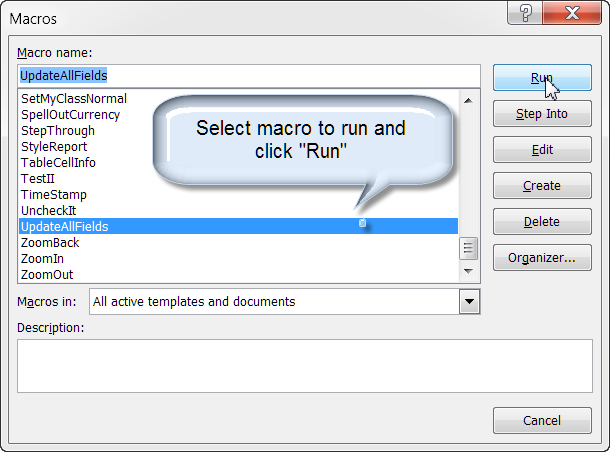
![]() Note: The illustration above shows the new macro with several of the macros that I've restored to my Normal template.
Note: The illustration above shows the new macro with several of the macros that I've restored to my Normal template.
With each version of Word there has been changes to the user interface (UI) and the location of the controls for working with macros. However, the ALT+F8 shortcut key specifically and the "Macros" dialog has remained consistent. It you think of the VBE as the "world" of VBA and macros (and it is), then you can think of the "Macros" dialog as the window to that world.
![]() Notes:
Notes:
1. See my: Add Macro to QAT if you would like to add a macro to the Word 2007/2010 Quick Access Toolbar.
2. If you would like to see a more on using the UI controls associated with macros or how to run a macro using a keyboard shortcut, see MVP Graham Macro's: Installing Macros from Listings.
3.
If you are still using Word 2003 and need assistance\instructions on how to run a macro from a menu or
toolbar icon contact me via website feedback.
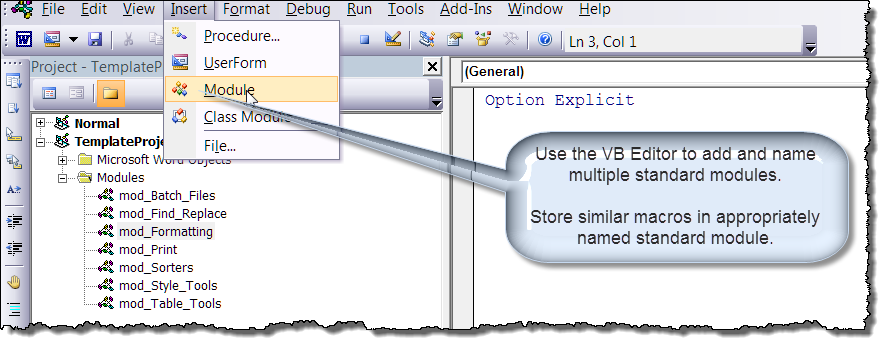
If you are like most people, after you find/create and start using your first macro you may soon find yourself with dozens, if not hundreds or more. Save yourself some frustration and plan to organize your macros early so you can quickly find and use them when needed. Some basic suggestion for organization include:
The Normal template (.dot or .dotm) is a global template and it is always loaded. However, as the Normal template is susceptible to corruption, it is not the best place to store and keep macros. If you do, be sure (as with all important templates and documents) to keep a current backup.
Creating one or more personal global templates to store and organize your macros is very simply. Just open a new Word document and save it as .dot (Word 2003) or macro-enabled .dotm (Word 2007 and higher). I recommend saving one in Word's startup folder to load automatically when Word starts for general macros that you use frequently (e.g., MyFrequentMacros.dotm) and another to your templates folder that you can loaded manually when you need it for the macros that you only occasionally or seldom use (e.g MyDustyMacros.dotm).
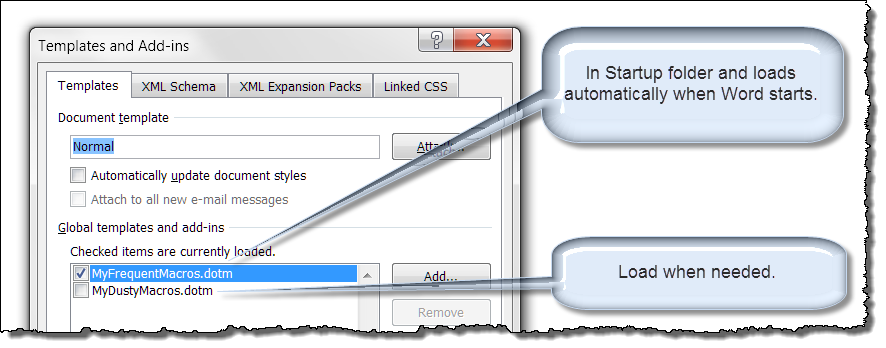
To load a global template add-in when Word starts, place the template in Word's Startup folder. Word's Startup folder can be determined using:
![]() Note: If you have not changed the preferred startup folder since installing Word, it can also be located (in English language versions of Windows) by typing
%appdata%\Microsoft\Word\Startup
In the Windows Explorer Address bar and pressing "Enter."
Note: If you have not changed the preferred startup folder since installing Word, it can also be located (in English language versions of Windows) by typing
%appdata%\Microsoft\Word\Startup
In the Windows Explorer Address bar and pressing "Enter."
To manually load a global template add-in, open the Templates and Add-ins dialog:
When the dialog opens, click the "Templates" tab. The Templates and Add-ins dialog is similar in all Word versions and is shown below.
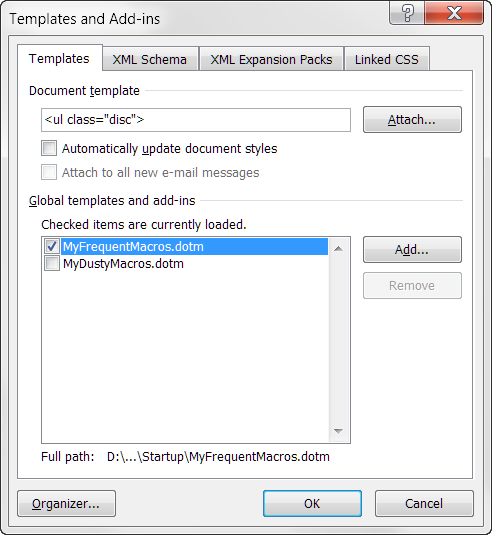
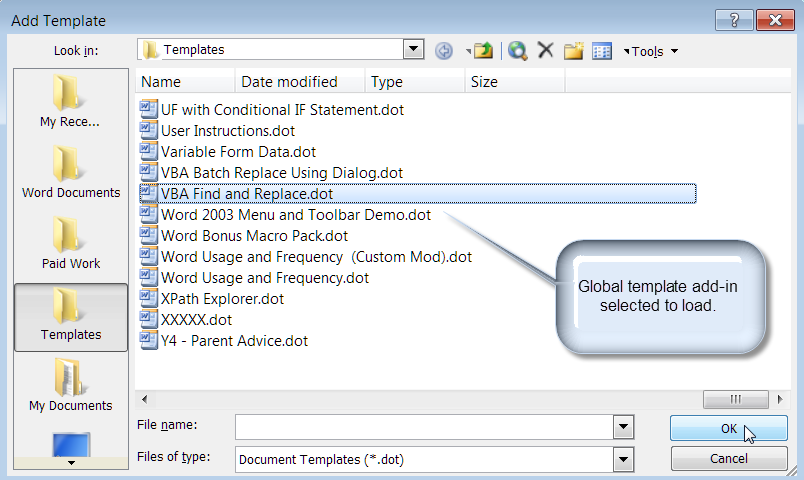
Click the "Add" button, and using the "Add Template" dialog displayed, navigate to the template location and click "OK"
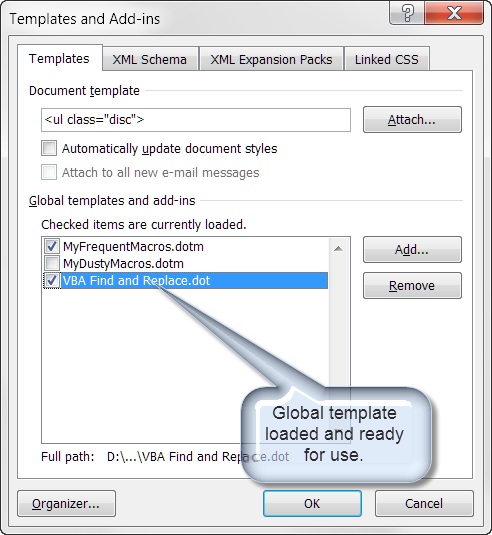
That's it! I hope you have found this tips page useful and informative.
The information, illustrations and code contained in my "Microsoft Word Tips" are provided free and without risk or obligation.


However, the work is mine. If you use it for commercial purposes or benefit from my efforts through income earned or time saved then a donation, however small, will help to ensure the continued availability of this resource.
If you would like to donate, please use the appropriate donate button to access PayPal. Thank you!