
The Anchorage
Personal website of Gregory K. Maxey, Commander USN (Retired)

The Anchorage
Personal website of Gregory K. Maxey, Commander USN (Retired)
The information, illustrations and code contained in my "Microsoft Word Tips" are provided free and without risk or obligation.


However, the work is mine. If you use it for commercial purposes or benefit from my efforts through income earned or time saved then a donation, however small, will help to ensure the continued availability of this resource.
If you would like to donate, please use the appropriate donate button to access PayPal. Thank you!
This Microsoft Word Tips & Microsoft Word Help page demonstrates several methods that you can use to populate a userform listbox (or combobox). Microsoft Word MVP Doug Robbins has kindly assisted with the preparation of this page. Thanks Doug!
![]() Notes:
Notes:
1. See my Create & Employ a Userform tips page for information on creating and employing userforms.
2. The basic process for populating a listbox or combobox is the same. For brevity, I will use one term or the other in the examples that follow.
3. You can download the demonstration document containing all of the example userforms and VBA procedures used to prepare this tips page with the link at the end of the page.
A listbox provides users with a convenient means of selecting one or more items from a fixed pre-defined list.
A combobox provides users with a compact and convenient means of selecting a single item from a pre-defined list. A combobox can be configured to accept pre-defined list entries only or allow the user to enter his or her own text.
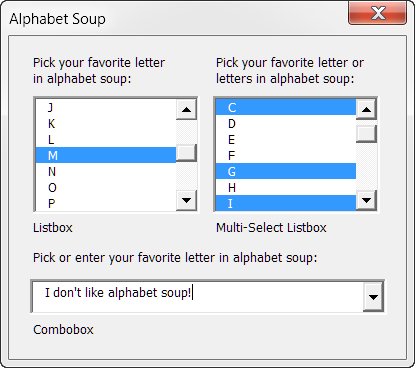
Rows (and columns in multi-column) listboxes are indexed starting with 0. For example the .ListIndex property returned if the first item in a listbox is select is 0. This can be confusing as the numbering used in with some of the other properties (e.g., .ColumnCount, .TextColumn, etc.) begin with 1.
In its simplest form, a listbox could be used for responding to simple yes or no questions.
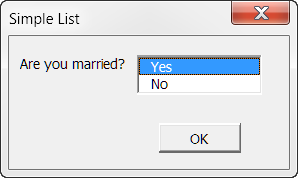
The code for populating a listbox is normally placed in the userform "Initialize" procedure. The "AddItem" method is well suited for a short simple list.
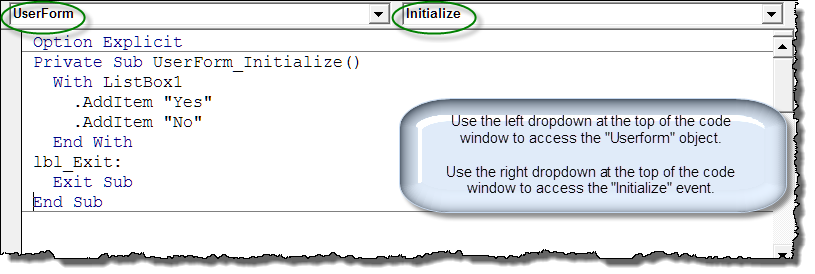
The "AddItem" method becomes cumbersome as the number of list members gets larger. For example, the list of U.S. state and District of Columbia abbreviations would require 51 separate lines of code to populate. Fortunately you can use the more versatile "List" method and an array of data to simplify the job.
Private Sub UserForm_Initialize()
Dim myArray() As String
  'Use Split function to return a zero based one dimensional array.
  myArray = Split("AL|AK|AZ|AR|CA|CO|CT|DE|DC|FL|" _
             & "GA|HI|ID|IL|IN|IA|KS|KY|LA|ME|MD|" _
             & "MA|MI|MN|MS|MO|MT|NE|NV|NH|NJ|NM|" _
             & "NY|NC|ND|OH|OK|OR|PA|RI|SC|SD|TN|" _
             & "TX|UT|VT|VA|WA|WV|WI|WY", "|")
  'Use .List method to populate listbox.
  ListBox1.List = myArray
lbl_Exit:
  Exit Sub
End Sub
A listbox can list and display multiple columns of data.
In the example below the listbox displaying the state full name has second hidden column containing the state abbreviation. The user will select his or her state name from the list but the result in the document will be the state abbreviation.


The code for populating the listbox shown above and for displaying the result in the document is provided and explained below:
Option Explicit
Private Sub UserForm_Initialize()
Dim arrStateName() As String
Dim arrStateAbbv() As String
Dim i As Long
  'Use the Split function to create two zero based one dimensional arrays.
  arrStateName = Split("Select State|Alabama|Alaska|Arizona|" _
             & "Arkansas|California|Connecticut|Etc.", "|")
  arrStateAbbv = Split(" |AL|AK|AZ|AR|CA|CT|Etc", "|")
  'Use the .ColumnWidth property to set column widths.  0 results in a hidden column.
  ListBox1.ColumnWidths = "60;0"
  For i = 0 To UBound(arrStateName)
    'Use the .AddItem method to add a multi-column row for each array element.
    ListBox1.AddItem
    'Use .List method to write array data to specific listbox row and column.
    ListBox1.List(i, 0) = arrStateName(i)
    ListBox1.List(i, 1) = arrStateAbbv(i)
  Next i
lbl_Exit:
  Exit Sub
End Sub

Private Sub CommandButton1_Click()
Dim oRng As Word.Range
Dim oBM As Bookmarks
  'Write userform data to bookmarked ranges in the document.
  Set oBM = ActiveDocument.Bookmarks
  Set oRng = oBM("Address").Range
  oRng.Text = TextBox1.Text
  oBM.Add "Address", oRng
  Set oRng = oBM("City").Range
  oRng.Text = TextBox2.Text
  oBM.Add "City", oRng
  Set oRng = oBM("State").Range
  'Use the listbox hidden column data. Note columns are indexed _
   starting with 0.
  oRng.Text = ListBox1.Column(1)
  oBM.Add "State", oRng
  Set oRng = oBM("Zip").Range
  oRng.Text = TextBox3.Text
  oBM.Add "Zip", oRng
  Me.Hide
  Set oRng = Nothing
  Set oBM = Nothing
lbl_Exit:
  Exit Sub
End Sub
Each of the previous examples used data contained in the userform Initialize event to create the listbox list members. Next we will look at some methods for using an external data source to populate a listbox.
The first method uses a Microsoft Word table contained in a separate document as the external source. Word MVP Doug Robbins has posted this method regularly in the Microsoft Word Public newsgroups.
Example 1 - The following series of illustrations show:
For this example, I used a source document saved as "D:\Data Stores\sourceWord.doc"


The code for populating the listBox shown above and for displaying the result in the document is provided and explained below:
Option Explicit
Private Sub UserForm_Initialize()
Dim arrData() As String
Dim sourcedoc As Document
Dim i As Integer
Dim j As Integer
Dim myitem As Range
Dim m As Long
Dim n As Long
  Application.ScreenUpdating = False
  'Modify the following line to point to your list member file and open the document
  Set sourcedoc = Documents.Open(FileName:="D:\Data Stores\sourceWord.doc", Visible:=False)
  'Get the number of list members (i.e., table rows - 1 if header row is used)
  i = sourcedoc.Tables(1).Rows.Count - 1
  'Get the number of list member attritbutes (i.e., table columns)
  j = sourcedoc.Tables(1).Columns.Count
  'Set the number of columns in the Listbox
  ListBox1.ColumnCount = j
  'Load list members into an array
  ReDim arrData(i - 1, j - 1)
  For n = 0 To j - 1
    For m = 0 To i - 1
      Set myitem = sourcedoc.Tables(1).Cell(m + 2, n + 1).Range
      myitem.End = myitem.End - 1
      arrData(m, n) = myitem.Text
    Next m
  Next n
  'Use the .List property to populate the listbox with the array data
  ListBox1.List = arrData
  'Close the source file
  sourcedoc.Close SaveChanges:=wdDoNotSaveChanges
lbl_Exit:
  Exit Sub
End Sub

Private Sub CommandButton1_Click()
Dim i As Integer
Dim Client As String
Dim oRng As Word.Range
  Client = ""
  For i = 1 To ListBox1.ColumnCount
    'Set the .BoundColumn property. Note .BoundColumn indexed starting at 1.
    ListBox1.BoundColumn = i
    'Use .Value property to get data from listbox bound column.
    Select Case True
      'Build the address display
      Case i = ListBox1.ColumnCount - 1
        Client = Client & ListBox1.Value & " "
      Case i = ListBox1.ColumnCount
        Client = Client & ListBox1.Value & vbCr
      Case Else
        Client = Client & ListBox1.Value & vbCr & vbTab
    End Select
  Next i
  Set oRng = ActiveDocument.Bookmarks("Client").Range
  oRng.Text = Client
  ActiveDocument.Bookmarks.Add "Client", oRng
  Me.Hide
lbl_Exit:
  Exit Sub
End Sub
With userform controls there are often more than one way to achieve a desired result. With the User Address form in the multi-column list example I used the .Column property to return data from the user selection. The .Column property is, in my opinion, the easiest method. In the example above, for demonstration purposes, I used a combination of the .BoundColumn and .Value properties of the listbox to return the data.
With Me.ListBox1
  'Set .BoundColumn property.  Determines source of listbox .Value property.
  .BoundColumn = 1
  'Return value or content from bound column of selected row.
  MsgBox .Value
  'Set .TextColumn property.  Determines source of listbox .Text property.
  .TextColumn = 3
  'Note: .BoundColumn and .TextColumn properties settings are indexed starting at 1 _
         .BoundColumn = 1 actually means listbox column 0.
  MsgBox .Text
  'Returns value in the second column of the selected row (.ListIndex) _
      Remember listbox columns are indexed starting with 0.
  MsgBox .List(.ListIndex, 1)
  'Returns data contained in the third column of the row selected.
  MsgBox .Column(2)
  'Returns specifically column 0, ListIndex 0 (first item/first column)
  MsgBox .Column(0, 0)
End With
Example 2 - There may be times when you want multi-column data available, but you only want to display primary data and then use all or only parts of the available data. In this case you collect the data from the source as previously shown and then hide all but the primary data.
For this example, I used a source document saved as "D:\Data Stores\sourceWordII.doc"

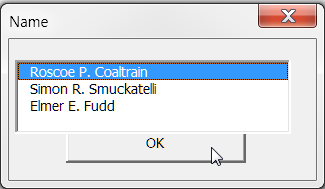

The code for populating the listBox shown above and for displaying the result in the document is provided and explained below:
Option Explicit
Private Sub Userform_Initialize()
Dim sourcedoc As Document
Dim i As Long, j As Long, m As Long, n As Long
Dim strColWidths As String
  'Define an array to be loaded with the data
  Dim arrData() As String
  Application.ScreenUpdating = False
  'Open the file containing the table with items to load
  Set sourcedoc = Documents.Open(FileName:="D:\Data Stores\sourceWordII.doc", Visible:=False)
  'Get the number members = number of rows in the table of details less one for the header row
  i = sourcedoc.Tables(1).Rows.Count - 1
  'Get the number of columns in the table of details
  j = sourcedoc.Tables(1).Columns.Count
  'Set the number of columns in the Listbox to match the number of columns in the table of details
  ListBox1.ColumnCount = j
  'Dimension arrData
  ReDim arrData(i - 1, j - 1)
  'Load table data into arrData
  For n = 0 To j - 1
    For m = 0 To i - 1
      arrData(m, n) = Main.fcnCellText(sourcedoc.Tables(1).Cell(m + 2, n + 1))
    Next m
  Next n
  'Build ColumnWidths statement
  strColWidths = "50"
  For n = 2 To j
  strColWidths = strColWidths + ";0"
  Next n
  'Load data into ListBox1
  With ListBox1
    .List() = arrData
    'Apply ColumnWidths statement
    .ColumnWidths = strColWidths
  End With
  'Close the file containing the individual details
  sourcedoc.Close SaveChanges:=wdDoNotSaveChanges
End Sub

Private Sub CommandButton1_Click()
  'Write column data to named bookmarks in document
  With ActiveDocument
    'Note calls to external procedures
    Main.FillBMs .Bookmarks("Name"), Me.ListBox1.Column(0)
    Main.FillBMs .Bookmarks("Email"), Me.ListBox1.Column(1)
    Main.FillBMs .Bookmarks("PhoneNumber"), Me.ListBox1.Column(2)
  End With
  Me.Hide
lbl_Exit:
  Exit Sub
End Sub
You may have noticed a few differences between this example and the previous example.
![]() Note: Until this example, I have used code directly in the userform to process and display listbox data in the document. I did this for two reasons 1) Clarity and to avoid confusion, 2) I'm sometimes lazy. A best practice is to limit code in a userform module to only code necessary to display and process the userform. All other procedures should be done in a separate standard code module.
Note: Until this example, I have used code directly in the userform to process and display listbox data in the document. I did this for two reasons 1) Clarity and to avoid confusion, 2) I'm sometimes lazy. A best practice is to limit code in a userform module to only code necessary to display and process the userform. All other procedures should be done in a separate standard code module.
The code pane below depicts a standard code module containing the code used to initiate and call the userform shown above and code to process the user selection in the form.
Option Explicit
Sub CallUF()
Dim oFrm As frmData
  Set oFrm = New frmData
  oFrm.Show
  Unload oFrm
  Set oFrm = Nothing
lbl_Exit:
  Exit Sub
End Sub

Sub FillBMs(ByRef oBMPassed As Bookmark, strTextPassed As String) 'Bookmark and ListBox column data passed as parameters
Dim oRng As Word.Range
Dim strName As String
  Set oRng = oBMPassed.Range
  strName = oBMPassed.Name 'Get bookmark name
  oRng.Text = strTextPassed 'Write ListBox column data to bookmark range (Note: This destroys the bookmark)
  ActiveDocument.Bookmarks.Add strName, oRng 'Recreate the bookmark spanning the range text
lbl_Exit:
  Exit Sub
End Sub

Function fcnCellText(ByRef oCell As Word.Cell) As String
  'Strip end of cell marker.
  fcnCellText = Left(oCell.Range.Text, Len(oCell.Range.Text) - 2)
lbl_Exit:
  Exit Function
End Function
For the two examples in used Access database files as the external data source.
Example 1 used a file named D:\Data Stores\sourceAccess.mdb. The database contains fields for the following information:
![]() Notes:
Notes:
1. Again, for clarity, I have included most of the processing code in the userform modules.
2. I am not an Access guru and much of what you see here is simple a result of "monkey see, monkey do." I can usually work out a basic database table and code, but anything beyond that is over my head. If any Access gurus visit this page I would certainly appreciate any suggestions you might make to improve the content!!

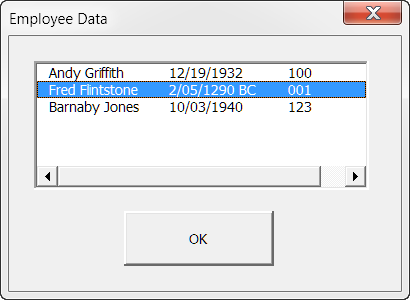

The code for populating the listbox shown above and for displaying the result in the document is provided and explained below:
Option Explicit
'Requires a reference to the '"Microsoft DAO 3.51 (or 3.6) Object Library."
Private Sub Userform_Initialize()
Dim myDataBase As DAO.Database
Dim myActiveRecord As DAO.Recordset
Dim i As Long
  'Open the database to retrieve data
  Set myDataBase = OpenDatabase("D:\Data Stores\sourceAccess.mdb")
  'Define the first recordset
  Set myActiveRecord = myDataBase.OpenRecordset("Table1", dbOpenForwardOnly)
  'Set the listbox column count
  ListBox1.ColumnCount = myActiveRecord.Fields.Count
  i = 0
  'Loop through all the records in the table until the EOF marker is reached.
  Do While Not myActiveRecord.EOF
    'Use .AddItem method to add a new row for each record
    ListBox1.AddItem
    ListBox1.List(i, 0) = myActiveRecord.Fields("Employee Name")
    ListBox1.List(i, 1) = myActiveRecord.Fields("Employee DOB")
    ListBox1.List(i, 2) = myActiveRecord.Fields("Employee ID")
    i = i + 1
    'Get the next record
    myActiveRecord.MoveNext
  Loop
  'Close the database and clean-up
  myActiveRecord.Close
  myDataBase.Close
  Set myActiveRecord = Nothing
  Set myDataBase = Nothing
lbl_Exit:
  Exit Sub
End Sub

Private Sub CommandButton1_Click()
Dim oRng As Word.Range
Dim oBM As Bookmarks
  Set oBM = ActiveDocument.Bookmarks
  Set oRng = oBM("EmpName").Range
  oRng.Text = ListBox1.Text
  oBM.Add "EmpName", oRng
  Set oRng = oBM("EmpDOB").Range
  oRng.Text = ListBox1.List(ListBox1.ListIndex, 1)
  oBM.Add "EmpDOB", oRng
  Set oRng = oBM("EmpID").Range
  oRng.Text = ListBox1.List(ListBox1.ListIndex, 2)
  oBM.Add "EmpID", oRng
  Me.Hide
lbl_Exit:
  Exit Sub
End Sub
Example 2 uses the same data but in a Access 2007/2010 .adddb format database file and a slight variation in method:
Private Sub Userform_Initialize()
'You need remove the reference to the '"Microsoft DAO 3.51 (or 3.6) Object Library." _
  and add a reference to the Microsoft Office 14 (or 12) Access database engine Object Library."
Dim db As DAO.Database
Dim rs As DAO.Recordset
Dim NoOfRecords As Long
  'Open the .accdb form database to retrieve data
  Set db = OpenDatabase("D:\Data Stores\sourceAccess.accdb")
  'Define the first recordset
  Set rs = db.OpenRecordset("SELECT * FROM Table1")
  'Determine the number of records in the recordset
  With rs
    .MoveLast
    NoOfRecords = .RecordCount
    .MoveFirst
  End With
  'Set the number of ListBox columns = number of fields in the recordset
  ListBox1.ColumnCount = rs.Fields.Count
  'Load the listbox with the retrieved records
  ListBox1.Column = rs.GetRows(NoOfRecords)
  'Cleanup
  rs.Close
  db.Close
  Set rs = Nothing
  Set db = Nothing
lbl_Exit:
  Exit Sub
End Sub
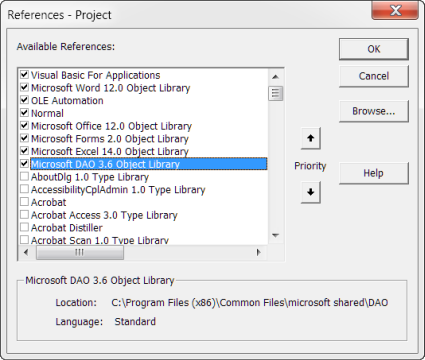
![]() Notes: Both methods illustrated above can be used with either database file format (.mdb or .accdb). The important difference is the data base engine object library reference. The .mdb format requires a reference to the DAO 3.6 Object Library. The .accdb format required a references to the new Office 14.0 (or 12.0 for Word 2007) Access database engine object library.
Notes: Both methods illustrated above can be used with either database file format (.mdb or .accdb). The important difference is the data base engine object library reference. The .mdb format requires a reference to the DAO 3.6 Object Library. The .accdb format required a references to the new Office 14.0 (or 12.0 for Word 2007) Access database engine object library.
 |
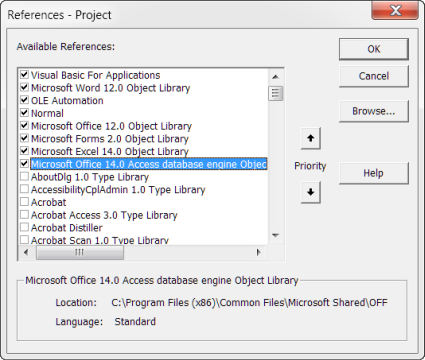 |
| DAO 3.6 | Office 14.0 (or 12.0) |
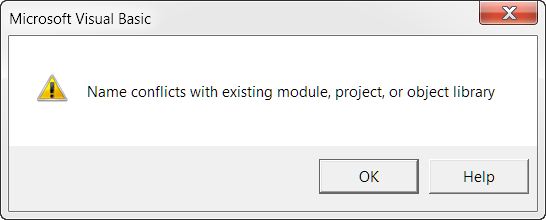 | |
| You have to remove the reference to the DAO 3.6 before you can reference the Office 14.0 Access database engine Object. | |
The next three examples use the same userform. For the first example, I used a spreadsheet file "D:\Data Stores\sourceSpreadsheet.xls." The method uses a technique called "Late Binding" where no reference to the Excel Object Library is required:

![]() Note: With minor exceptions noted in the code panes below, the Excel file formats .xls, .xlsx and .xlsm can be used interchangeably in the following examples.
Note: With minor exceptions noted in the code panes below, the Excel file formats .xls, .xlsx and .xlsm can be used interchangeably in the following examples.
Private Sub Userform_Initialize()
'Late binding.  No reference to Excel Object required.
Dim xlApp As Object
Dim xlWB As Object
Dim xlWS As Object
Dim cRows As Long
Dim i As Long
  Set xlApp = CreateObject("Excel.Application")
  'Open the spreadsheet to get data
  Set xlWB = xlApp.Workbooks.Open("D:\Data Stores\sourceSpreadsheet.xls")
  Set xlWS = xlWB.Worksheets(1)
  cRows = xlWS.Range("mySSRange").Rows.Count - xlWS.Range("mySSRange").Row + 1
  ListBox1.ColumnCount = 3
  'Populate the listbox.
  With Me.ListBox1
    For i = 2 To cRows
       'Use .AddItem property to add a new row for each record and populate column 0
      .AddItem xlWS.Range("mySSRange").Cells(i, 1)
      'Use .List method to populate the remaining columns
      .List(.ListCount - 1, 1) = xlWS.Range("mySSRange").Cells(i, 2)
      .List(.ListCount - 1, 2) = xlWS.Range("mySSRange").Cells(i, 3)
    Next i
  End With
  'Clean up
  Set xlWS = Nothing
  Set xlWB = Nothing
  xlApp.Quit
  Set xlApp = Nothing
lbl_Exit:
  Exit Sub
End Sub
Example 2 uses a method called "Early Binding." It uses an array variable and the Excel .RefersToRange property to retrieve the spreadsheet data.
Private Sub Userform_Initialize()
'Uses early binding and requires a reference to the Excel Object Library
Dim xlApp As Excel.Application
Dim xlbook As Excel.Workbook
Dim Listarray As Variant
Dim bStartApp As Boolean
  On Error Resume Next
  Set xlApp = GetObject(, "Excel.Application")
  If Err Then
    bStartApp = True
    Set xlApp = New Excel.Application
  End If
  On Error GoTo 0
  With xlApp
    Set xlbook = .Workbooks.Open("D:\Data Stores\sourceSpreadsheet.xls")
    Listarray = xlbook.Names("mySSRange").RefersToRange.Value
    xlbook.Close SaveChanges:=False
    Set xlbook = Nothing
  End With
  If bStartApp Then xlApp.Quit
  Set xlApp = Nothing
  With ListBox1
    .ColumnCount = UBound(Listarray, 2)
    .Clear
    .List() = Listarray
  End With
lbl_Exit:
  Exit Sub
End Sub
![]() Note: For and explanation of "Early" and "Late" binding and the advantage and disadvantages of both, see my: Early vs. Late Binding
Note: For and explanation of "Early" and "Late" binding and the advantage and disadvantages of both, see my: Early vs. Late Binding
The third Excel method uses the DAO object (similar to the Access method) to retrieve Excel data:
Private Sub Userform_Initialize()
'Use DAO object.  Requires reference to DAO 3.51 (3.6) Object Libray or Micorsoft Office _
  14.0 (12.0) Access database enginge Object Library"
Dim strOffice As String
Dim i As Long
Dim db As DAO.Database
Dim rs As DAO.Recordset
  strOffice = "mySSRange"
  'Open the spreadsheet containing the data
  Set db = OpenDatabase("D:\Data Stores\sourceSpreadsheet.xls", False, False, "Excel 8.0; IMEX=1;")
  'Use the following code line for Excel 2007/2010 .xlsx format file.
  'Set db = OpenDatabase("D:\Data Stores\sourceSpreadSheet.xlsx", False, False, "Excel 12.0; IMEX=1;"
  'Retrieve the recordset
  Set rs = db.OpenRecordset("SELECT * FROM `mySSRange`")
  'Set the number of Columns = number of Fields in recordset
  ListBox1.ColumnCount = rs.Fields.Count
  'Determine the number of retrieved records
  With rs
    .MoveLast
    i = .RecordCount
    .MoveFirst
  End With
  'Load the listbox with the retrieved records
  ListBox1.Column = rs.GetRows(i)
  'Cleanup
  rs.Close
  db.Close
  Set rs = Nothing
  Set db = Nothing
lbl_Exit:
  Exit Sub
End Sub
![]() Notes:
Notes:
1. See the MVP FAQ: Load a Listbox from a Name Range in Excel using DAO for a detailed discussion of the above method and its advantages.
2. See my addendum tips page: Populate Userform Listbox From XML Source for a method of retrieving data from an XML source file.
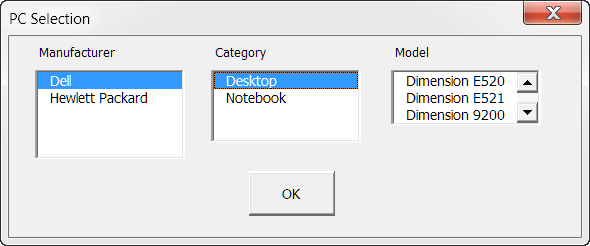
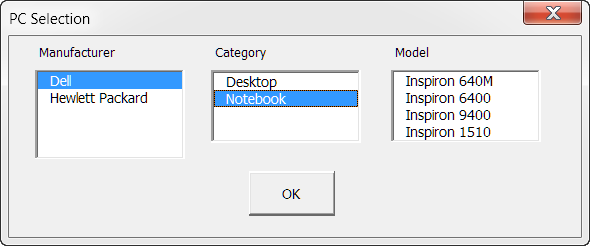
In the following examples I demonstrate a few methods for populating secondary and tertiary listboxes based on the value chosen in a parent primary listbox. In the listbox depicted below, the list members displayed in the secondary "Category" listbox determined by the user selection in the primary "Manufacture" listbox. The list displayed in tertiary "Model" listbox is determined by the user selection in the "Category" listbox.
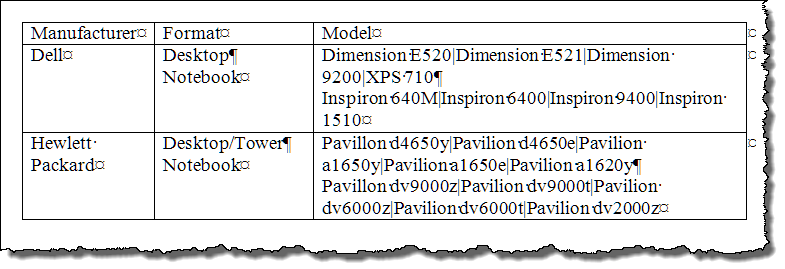
The data source for the userform listboxes shown above is contained in an external Word document table as show in the illustration below.
The code to initial and display the form is provided in Demo Pack "UserFormJ" which you can download using the link at the end of this page.
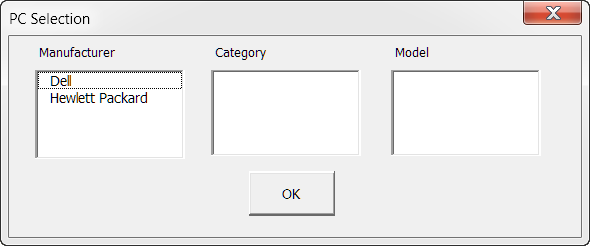
The initial form displays only a manufacture:
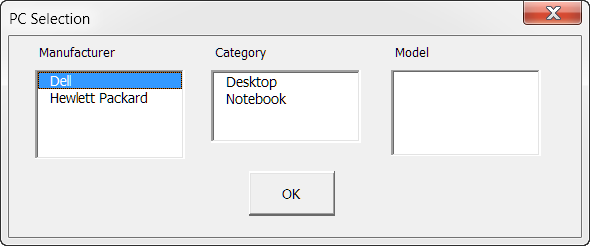
When the user selects a PC manufacture a ListBox1_Change event procedure is used to populate the "Category" listbox2:
When the user selects a category we use the ListBox2_Change event to process the code that populates ListBox3
The following provides and example of code for processing the data selected:
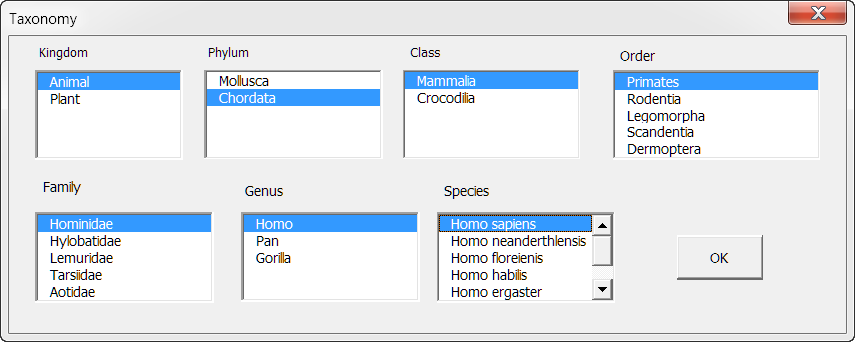
With a lot more work and tedious attention to detail in creating the source document and userform code you can continue cascading listboxes practically indefinitely. Here is an "abbreviated" example (i.e., my source document is incomplete) of listboxes that cascade seven levels. If you are interested in something this deep then contact me via the website feedback.
Wrapping it up, I will close with a few examples for demonstrating multi-select listboxes. A lot of people get tripped up using the Listbox.Selected property. Hopefully this will help.
A listbox can be configured to allow single or multiple item selection. In the following example the user is asked to choose their two favorite sports from a list.
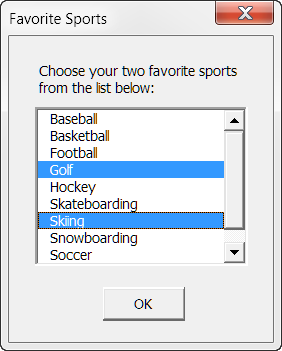
Code in the ListBox_Change event and the Command Button_Click event ensure that two and only two selections are made and processes the results:
Option Explicit
Private Sub ListBox1_Change()
Dim i As Long
Dim lngCount As Long
  lngCount = 0
  For i = 0 To ListBox1.ListCount - 1
    If ListBox1.Selected(i) Then
      lngCount = lngCount + 1
    End If
  Next i
  'Don't let user select more than two list members.
  If lngCount > 2 Then
    ListBox1.Selected(ListBox1.ListIndex) = False
    MsgBox "Two items are already selected. Please de-select an item to continue."
    Exit Sub
  End If
lbl_Exit:
  Exit Sub
End Sub

Private Sub CommandButton1_Click()
Dim i As Long
Dim lngCount As Long
Dim strPicks As String
  lngCount = 0
  'Make sure user selects two list members.
  For i = 0 To ListBox1.ListCount - 1
    If ListBox1.Selected(i) Then
      lngCount = lngCount + 1
      If lngCount = 1 Then
        strPicks = ListBox1.List(i)
      Else
        strPicks = strPicks & " and " & ListBox1.List(i)
      End If
    End If
  Next i
  If lngCount = 2 Then
    MsgBox strPicks
    Me.Hide
  Else
    MsgBox "Please select two items from the list."
  End If
lbl_Exit:
  Exit Sub
End Sub
That's it! I hope you have found this tips page useful and informative. You can download the demonstration files I used to create this tips page here: Populate Userform Listbox Demo Pack
UPDATE: Over the years the demonstration document used to produce this tips page had grown unwieldy. If an effort to present the material in a more organized manner without having to completely revise this page, I've added a new version as part of my more recent Populate UserForm ListBox or ComboBox w\Advanced Functions tips page. Please visit that page to download the new version and a whole lot more!
The information, illustrations and code contained in my "Microsoft Word Tips" are provided free and without risk or obligation.


However, the work is mine. If you use it for commercial purposes or benefit from my efforts through income earned or time saved then a donation, however small, will help to ensure the continued availability of this resource.
If you would like to donate, please use the appropriate donate button to access PayPal. Thank you!