This Microsoft Word Tips & Microsoft Word Help page provides my custom designed and improved dialog for creating, mapping and setting content control properties. At time of publication, it can be used in Word versions 2007 throughout 2016
Background
I have been a big fan and promoter of Microsoft's Content Controls which I consider the unsung "Crown Jewels" of Word. However, and for some unfathomable reason, Microsoft has left them like unfinished diamonds in the rough barely changed since their introduction with Word 2007. They are only accessible from a scary thing called a "Developer" tab and when inserted, there it is, what do you do with it?
Over the years I have published several tips pages here on their use and employment and a comprehensive add-in for advanced mapping features: Content Control Tools. Recently friend and fellow Word enthusiast Graham Mayor, shared with me a simplified Content Control Insert interface he created. We collaborated to develop a simplified mapping process. I liked Graham's idea so much that I threw myself into expanding that initial work into the product published here.
 Note: This tips page was created using screen graphics from Word 2016. Several advanced features of the add-in (e.g., Repeating Section content controls and Rich Text content control mapping) are not available in earlier Word versions. If you have an earlier Word version then your actual display when using the add-in will appear differently.
Work on this project was exhaustive. Like solving several complex riddles, and it matches or exceeds Content Control Tools in time investment and complexity. Through future feedback from users, I hope to uncover and resolve any issues which I haven't discovered on my own.
Version History
- Version 1.0 - Initial release.
- Version 1.1 - Minor changes to the validation of the list Display Name and Value fields.
- Version 1.2 - Corrects typos, reverses the position of the Title and Tag textbox control, changes Match Title to Tag control name to Match Tag to Title.
- Version 1.3 - Resolved ribbon callback conflict reported by feedback between this add-in and my Building Blocks add-in
- Version 1.4 - Resolved display issue with Insert Picture Content Control when using Word 2010.
- Version 1.5 - Fixed a bug in the Insert and Map to General Node
Option.
- Version 1.6 - Fixed a bug in the Preserve Placeholder Text list sort
process.
- Version 1.7 - Fixed a bug in the Edit Properties process for
DropdownLists and Comboboxes
- Version 2.0 - Provvides general processing enhancments.
Limitations/Anomalies/Observations
This add-in was developed using Visual Basic for Applications (VBA). Unfortunately, there are some things in the Word object module which simply isn't accessible with VBA.
- I was unable to fully filter, as is done in the built-in Properties dialog, the list of available styles which can be applied to content control contents without a noticeable degrade in response and performance.
- The add-in "New Style" command button presents a "Create New Style ..." dialog which, unlike the built-in Properties dialog, includes all of the available style types in the "Style Type" listbox. When using this control, only a "Character" or "Linked (paragraph and character)" style type should be selected.
- When editing properties of an existing Content Control Checkbox the add-in presents the built-in properties dialog. With VBA, the effort and complexity required to determine the character code and font of an existing Checkbox checked and unchecked symbols would create a noticeable degrade in response and performance.
- The availability (enabled\disabled) of the add-in controls replicates as closely as possible the behavior of the built-in controls. This is accomplished using RibbonXML invalidate calls and the Windows Selection Change event. Since the Windows Change Event is rather limited and does not detect typing or some delete actions, you may experience cases where the controls should be enabled but show disabled. If this occurs, the add-in includes a control on the QAT to re-boot the selection monitor which will refresh and update the controls. I considered the alternative of leaving the controls enabled at all times and handle user attempts to use them in invalid conditions with messages boxes as excessive annoyances.
That may seems like a large list of problems. I hope you will find the enhanced features of the add-in will outweigh these issues.
Description and Use of Add-in Ribbon\QAT\User Interface
The add-in user interface consists of a userform that is initiated either from controls on the ribbon Developer tab or Insert tab and a Re-boot Monitor control on the quick access toolbar (QAT). The ribbon and QAT controls are shown below.
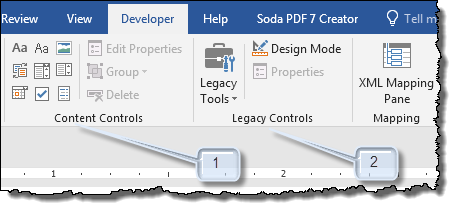
Developer Tab
On the Developer tab, the built-in "Controls" group has been hidden and replaced with two custom groups shown above.
- The custom "Content Controls" group contains 9 custom buttons representing each type of Content Control available in Word 2013 and above, a custom "Edit Properties" button, the built-in "Group" menu, and a custom "Delete" button.
- The custom "Legacy Controls" group contains a large version of the built-in "Legacy Tools" gallery, the built-in "Design Mode" toggle and the built-in "Properties" button.
Note: The "Group, Legacy Tools, Design Mode and Properties" controls function exactly the same as the controls they replicate from the built-in "Controls" group.
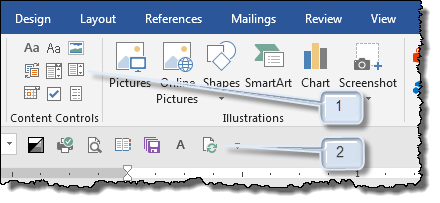
Insert Tab/QAT
- The nine content control type buttons from the Developer tab are replicated and available on the Insert tab.
- The monitor re-boot control is located on the QAT as shown.
Note: Due to the limitations of VBA and anomalies discussed above, there can occur conditions where you feel a control should be enabled when it is not. This can be due to the application WindowSelectionChange event monitor stopping or simply not triggering (e.g., typing text changes the selection, but does not trigger the event!). If this occurs, you can re-boot the event monitor and manually trigger the ribbon to valid and properly display the controls.
Content Controls Group
Each of the nine content control type ribbon controls opens a customized dialog used to insert, set properties and optionally map the selected content control type. Many of the controls in each dialog are similar and function like or replicate the controls in the built-in "Properties" dialog. Only the unique or enhanced features of the add-in controls are discussed.
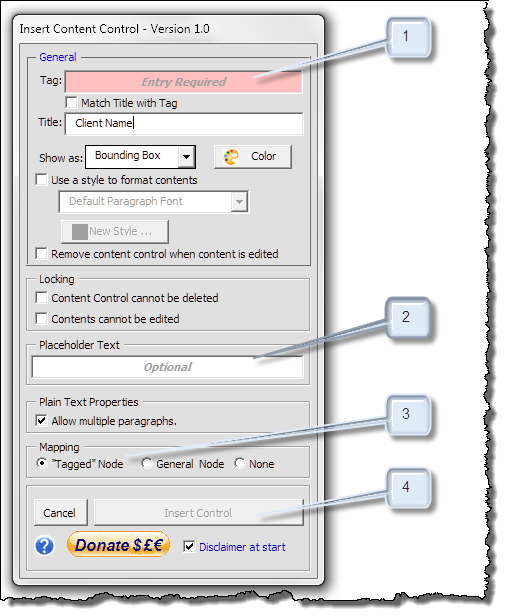
Rich Text Content Control
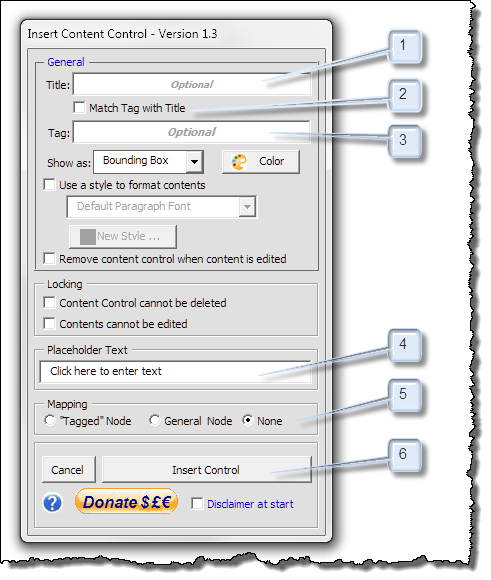
- The content control "Title" property is an optional single use property you can define when inserting each content control.
- "Match Tag with Title" is a sticky property attribute. When this attribute is set, the text you define in the "Title" field is replicated in the "Tage" field. Note - text entered directly in the "Tag" field is accepted but if left checked and the title text is later changed the tag text will also change.
Notes:
1. When set, and if Mapping "Tagged" Node is set, the title text you enter can result in a situation where mapping to the tag thus defined in not possible. In these cases, you will have to manually revise your defined tag.
2. The add-in stores several properties as "Sticky" properties which means that they are recalled with the value last defined each time you insert a new content control.
- The content control "Tag" property is a single use property you define when inserting each content control. It is and optional property when the "Mapping" attribute option buttons "General Node" or "None" are selected.
- The content control "Placeholder Text" property is an optional single use property you can set when inserting each content control. The add-in automatically applies a pre-defined Placeholder text depending on the type of content control selected. If left blank, a zero width character is applied as the placeholder text, this character does not print or take up space in the document
- Mapping can be performed automatically as you insert content controls by selecting either the "Tagged Node" or "General Node" mapping attribute options. When "Tagged Node" is selected, 1) a content control tag must be defined and 2) content controls with like tags are mapped to a common data node.
Note: As rich text content control mapping is not supported in Word 2010 and earlier, this component of the user interface is not presented when using Word 2010.
- Click to insert content control as defined.
Notes:
1. Rich text content controls can not be mapped in Word 2010 or earlier.
2. Due to changes made in revision 1.2, the position of the Tag and Text property labels and fields are out of order in the illustrations that follow.
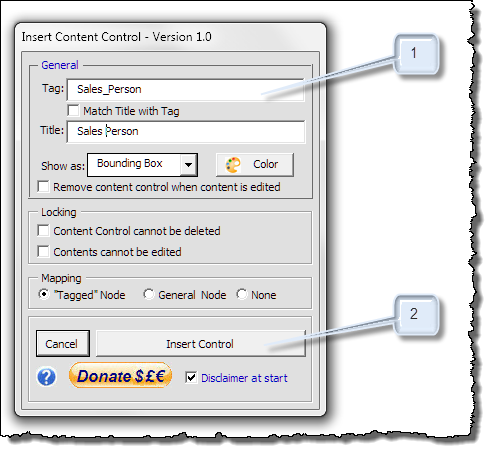
Plain Text Content Control
- Certain user interface fields are flagged to indicate required data entry. Here the tag property is flagged because the Mapping attribute is set to "Tagged" node (see number 3).
- In this example the pre-defined placeholder text has been deleted. When inserted this content control will not display placeholder text or take space in the document.
- This content control will be mapped to a XML data node name to match the defined tag.
- Disabled due to missing data in the required "Tag" field.
Picture Content Control
- When the "Tag" is mandatory as in this case, the defined tag must meet XML Data structure requirements. The tag must: 1) begin with an alpha character e.g., (A-Za-z) and 2) each following character must be an alpha character, number or the underscore character (as shown). Spaces are not permitted.
Logic in the add-in ensure that only valid tag characters are entered.
- All requirements for insertion and mapping are met. Control is enabled.
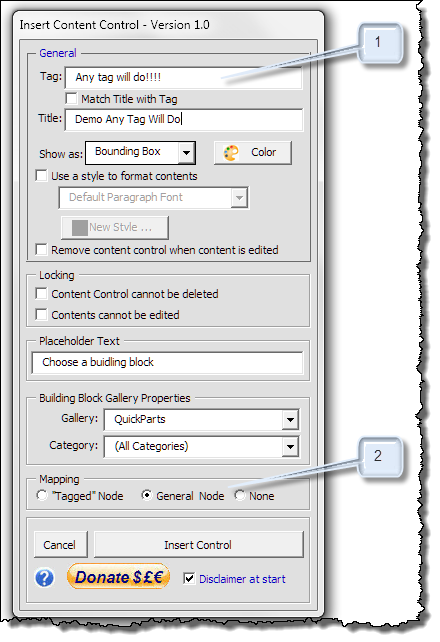
Building Block Gallery Content Control
- When the "Tag" property is optional as in this case, then any tag (or no tag at all will do).
- Content control is bound (mapped) to a generic data node defined by the add-in.
Note: By design Building Block Gallery content controls must show a title. If you leave the title blank the name of the selected gallery is displayed as the title.
Combo Box & Dropdown List Content Controls
The interface for the combo box and dropdown list contents controls are identical and include additional controls for defining and managing the list entries.
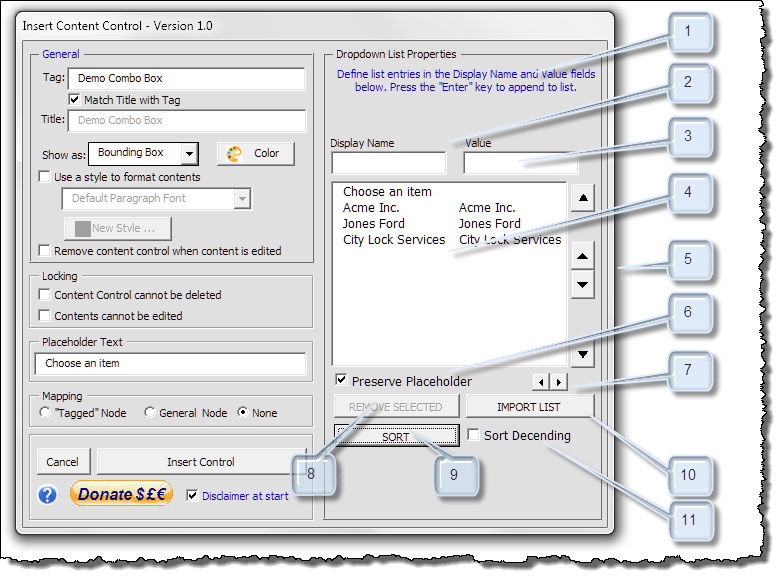
- Mini notification panel provides general guidelines on creating (appending) list and editing an existing list.
- Combo and Dropdown List box content control lists have two parts. The "Display Name" (or what appears in the document list and text) and "Value" (or what is mapped to the XML data node.) In many, if not most cases, these data are the same in both list. Accordingly the add-in automatically replicates text you type in the "Display Name" field into the "Value" field.
Note - In "ALL" cases each data entry in each list must be unique. Duplicates are not permitted.
- If you need different data for the value then it can be entered independently in the "Value" field.
- The define list. Items in this list can be selected singly for editing, relocation in the list or deletion, or multiple items can be selected for relocation or deletion.
- Four buttons Move to Top, Move Up, Move Down and Move to Bottom can be used to move selected items in the list. Note - If multiple items are selected the items must be contiguous.
- Preserves the placeholder position in the list. Should normally be checked. Note - if no placeholder text is defined, the list will appear with a blank first row.
- Used to expand or condense the list column widths so long entries can be reviewed.
- Used to delete selected list items.
- Used to sort the list entries. (Sorts performed can be undone if required)
- Used to import predefined list created in Excel
- Modifies sort order.
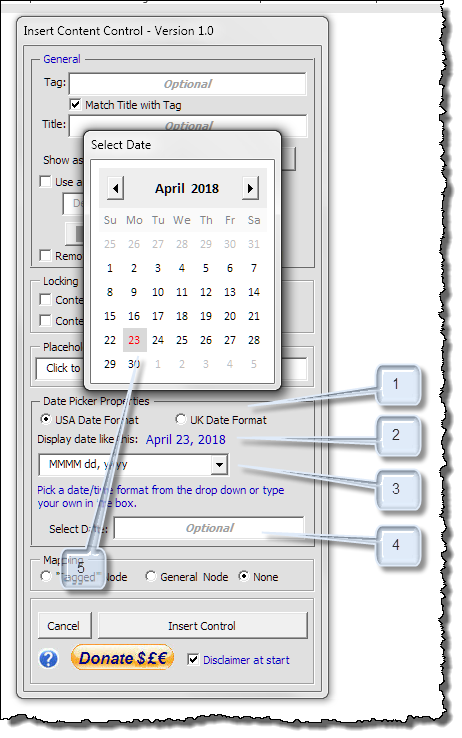
Date Content Control
- As the add-in is US\UK (or English speaking centric) I decide to follow Graham's lead and scale down the "Date Picker" properties displayed.
Here you can select US or UK date format and the formats predefined in 3, match those supplied by Microsoft.
- Illustrates the selected date format.
- Used to select a predefined date format or enter your own format.
- Used to insert a future or past date. When clicked with the mouse, the date picker 5 is displayed.
- Used to pick a past, present or future date. See: Date Picker Form
Note: The date format properties (excluding Select Date) are sticky properties.
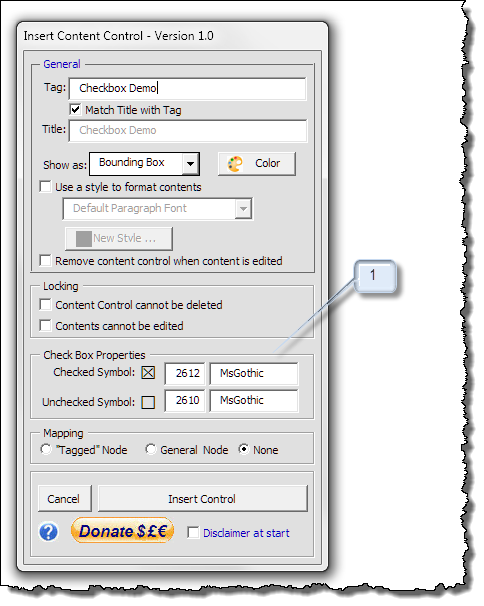
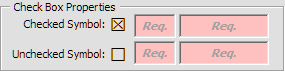
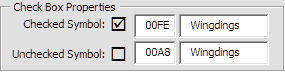
Checkbox Content Control
Note: The checkbox control is not available in Word 2007
- The Checkbox checked and unchecked character number (Hex) and font name are required sticky properties. To change and define a new default checked or unchecked symbol you must determine the Hex character value and font name. This can be accomplished using the ribbon Insert>Symbols>More Symbols dialog.
- Shows the font name used to display the symbol
- The symbol you want to use.
- Shows the Hex character code to use.
- Must be set to "Symbol (hex).
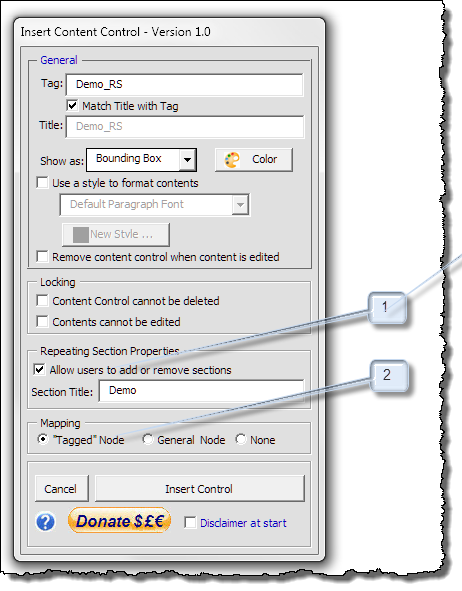
Repeating Section Content Control
Note: The Repeating Section Content Control is not available in Word versions prior to Word 2013.
- Sticky setting.
- While mapping of Repeating Section content controls is accomplished, subsequent mapping of other control types you place within a repeating section content control is rudimentary at best. I recommend you perform any mapping of repeating section content controls and other content controls contained within the repeating section control using the advanced mapping or InstaMap features of my Content Control Tools.
Edit Properties
- The Edit Properties button opens (with the exception when a checkbox content control is selected) a custom dialog similar to the nine buttons described and tailored to the selected content control. The dialog is populated with the properties defined in the selected content control and can be used edit/change the properties applied.
- Launches the built-in "Properties" dialog if a checkbox content control is selected. This is due to the add-in limitations discussed above.
- Changes made to properties in this edit mode do not affect the sticky properties. For example if you insert a content control with the "Match Title to Tag" property set, then later use Edit Properties and uncheck that property and change the title, the next time you insert a content control the "Match Title to Tag" property remains set.
- Mapping changes are not available in edit mode. If you want to delete mapping or perform other advanced mapping procedures, see my Content Control Tools.
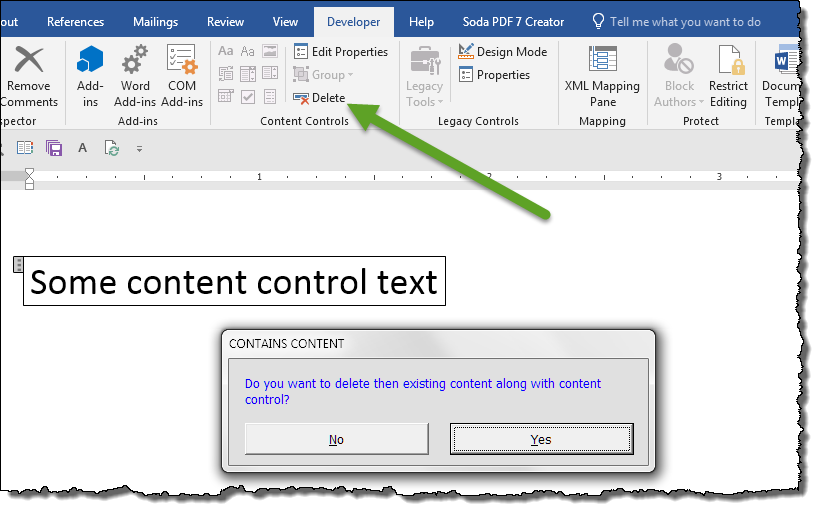
Delete
- One of the most annoying things during template development, is when I have set the "Content control cannot be deleted" and later decide I don't want it, to have to go back into properties to delete it!
- This control allows you delete a selected controls regardless of the lock properties.
- If the selected content control is showing placeholder text, it is deleted automatically with no further user action or notification. If contents are displayed, a dialog as shown above is presented, so you can decided to keep the content or delete it along with the content control.
Legacy Tools Group
Legacy Tools
A large version of the Legacy Tools control used in the built-in Developer Controls group.
Design Mode
Same as the Deign Mode toggle in the built-in Developer Controls group. Since placeholder text is easily applied using the custom dialogs, I saw no use for this built-in control in the Content Controls group. I move it here as a place to park it.
Properties
Same as the Properties button the built-in Developer Controls group. Can be used to edit properties in legacy form controls (or content controls if you wish).
General Add-In Information
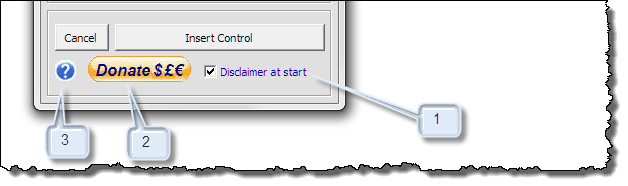
1. Disclaimer
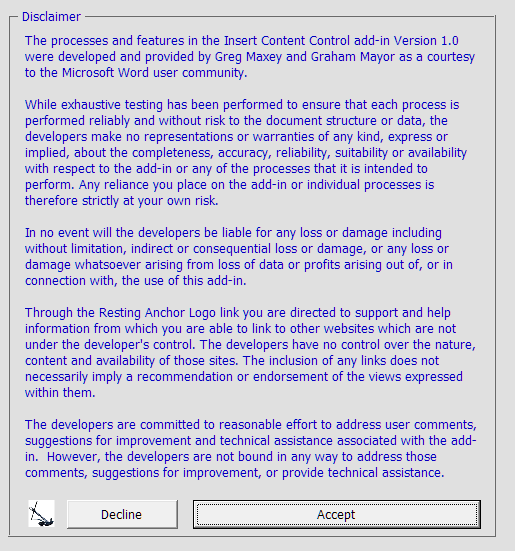
On first use of any custom control presented in the add-in, you will be presented the following disclaimer. Before proceeding, you must acknowledge the dialog and dismiss the disclaimer statement. After first use, the presentation of the disclaimer is a sticky option applied from the main dialogs. If you decline, the dialog is dismissed and processing stops.
2. Donate
Launches a link to my PayPal account to make donations.
Probably the most under used control in any add-in that Graham and I have ever developed!! A tremendous amount of work has gone in to developing this tool and tips page. If you feel that it has enhanced your productivity then please consider making a donation.
3. Help Logo Link
Expands the dialog to display some abbreviated user tips and notes.
Sticky Properties
The following content control properties applied using this add-in are sticky properties:
- Match Tag with Title
- Show as (Word 2013 and above)
- Color (Word 2013 and above
- Remove content control when content is edited
- Locking - Content Control cannot be deleted
- Locking - Contents can not be edited
- Plain text - Allow multiple paragraphs
- Date format properties
- Repeating Section - Allow users to add or remove sections.
- Mapping mode
Conclusion
You can download the template add-in file here:
Content Control Insert Utility
That's it! I hope you find the add-in and this tips page useful and informative.
For more on template add-ins and how to load them, see: Organizing Your Macros/Template Add-ins at: Installing Macros