
The Anchorage
Personal website of Gregory K. Maxey, Commander USN (Retired)

The Anchorage
Personal website of Gregory K. Maxey, Commander USN (Retired)
The information, illustrations and code contained in my "Microsoft Word Tips" are provided free and without risk or obligation.


However, the work is mine. If you use it for commercial purposes or benefit from my efforts through income earned or time saved then a donation, however small, will help to ensure the continued availability of this resource.
If you would like to donate, please use the appropriate donate button to access PayPal. Thank you!
The purpose of this Microsoft Word Tips & Microsoft Word Help page is to publish my self contained Word Address Book Add-In.
The add-in is a collaborative effort with Word MVP Graham Mayor. When Microsoft produced the Home and Student versions of Office, without the benefit of Outlook to store frequently used addresses, Word users lost a convenient means of inserting postal addresses into Word documents. Some time ago, Graham published his own Address Book Add-In to overcome this problem. Graham's version uses Excel spreadsheet to store the add-in address books and entries.
While I liked Graham's concept of address books for Word, I became interested in trying to create multiple self-contained address books stored in the add-in and independent of Excel or any other application.
I had done some previous tinkering with document Custom XML Parts and thought I would try using one or more Custom XML Parts to store the add-in address book entries.
Graham shared his code with me and I have adapted and expanded on it to provide the add-in published here.
Download the add-in file using this link: Word Address Book
After downloading, unzip the compressed file and save the unzipped Address Book Ver. #.#.dotm file either in your Word Startup folder (so the add-in is available and loaded automatically when Word starts) or you can save it in any other convenient location and load it manually when needed.
For more on using and loading Word template add-ins see: Organizing Your Macros/Template Add-Ins.
When loaded, the add-in reconfigures the Word built-in user interface as shown below. It adds an "Address Book" group and "Insert Address" button control to the ribbon "Insert" tab and an address book button control to the Quick Access Toolbar (QAT) .
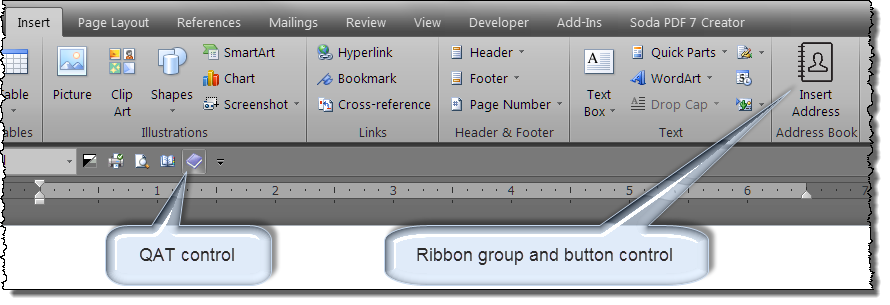
Clicking either control launches the address book add-in.
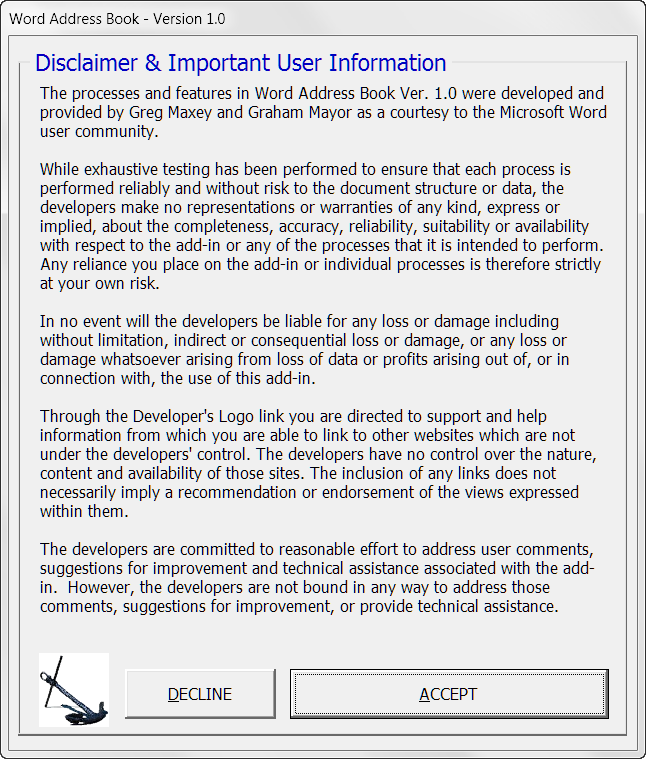
On first use the developers' disclaimer is displayed. To continue and use the add-in, you must explicitly accept the terms of the developer's disclaimer by clicking ACCEPT. After accepting the terms of use, the add-in UI is displayed with the Active Address Book tab displayed.
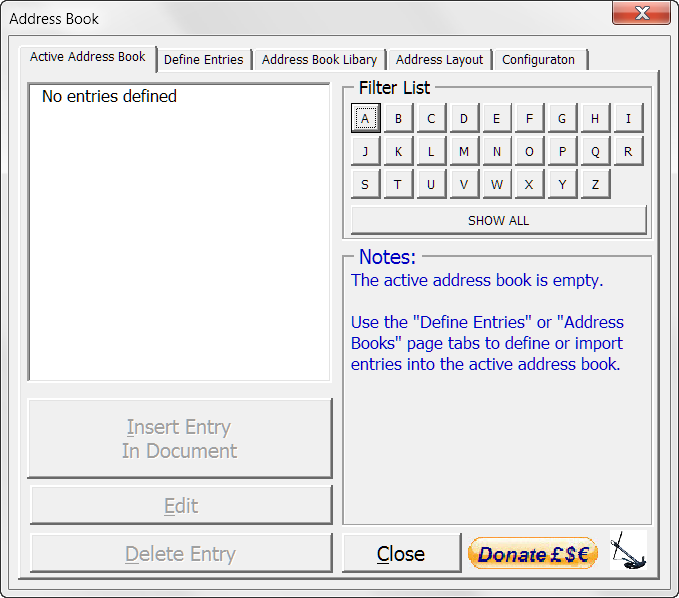
![]() Note: For functionality, the add-in requires an active address book. On installation, an empty address book named "Address Book" is defined and set as the active address book.
Note: For functionality, the add-in requires an active address book. On installation, an empty address book named "Address Book" is defined and set as the active address book.
In addition to the Disclaimer, the add-in UI consists of the main VBA userform with a multi-page control and five tabs (show above) and four supporting VBA userforms. The UI is fully explained below.
The Active Address Book tab provides the means to insert a selected address book entry in the active document and tools for deleting, filtering or editing active address book entries.
![]() Note: With the add-in methods described later, the user can define and create multiple address books, define new individual address book entries or import entries from other address book source files.
Note: With the add-in methods described later, the user can define and create multiple address books, define new individual address book entries or import entries from other address book source files.
The illustrations below depict an active address book with several address book entries defined by a user and configuration of the tab controls after various combinations of user actions.
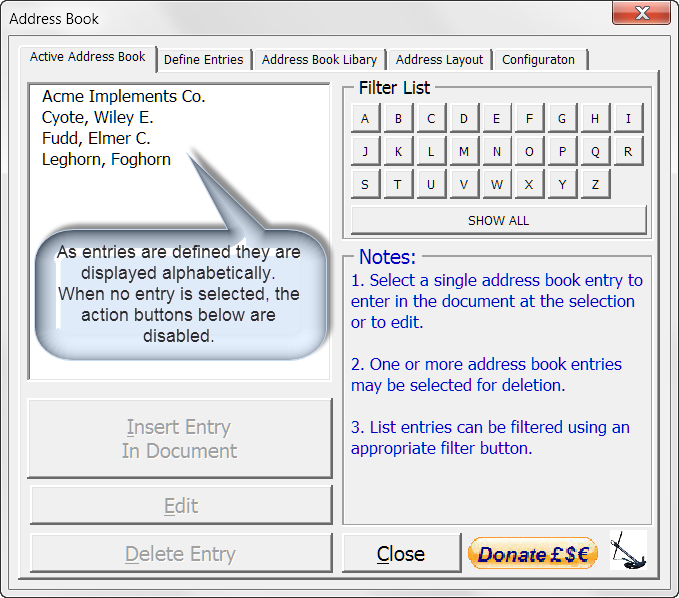
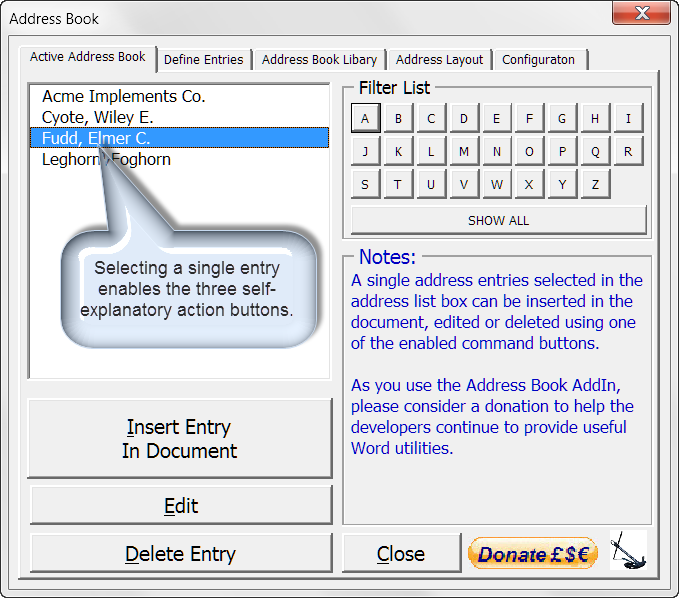
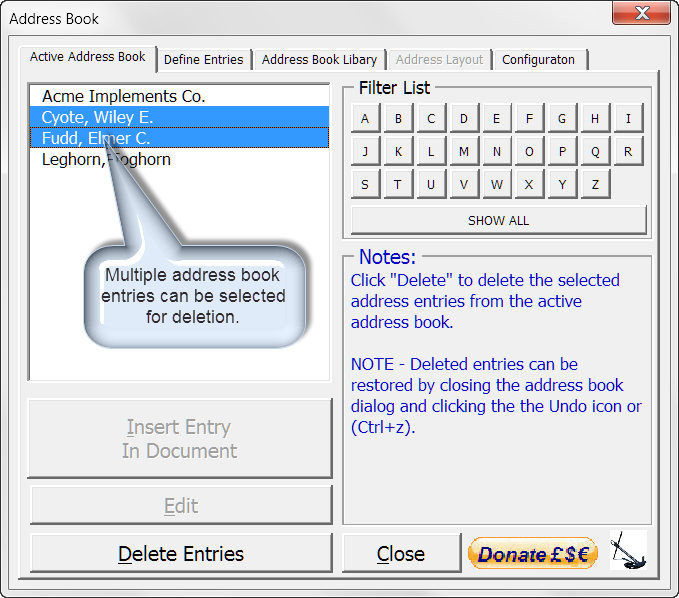
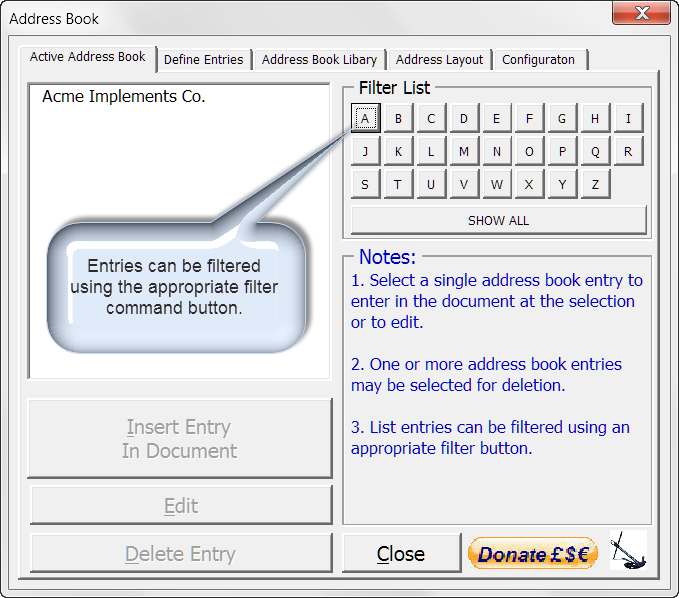
When "Insert Entry In Document" is executed, the selected address entry is inserted in the document at the insertion point.
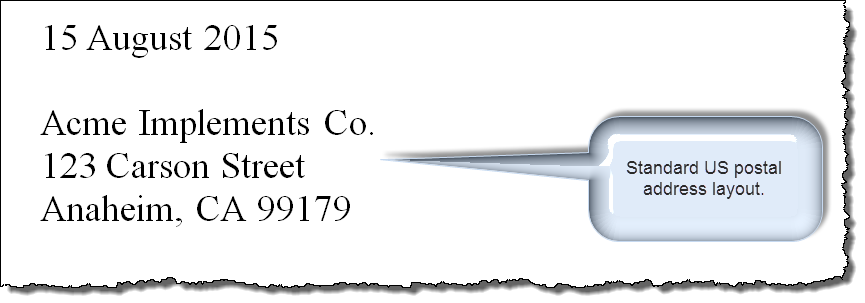
By default, address entries are inserted in the standard US postal address layout using the font and font attributes defined at the insertion point.
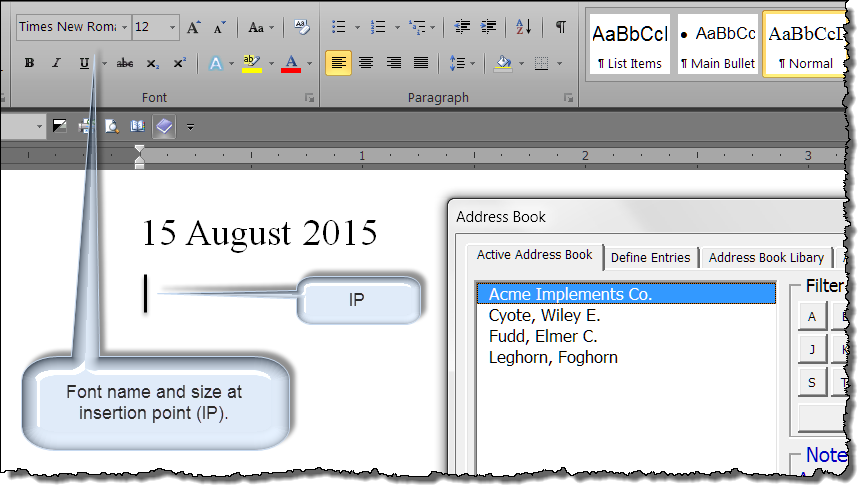
When a single address entry is selected and "Edit" is executed, the UI is reconfigured to display the "Define Entries" tab with the existing attributes of the selected address displayed.
![]() Note: Selecting an entry in the active address book and executing "Edit" is the only way to edit and redefine an existing address book entry. If the user physically selects the "Define Entries" tab, the add-in displays a blank template for defining a new single address book entry.
Note: Selecting an entry in the active address book and executing "Edit" is the only way to edit and redefine an existing address book entry. If the user physically selects the "Define Entries" tab, the add-in displays a blank template for defining a new single address book entry.
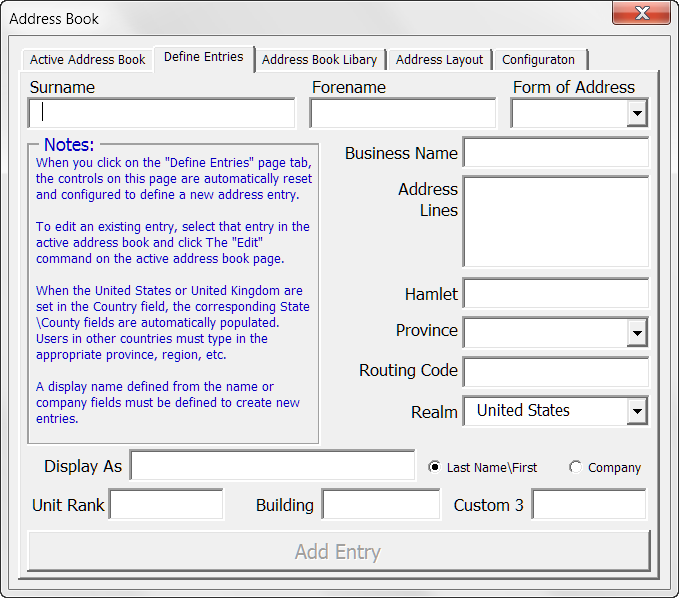
The Define Entries tab is used to define new or edit and redefine existing address book entries in the active address book. As explained above, when an existing address book entry is selected in the active address book and "Edit" is executed, the Define Entries tab is displayed.
Here the user chose to edit the Leghorn, Foghorn entry.
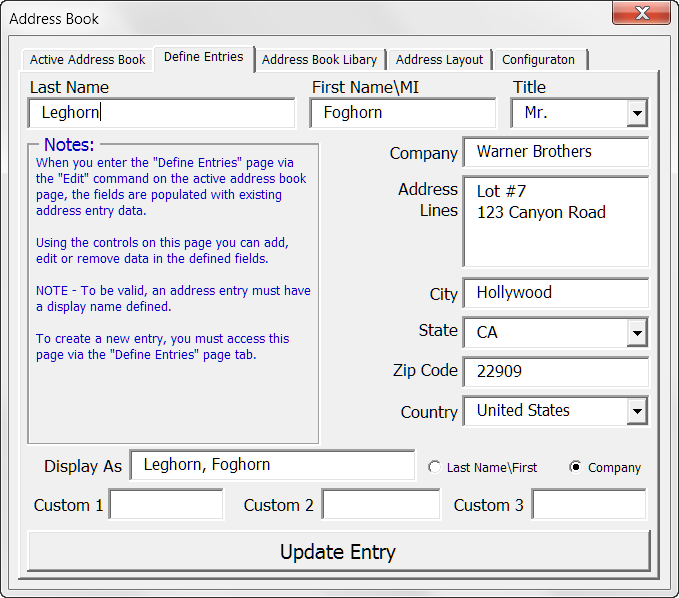
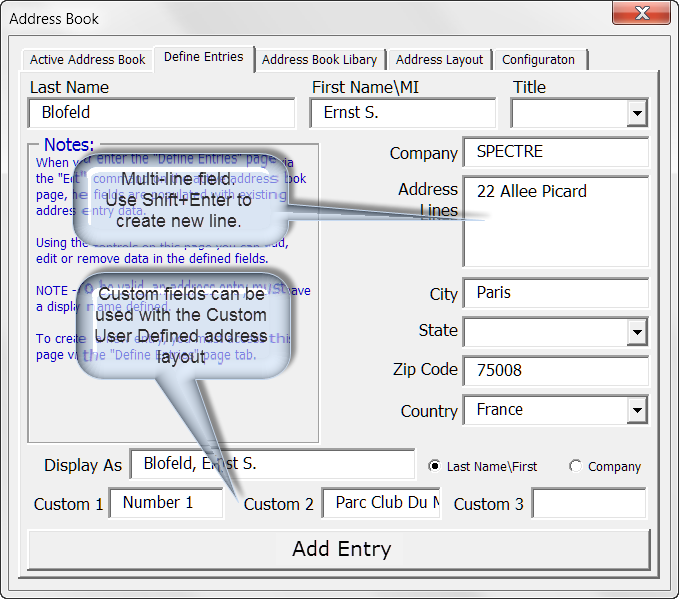
Address books provide twelve data fields that can be used define address book entries. The address entry selected for editing uses nine data fields as shown above.
The "Display As" and display as option buttons define how an address book entry is displayed in the active address book. Entries can be displayed by Last Name/First name or by Company name.
The three custom data fields can be used where a custom postal address layout requires.
When the "Define Entries" tab is clicked, the user is presented with a blank address book entry template.
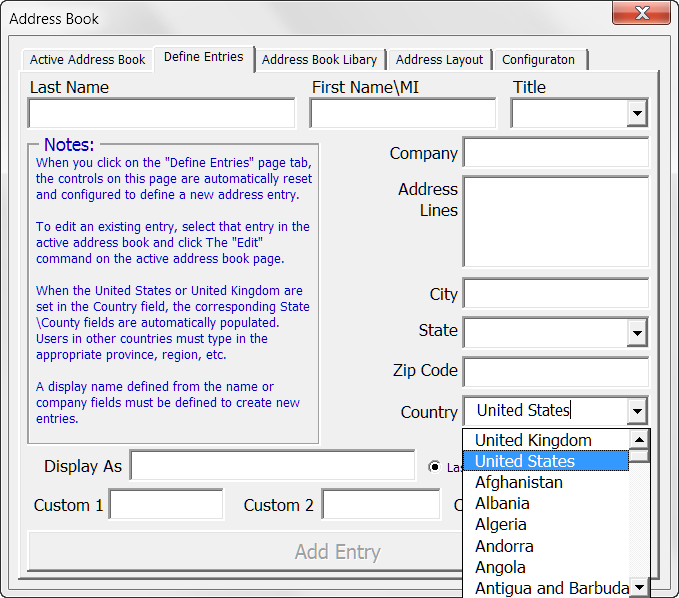
The country combobox is populated with a list of most world countries (as of Aug 15) listed alphabetically (explicitly excluding Iran which I consider an arch enemy). The country combobox displays the country name define by the user's regional settings. United Kingdom and United States appear out of sequence at the top of the list.
The "Title" field is populated with common titles.
The "State" field is automatically populated with the US state names when the United States is the selected country. When the United Kingdom is the selected country the "State" field is populated with UK counties and the "State" and "Zip Code" labels are changed to "County" and "Post Code."
Users from other countries must manually type in the appropriate state, county, region, province, etc.
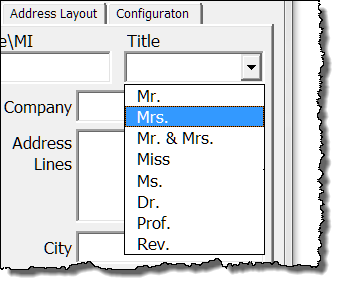 Titles |
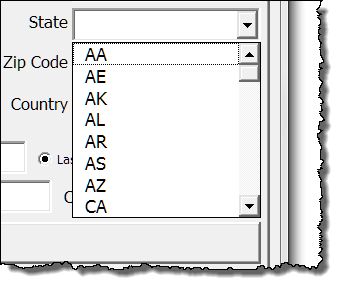 US States & Possessions (Standard postal abbreviations) |
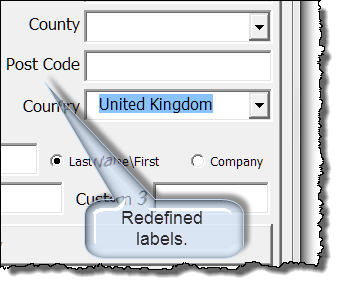 UK labels |
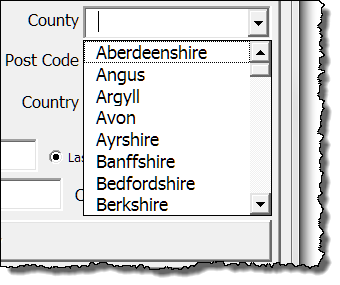 UK Counties |
![]() Note: The automatic changes to the State and Zip Code field labels are suppressed when the user defines an explicit label name using the Configuration tab.
Note: The automatic changes to the State and Zip Code field labels are suppressed when the user defines an explicit label name using the Configuration tab.
To fully develop and define and address book entry, you must define the "Display As" field as either "Last Name\First" or "Company." Depending on which option is selected, the "Display As" field is auto-defined as you type.
![]() Note: The display as option determines the key field (Last name (and or First name\MI) or Company) for an entry. An entry cannot be added to the address book until the key field is defined.
Note: The display as option determines the key field (Last name (and or First name\MI) or Company) for an entry. An entry cannot be added to the address book until the key field is defined.
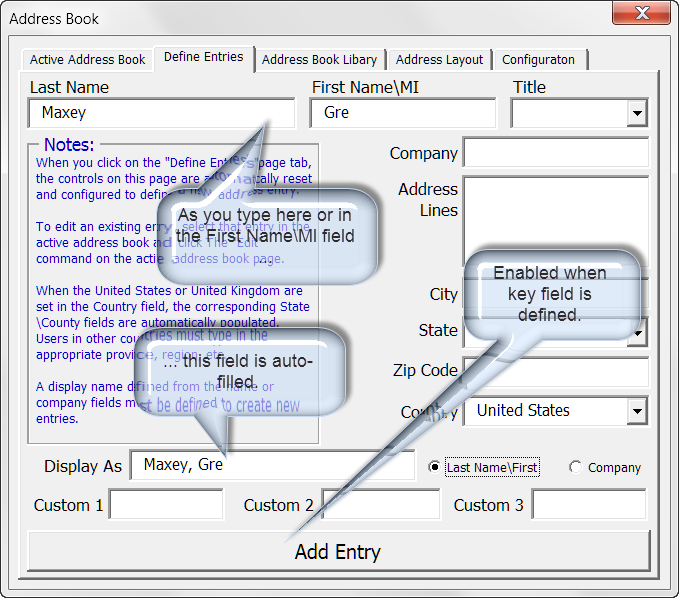
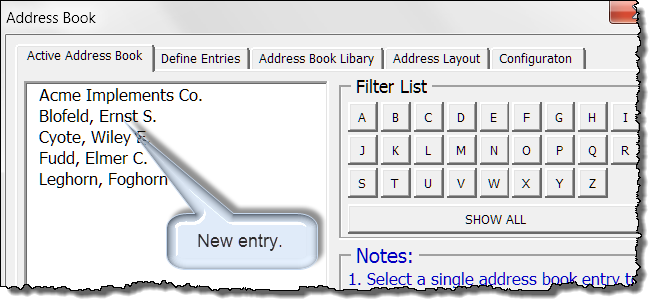
Here is an address book entry fully developed using the multi-line address lines field and one of the custom fields. Click "Add Entry" to enter the defined address in the active address book.
The Address Book Library tab provides tools to create, delete and manage your collection of address books.
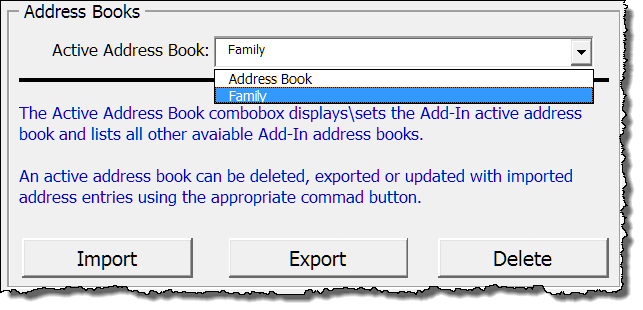
The "Active Address Book" field lists all add-in address books (default and user defined) and displays the address book set as the active address book.
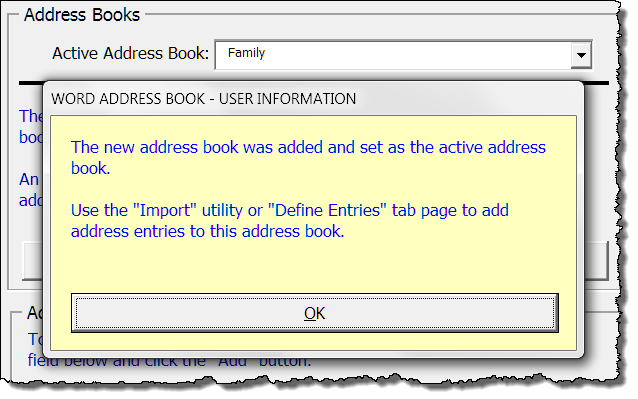
To create a new user defined address book, type in the address book name and click "Add"

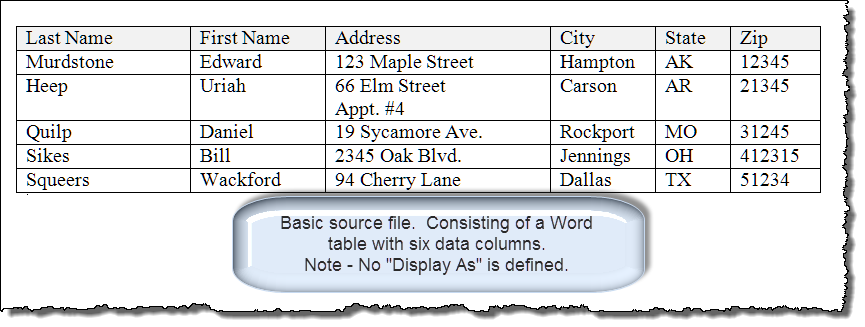
Address book entries can be imported into the active address book from several sources. The following depicts a basic Word document (w\table) used as an import source.
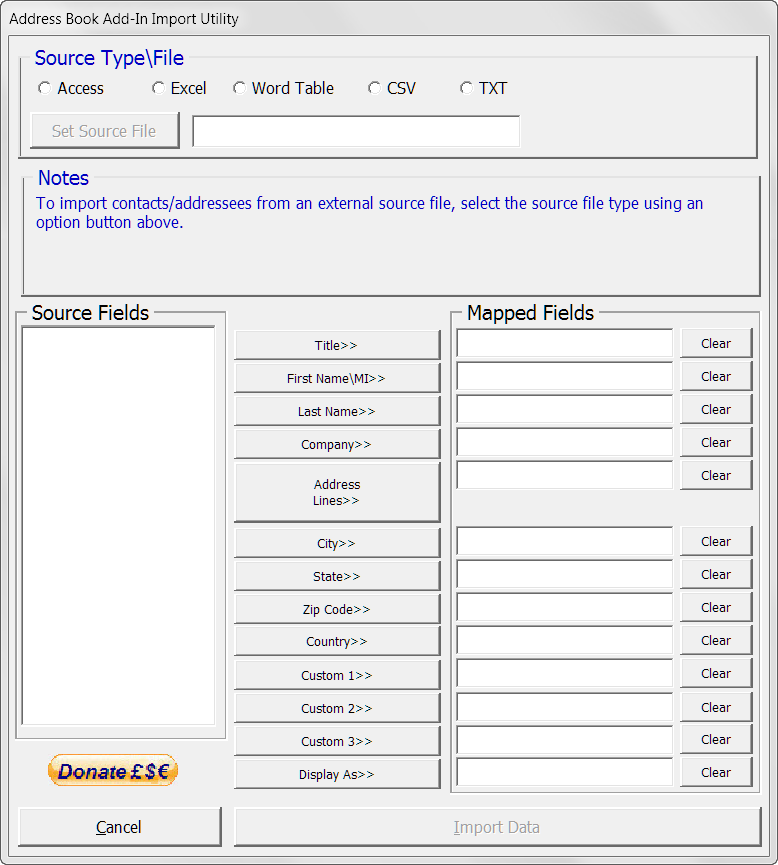
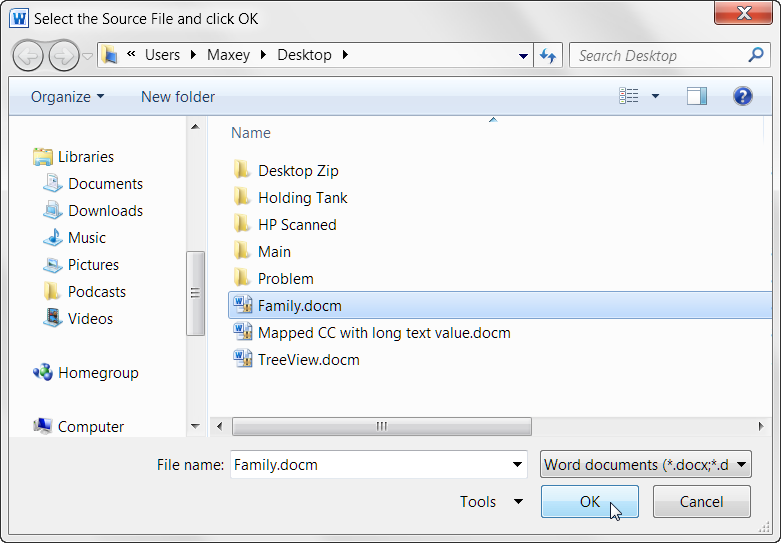
When you execute the "Import" command, the add-in Import Utility form is displayed. Using this form you select the import source, map the source fields to appropriate add-in address book entry fields, and import the data.

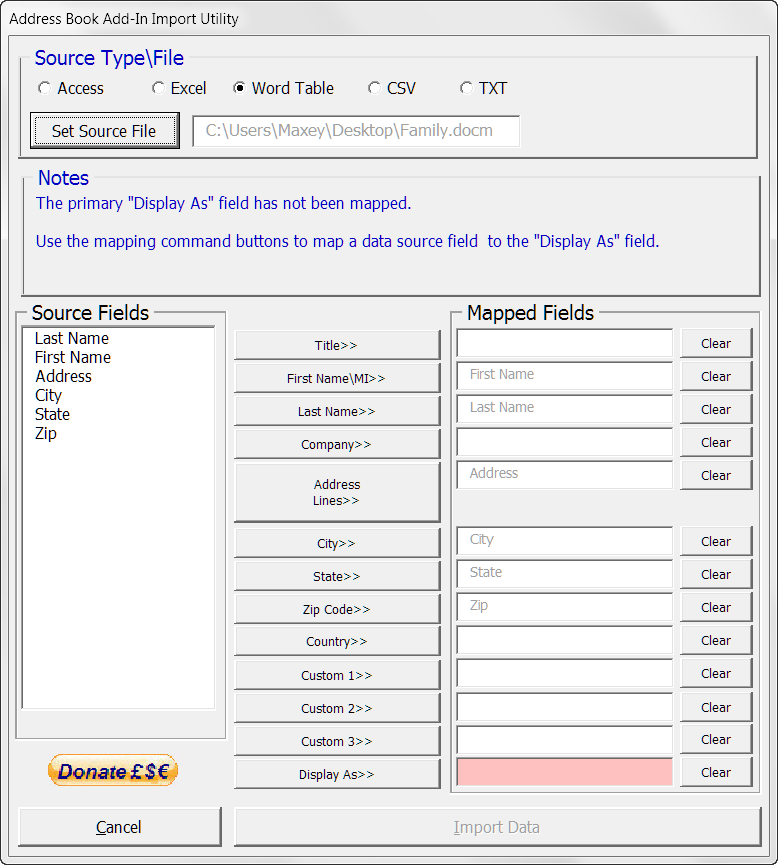
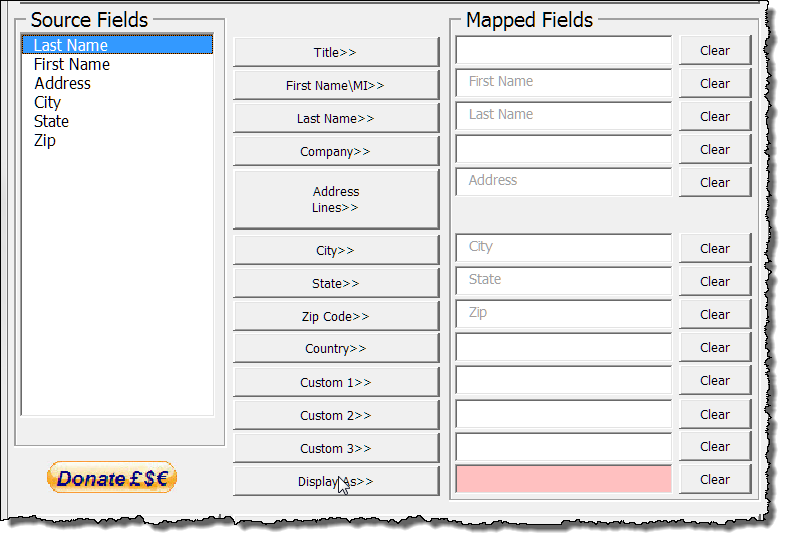
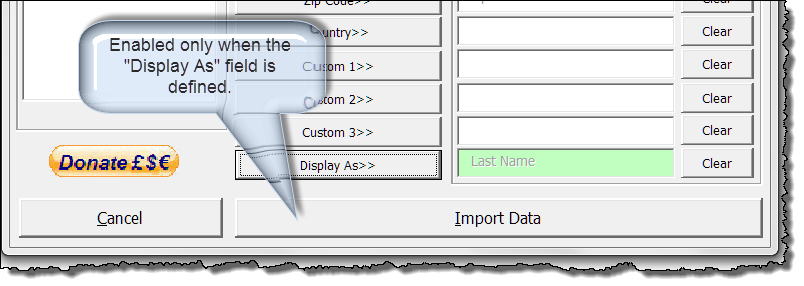
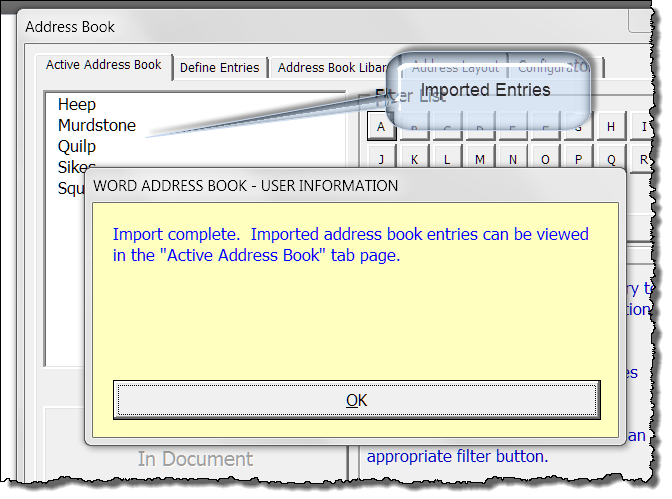
![]() Note: To avoid a sparse listing, as illustrated above, and to ensure the aesthetic look of your address book it is best to define a "Display As" field in your source files.
Note: To avoid a sparse listing, as illustrated above, and to ensure the aesthetic look of your address book it is best to define a "Display As" field in your source files.
Importing using one of the other supported formats is performed in a similar manner.
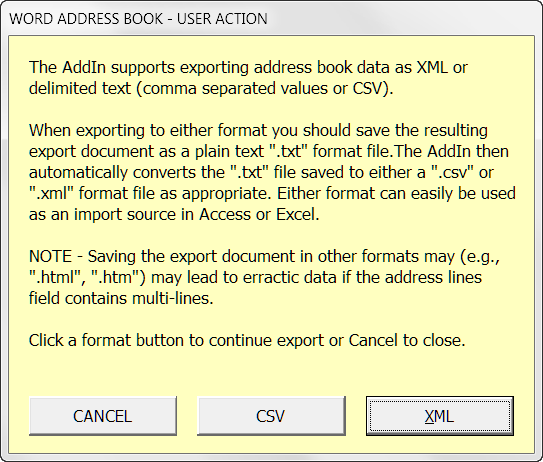
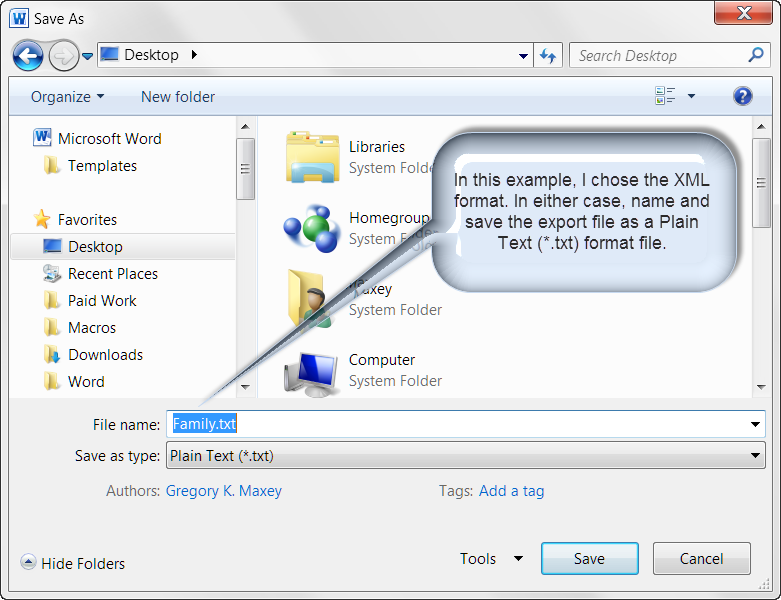
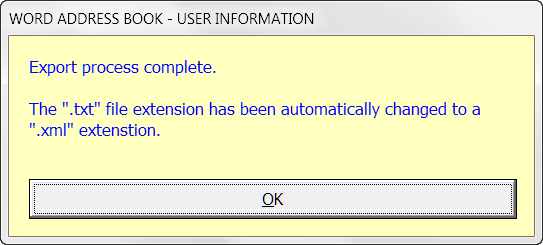
The add-in export utility supports exporting all address books entries in the active address book in one of two formats. Exporting single or selected entries is not supported.
Address book entries can be exported to and XML file or a simple text file as comma separated values (CSV). Both formats can readily be uses as an import source by other application (e.g., Access and Excel).
Executing the "Export" command displays the following dialog. Use the dialog to export to the format of your choice:


Address books (both the default and user defined), can be deleted. However, the add-in requires at least one address book at all times.
Accordingly, to delete the default address book you must first create a user defined address book using a different name. If the default address book has been deleted and you then wish to delete all user defined address books, a new default address book (empty) will be created automatically when the last user defined address book is deleted.
![]() Note: Use care when deleting address books. Unlike deleting individual address book entries which can be restored using UNDO (Ctrl+z), deleting address books is permanent and irrevocable.
Note: Use care when deleting address books. Unlike deleting individual address book entries which can be restored using UNDO (Ctrl+z), deleting address books is permanent and irrevocable.
The Address Layout tab provides tools for defining the look and layout of the address book entries as they will appear inserted in the document. The following depicts the the default US Standard layout with a single business addressee selected in the active address book.
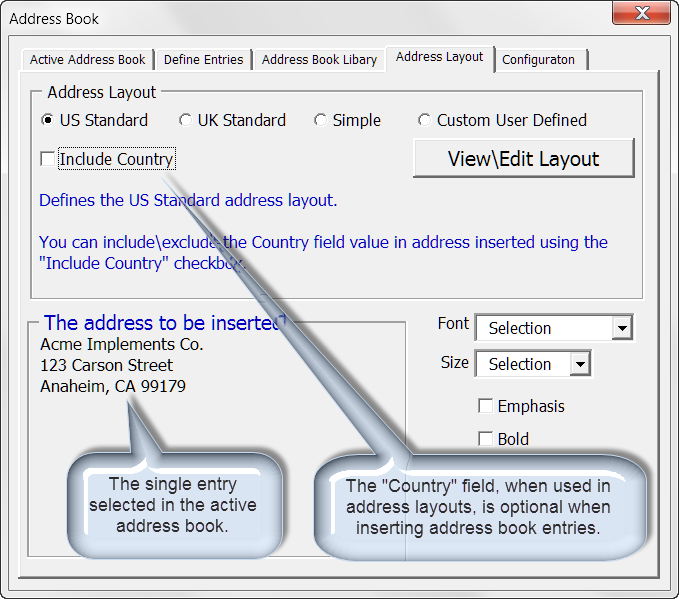
![]() Note: The Address Layout tab is disabled if multiple address entries are selected in the active address book.
Note: The Address Layout tab is disabled if multiple address entries are selected in the active address book.
The standard US Standard layout utilizes the add-in Title, First Name, Last Name, Company, Address Lines, City, State, Zip Code and optional Country fields arranged in the prescribed US postal address layout.
The standard UK Standard layout utilizes the add-in Title, First Name, Last Name, Company, Address Lines, City, County, Post Code and optional Country fields arranged in the prescribed UK postal address layout.
The Simple layout utilizes the add-in Title, First Name, Last Name, Company and Address Line fields only. When using this layout all addressee information other than recipient (name/company), must be defined in the address entry multiple Address Lines field.
The multi-line address field and simple layout is particularly useful for user who correspond with persons in another country with a postal address layout different than the layout prescribed in their home country.
![]() Bonus Tip: Prescribed postal layouts for most countries can be found here: AddressDoctor
Bonus Tip: Prescribed postal layouts for most countries can be found here: AddressDoctor
The Custom User Defined layout is my attempt to make the add-in as versatile and international as possible.
![]() Note: The Custom User Defined layout option is disabled until the user defines a layout.
Note: The Custom User Defined layout option is disabled until the user defines a layout.
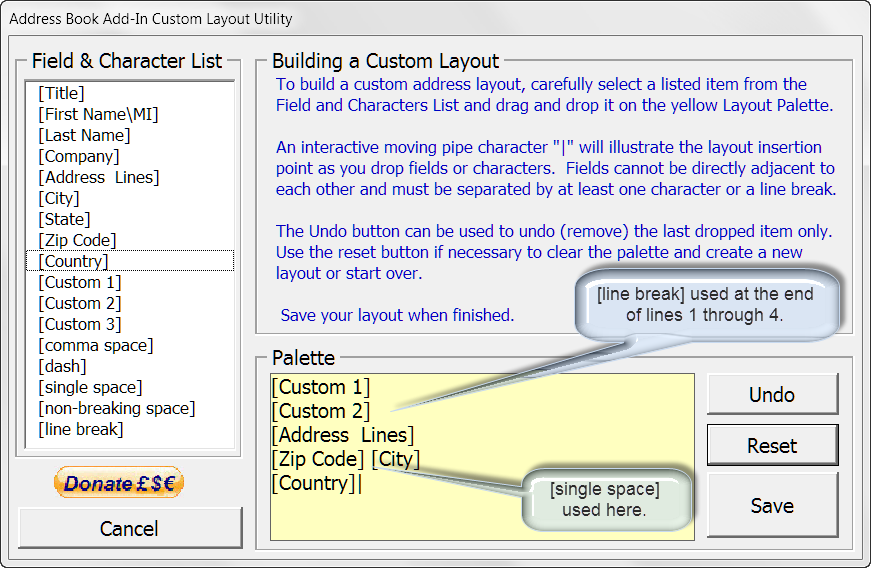
To define a layout, execute the "Create Custom Layout" command. This displays the Custom Layout Utility shown below.
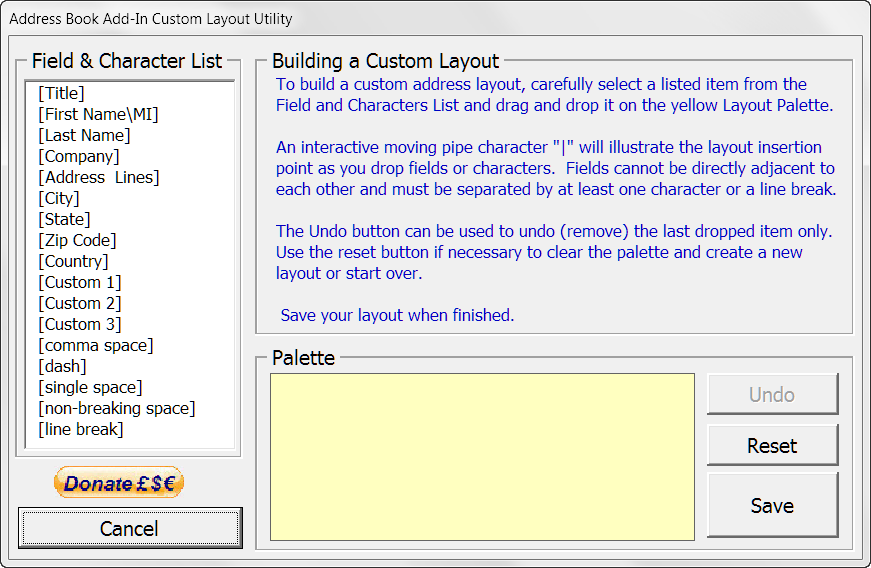
Using the layout utility, select an address book field from the "Fields and Characters" list and then drag and drop it on the pallet. Repeat with appropriate punctuation, space or field until your layout is defined.
![]() Note: Building the custom layout is a simple inline process. Items selected, dragged and dropped are dropped at the end of the layout expression. For example, you can't go back and insert additional space between fields previously droppred.
Note: Building the custom layout is a simple inline process. Items selected, dragged and dropped are dropped at the end of the layout expression. For example, you can't go back and insert additional space between fields previously droppred.
Here I have created a demonstration custom layout ready for saving.
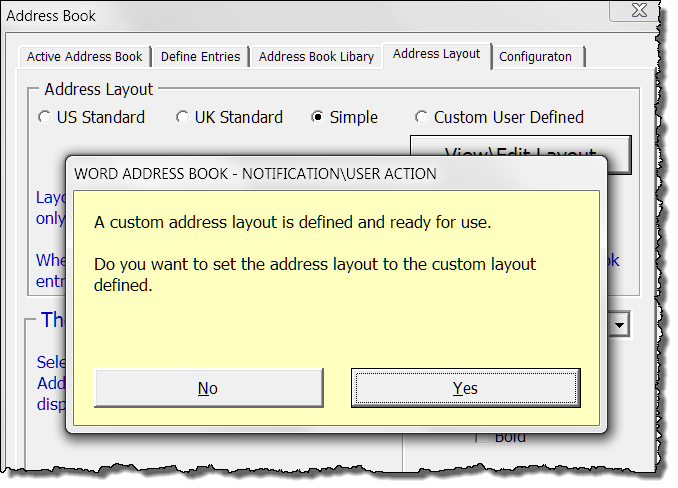
Now lets preview and apply attributes to the address book entry created earlier.
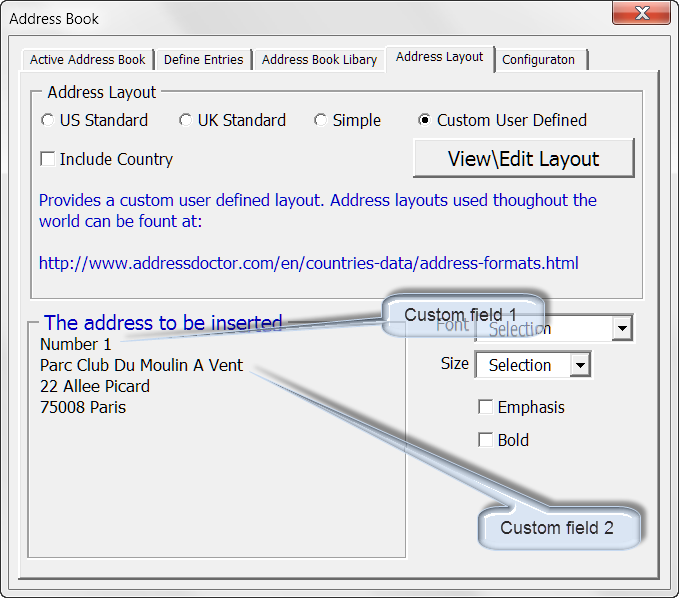
![]() Note: Custom field 2 was used in the example address book entry and custom layout for demonstration purposes only. In practice, the multi-line "Addresss Lines" field could have been used to store both the building name and number/street data for Mr. Blofeld's address.
Note: Custom field 2 was used in the example address book entry and custom layout for demonstration purposes only. In practice, the multi-line "Addresss Lines" field could have been used to store both the building name and number/street data for Mr. Blofeld's address.
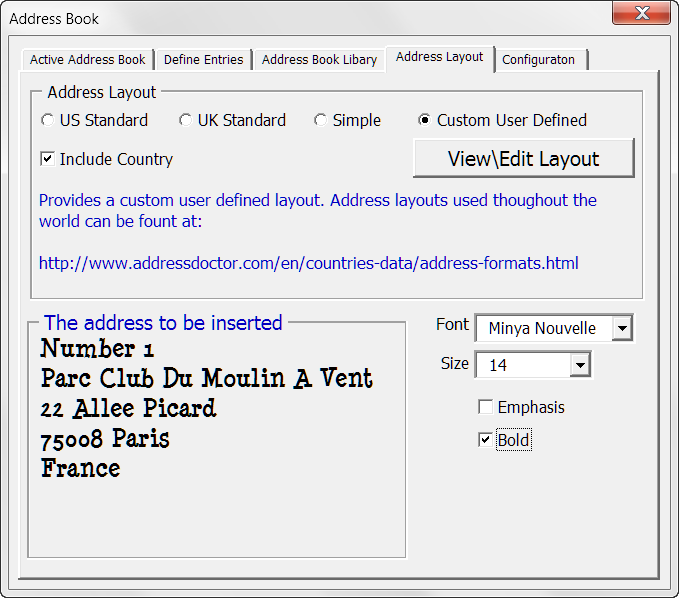
As shown previously, the add-in inserts address book entries with the font attributes applied at the insertion point. Using the font attribute controls on the Address Layout tab, you can customize how the address entry appears in the document.
![]() Notes
Notes
1. The settings on the Address Layout tab are sticky. Once you change or make a setting, that setting remains applied until you change or make other settings.
2. The Emphasis and Bold attribute settings are independent of the font attributes at the selection. If these attributes are left unchecked and the font attribute at the selection is emphasis or bold then those attributes will change to match checkbox settings.
Lastly the Configuration tab. Using the Configuration tab, you can customize the labels used for the address book data fields, review existing configuration settings, reset settings or view the disclaimer.
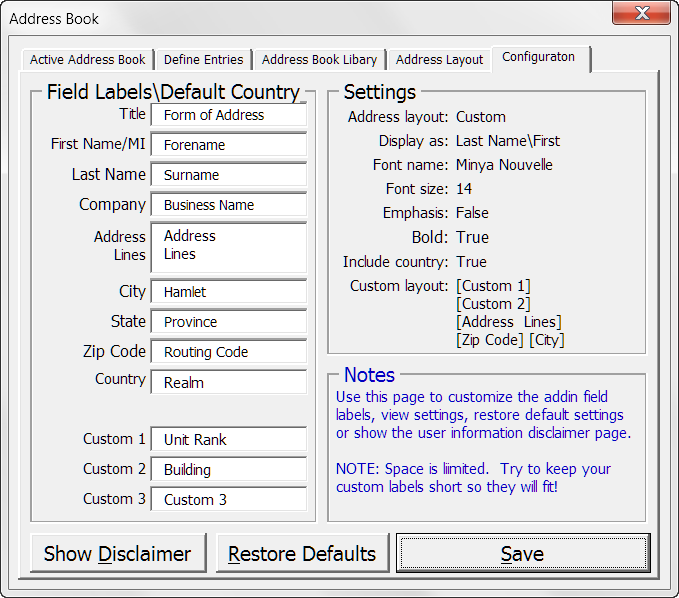
![]() Note: If you have defined a custom layout and then change the field names you will most likely have to redefine the custom layout based on the changed names.
Note: If you have defined a custom layout and then change the field names you will most likely have to redefine the custom layout based on the changed names.
That's it. I hope you find the address book add-in a suitable substitute for the address book you currently use and will make a donation to support my work.
![]() Note: The add-in, illustrations and examples were developed using Word 2010. The add-in is wholly functional with Word 2007, 2010 and 2013. Untested in Word 2016.
Note: The add-in, illustrations and examples were developed using Word 2010. The add-in is wholly functional with Word 2007, 2010 and 2013. Untested in Word 2016.
The information, illustrations and code contained in my "Microsoft Word Tips" are provided free and without risk or obligation.


However, the work is mine. If you use it for commercial purposes or benefit from my efforts through income earned or time saved then a donation, however small, will help to ensure the continued availability of this resource.
If you would like to donate, please use the appropriate donate button to access PayPal. Thank you!