
The Anchorage
Personal website of Gregory K. Maxey, Commander USN (Retired)

The Anchorage
Personal website of Gregory K. Maxey, Commander USN (Retired)
The information, illustrations and code contained in my "Microsoft Word Tips" are provided free and without risk or obligation.


However, the work is mine. If you use it for commercial purposes or benefit from my efforts through income earned or time saved then a donation, however small, will help to ensure the continued availability of this resource.
If you would like to donate, please use the appropriate donate button to access PayPal. Thank you!
Online forms, protected forms, fill-in forms, electronic "e" forms, ... call them what you will; like their predecessor, the printed page with lines, Microsoft Word forms provide a structured and convenient means for the document user to input information.
Word forms using "legacy" form fields have been around since at least Word 97. There is an excellent 5 part series of articles by Dian D. Chapman explaining their design and use beginning here: Please Fill Out This Form.
Microsoft introduced content controls with the release of Word 2007. Content controls continue to evolve and have been steadily expanded and enhanced as each new Office suite version is released.
![]() Note: I have a summary and a steadily growing collection of subject articles on content controls beginning here: Content Controls.
Note: I have a summary and a steadily growing collection of subject articles on content controls beginning here: Content Controls.
While the legacy form fields are still available through Word 2013, and several long standing content control shortcomings remain; in my opinion, content controls stand poised to relegate "legacy" form fields to the dust bin of history.
This Microsoft Word Help & Tips page will show you how to create a functional content control form "similar" to the insurance application form example that Dian uses in part 2 of her legacy form series.
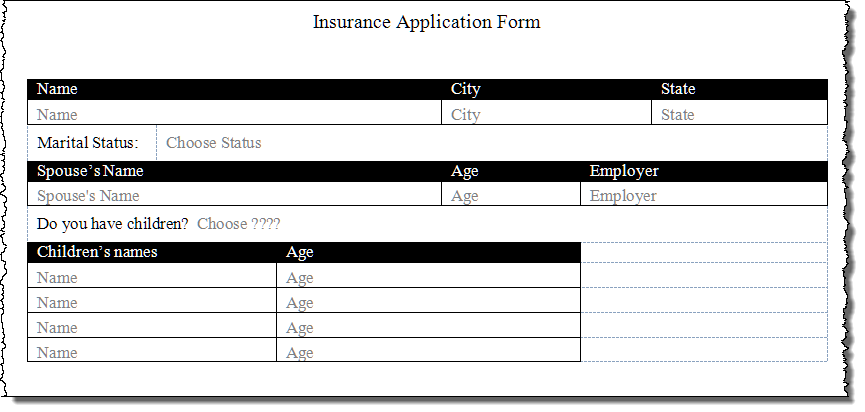
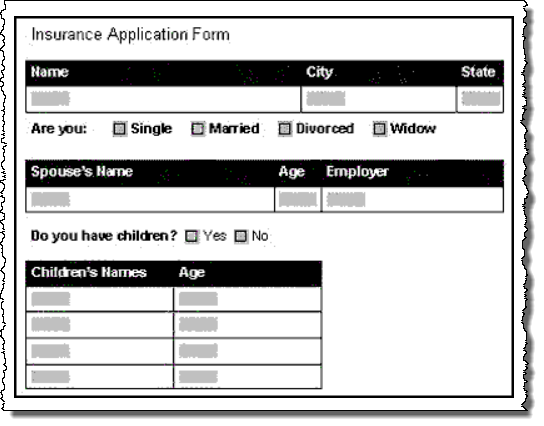
In the following illustrations and steps, I will explain how you can create and employ a basic form, and some advanced tips to convert the basic form into the functional content control form shown above. As the discussion develops, I will attempt to explain some advantages and disadvantages of forms in general and in using content controls in place of "legacy" form fields in particular.
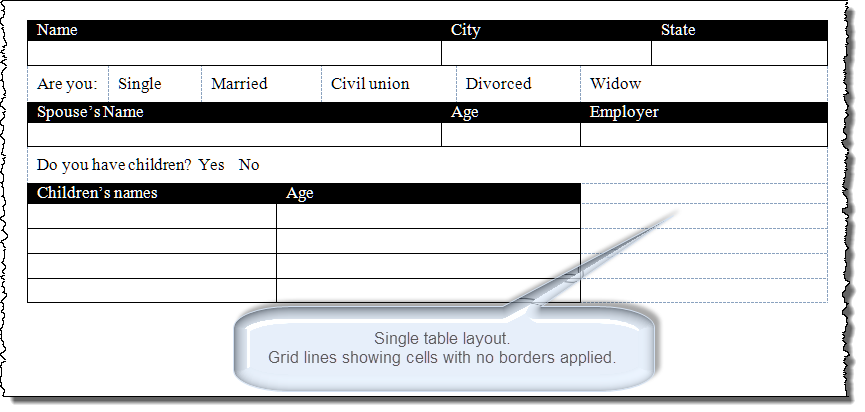
While content controls can be inserted directly into a document, it is easier to fix their location and create a professional look by incorporating a table in your form design. As with the legacy form in Dian's example, I'm using a single table to define the form layout.
![]() Note: In the basic form, I'm going to faithfully duplicate the layout and data entry methods used in the legacy form.
Note: In the basic form, I'm going to faithfully duplicate the layout and data entry methods used in the legacy form.
The built-in user interface for content controls is found in the Controls group in the ribbon Developer tab.
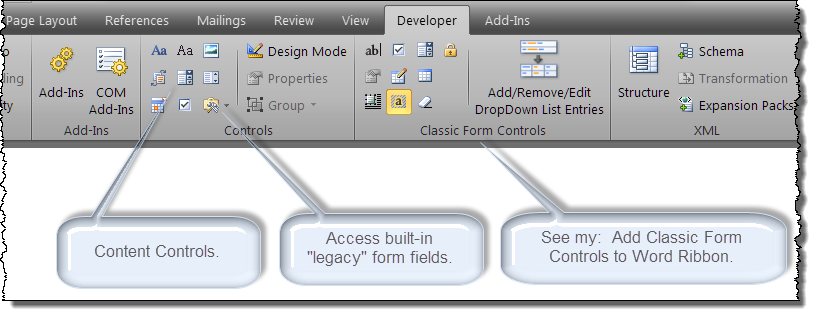
![]() Note: Word 2007 users, if your developer tab is not displayed, click the Office Menu>Word Options>Popular and check "Show Developer tab in the Ribbon. For Word 2010/2013 users, right click anywhere in the ribbon, select "Customize the Ribbon," in the right hand panel, check "Developer."
Note: Word 2007 users, if your developer tab is not displayed, click the Office Menu>Word Options>Popular and check "Show Developer tab in the Ribbon. For Word 2010/2013 users, right click anywhere in the ribbon, select "Customize the Ribbon," in the right hand panel, check "Developer."
Add content controls to the form as follows:
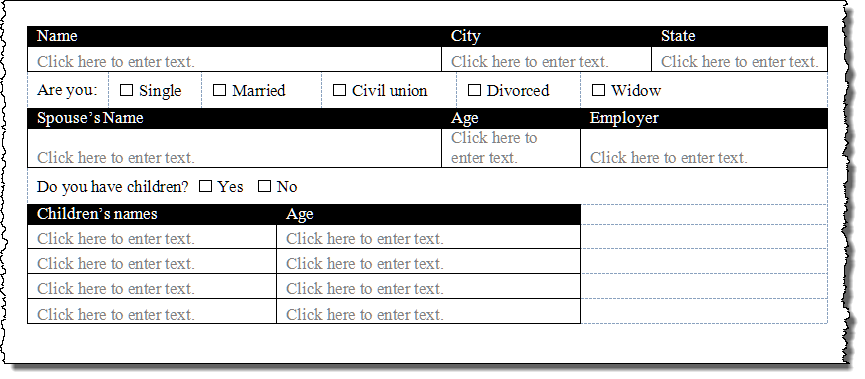
As with any form, a Word content control form is supposed to maintain "form." You want the form user to input information is the spaces provided, and not be able to alter other content or your form layout.
There are a couple of ways that you can do this with content control forms. Unfortunately, as with legacy forms, there is no perfect, ideal method and each has its advantages and disadvantages.
For our basic form, I will use traditional document editing restrictions — Filling in forms. This method is already familiar to users moving from legacy forms and it offers, the albeit practically useless, password protection. I'll demonstrate the other methods and explain "albeit practically useless" later in the discussion.
To apply editing restrictions to the form, click Developer>Protect>Restrict Editing. In the Restrict Formatting and Editing pane that appears, apply protection for Filling in forms and then start enforcing protection.
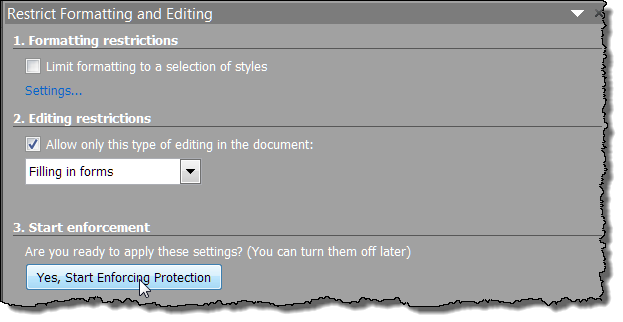
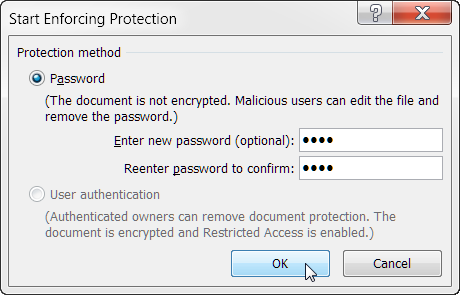
The basic form is ready to use. The user tabs/clicks his or her way through the form filling in the information requested.
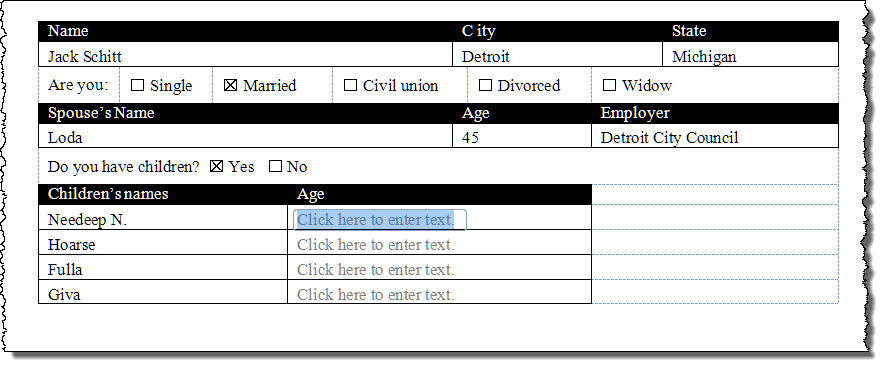
If a simple form like the one demonstrated above is all that you are after, then you don't need to read on.
If a simple form like the one demonstrated is all content control forms can offer, then I wouldn't bother writing on. I've not shown you anything, yet, that you can't do with legacy form fields! In fact, a content control form developed to the point demonstrated has several nagging shortcomings, and one serious design flaw.
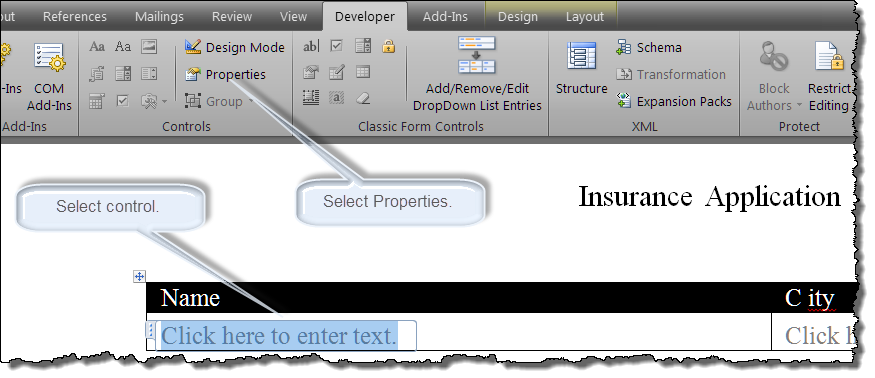
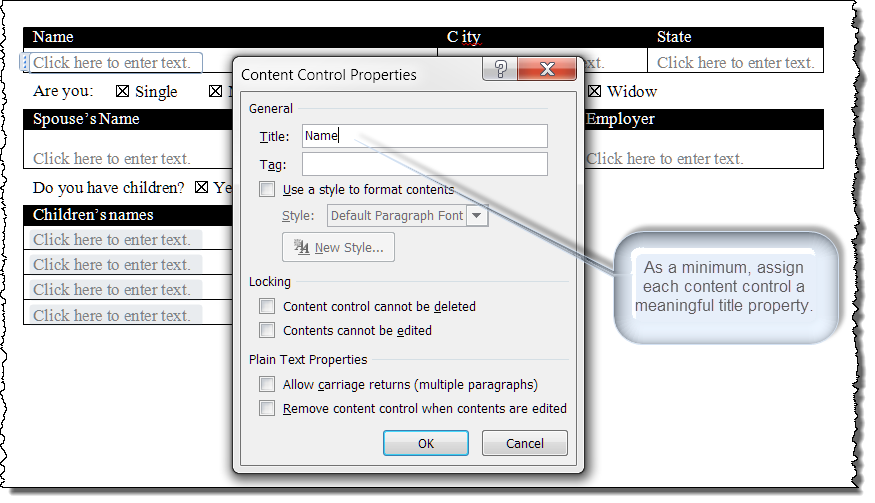
There are several basic steps that you can take to improve and add functionality to the basic form. The first thing you should do when employing content controls in forms, or for any other purpose, is define and set properties. To define set properties for an individual content control, perform the following:
For the functional form, I'm going to replace the checkbox controls in the basic form with dropdown list controls. I am doing this for two reasons:
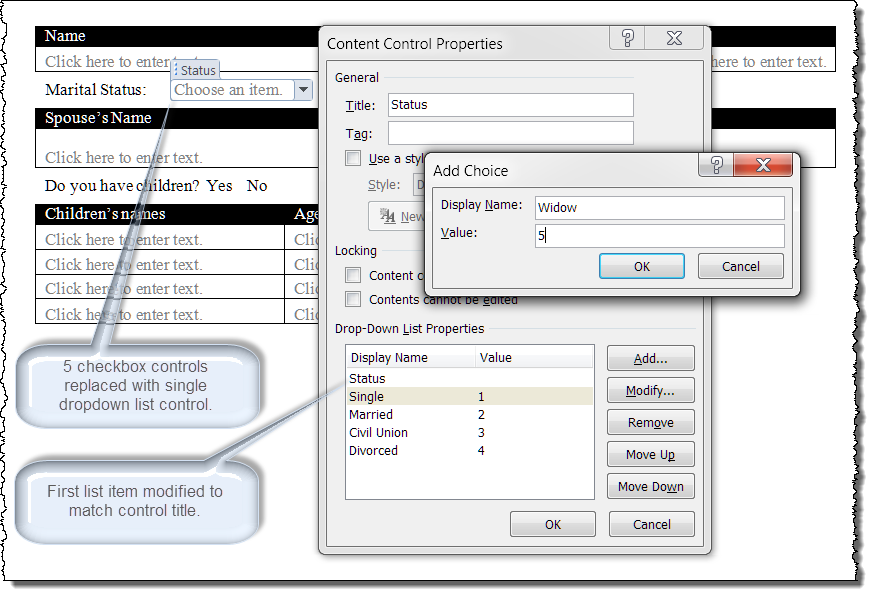
![]() Bonus Tip: When defining dropdown list and combobox list properties. The "Display Name" defines the text displayed in the physical control in the document. The "Value" defines the information stored in an XML data node when content controls are mapped to a document CustomXMLPart. In a general purpose form, the value assigned can be left blank or it remain the default duplicate of the the display name.
Bonus Tip: When defining dropdown list and combobox list properties. The "Display Name" defines the text displayed in the physical control in the document. The "Value" defines the information stored in an XML data node when content controls are mapped to a document CustomXMLPart. In a general purpose form, the value assigned can be left blank or it remain the default duplicate of the the display name.
The default placeholder text can be changed using the control design mode. For the functional form, I'm going to define the placeholder text to match the control title.
![]() Note: Content control placeholder text can be a fickle beast. For more on peculiarities with placeholder text, see: 5 Curiosities about Placeholders in Word Content Controls.
Note: Content control placeholder text can be a fickle beast. For more on peculiarities with placeholder text, see: 5 Curiosities about Placeholders in Word Content Controls.
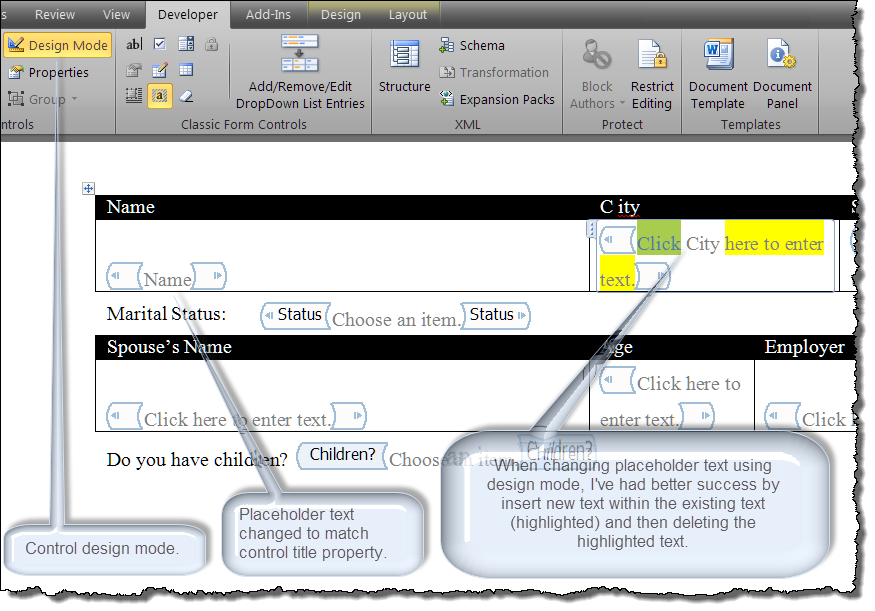
Obviously modifying placeholder text in more than a few controls can become laborious. If you care to use it, the process can be greatly simplified and speeded up using a simple VBA procedure.
Sub SetSimplePlaceholderText()
Dim oCC As ContentControl
Dim strText As String
  For Each oCC In ActiveDocument.ContentControls
    Select Case oCC.Type
    Case 0, 1
      'Rich text and plain text controls
      strText = oCC.Title
      If strText <> "" Then
        oCC.SetPlaceholderText , , strText
      End If
    Case 3, 4
      'Combobox and dropdown list controls
      strText = oCC.DropdownListEntries(1).Text
      If strText <> "" Then
        oCC.SetPlaceholderText , , "Choose " & strText
      End If
    Case 6
      'Date controls
      strText = oCC.Title
      If strText <> "" Then
        oCC.SetPlaceholderText , , "Set " & strText
      End If
    End Select
  Next oCC
lbl_Exit:
  Exit Sub
End Sub
![]() See: Installing Macros for instructions on how to set up and use the macros provided in this Microsoft Word Help & Microsoft Word Tips page.
See: Installing Macros for instructions on how to set up and use the macros provided in this Microsoft Word Help & Microsoft Word Tips page.
If you use the VBA procedure or just study the process, you will understand the value of applying properties to your form content controls!!
At this point we have completely defined the functional form in the first illustration.
Remaining are the issues with the continuous loop tab and the placeholder text in uncompleted content controls. The first, while a nuisance, is minor and inconsequential. The latter is significantly more problematic. Both are covered in greater detail and can be overcome using VBA procedures. See: Content Control Grouping and Navigation and Content Control - Do Not Print Placeholder Text.
For many form designers, avoiding VBA procedures and the related security issues are a primary concern. If this is your case, then the content control placeholder text issue may be insurmountable. The only remaining viable option, that I know of, is to simply set the placeholder text to to nothing and let the form design itself serve as the visual cue for data entry fields.
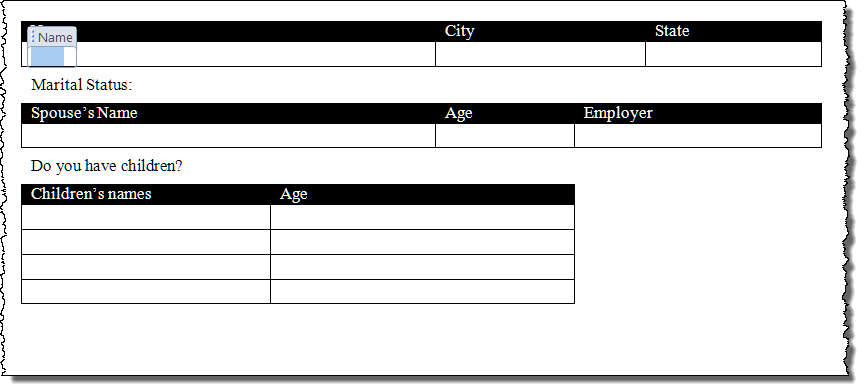
By applying the techniques described above, I feel that form designers can create a content control form that equals in nearly every case what legacy form designers can produce. Still, there has to be something else to make the effort worthwhile.
Let's face it. Legacy forms are pretty drab and their inherent protection requirement disables a large part of Word's formatting and editing capabilities. For years, users of legacy forms have bemoaned the stick drawing appearance of the checkbox, the 25 item limit in dropdown fields, and all the great Word features that are turned off when the editing restriction/protection is applied.
Content control forms offer a solution to most of these long standing complaints.
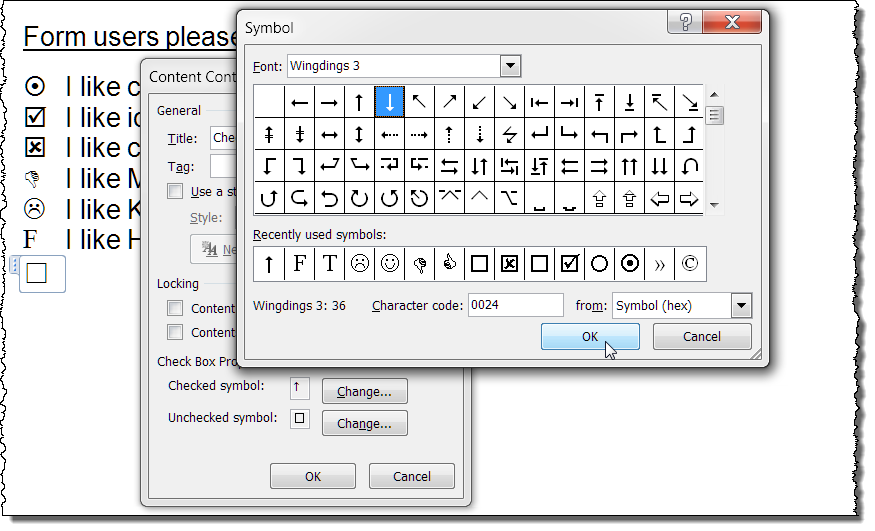
The checkbox content control introduced with Word 2010 can be formatted to display practically any combination of pairs to represent the true/false state of the condition.

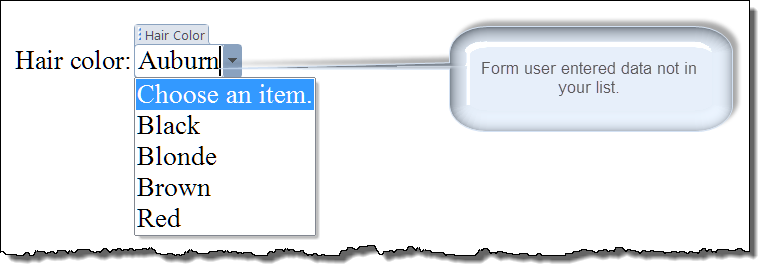
Content control forms, in a addition to dropdown list fields, can employ the combobox content control. This allows the user to select from your defined list or add their own custom input.
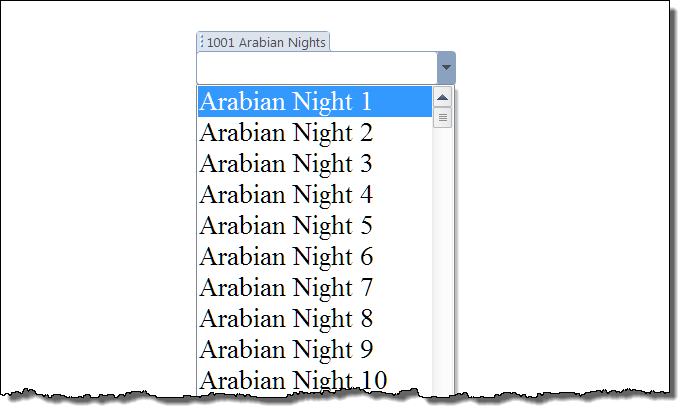
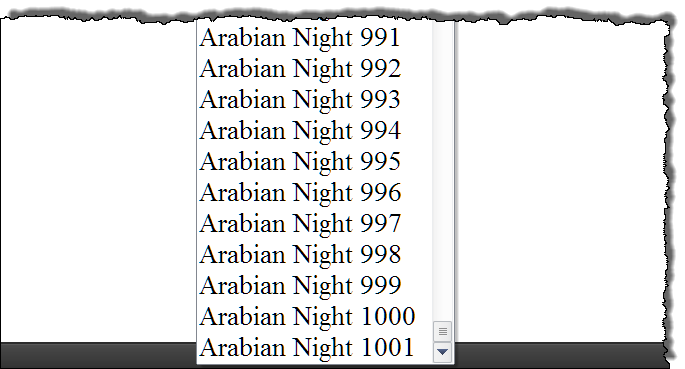
I am not aware of the physical limit, but both content control combobox and dropdown list controls certainly overcome the 25 item limit in legacy dropdown field lists. A Thousand and One Arabian Nights is no problem at all!!
Earlier in this demonstration and discussion, I elected to use traditional editing restrictions to prevent form users from altering my form design and layout. With that decision, and as is inevitable with any legacy form, I conceded to lose most of Word's enhanced text editing and formatting features.
Alternate methods to protect your form design and layout, while some may be seemingly less robust, are available. All of the alternatives however, preserve and keep enabled many Word features that are disabled when traditional legacy editing restrictions are used and resolve the tabbing between checkbox issue.
The first, and simplest, is to select the entire form and apply a group control.
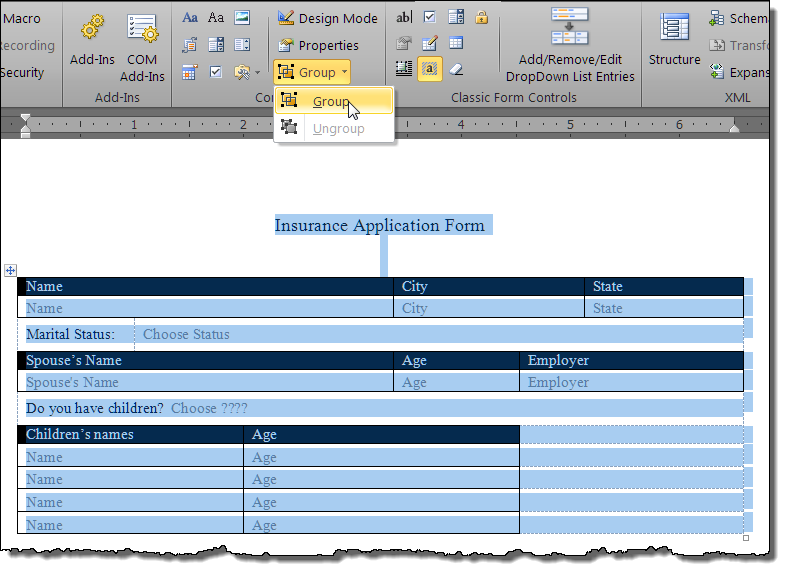
When content is grouped as shown above, the free text and objects bound by the group cannot be edited or formatted. Content within the boundaries of the individually grouped controls are unrestricted. The form appears to have traditional editing restrictions applied, but a whole host of Word features are still very much alive to the form user.

The second, slightly more involved method, is to select the entire form content, apply a rich text content control and set the properties of the control to restrict editing. As with the grouping method, the form appears to have traditional editing restrictions applied.
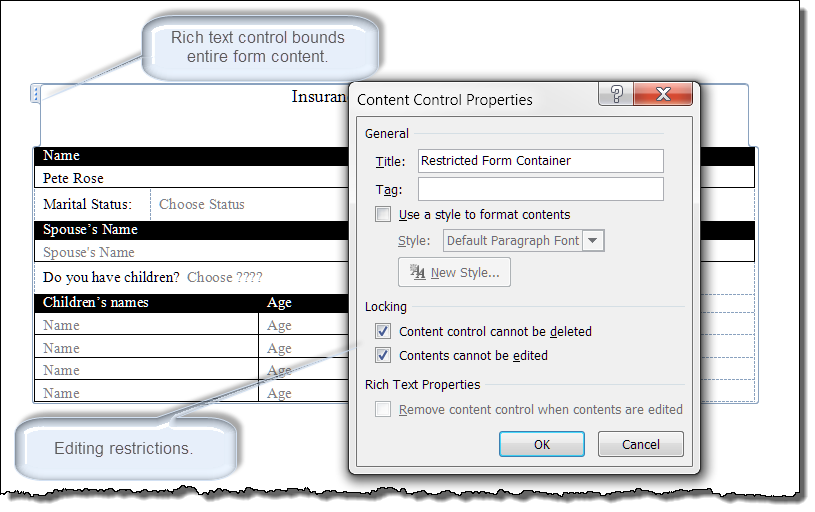
There are some disadvantages using either of these methods.
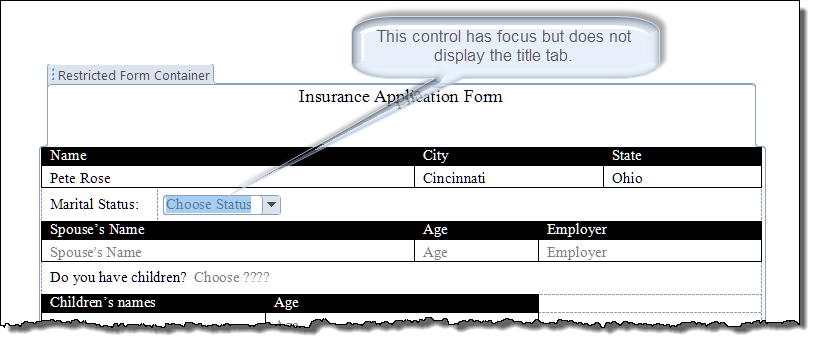
In my opinion, neither of these disadvantages outweigh their simplicity and the tremendous advantage of having such a broad range of Word features restored for your form users!
![]() Note: When you select the control, selecte just the "Content" NOT the control tab. Otherwise users could inadvertently delete the control.
Note: When you select the control, selecte just the "Content" NOT the control tab. Otherwise users could inadvertently delete the control.
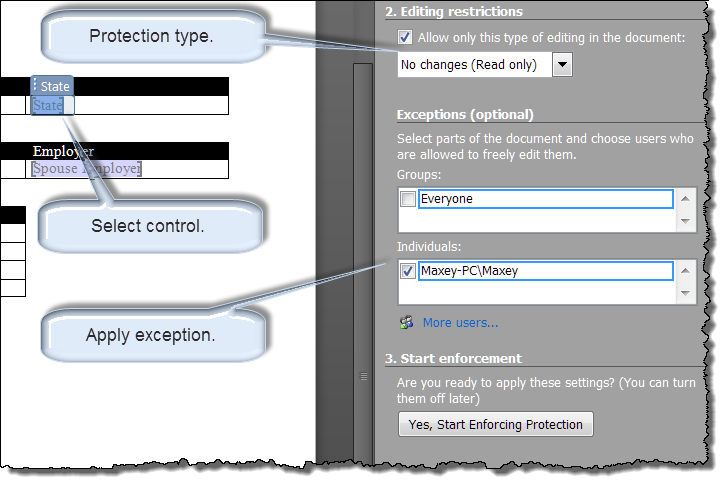
Sub SetEditableRegions()
'This procedures makes every CC in the main text
'area of a document an 'editable" region in
'documents with read only restricted editing applied.
Dim oCC As ContentControl
  For Each oCC In ActiveDocument.ContentControls
    oCC.Range.Editors.Add wdEditorCurrent
  Next oCC
End Sub
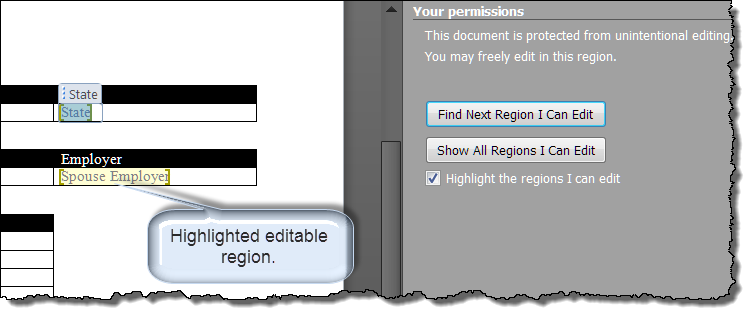
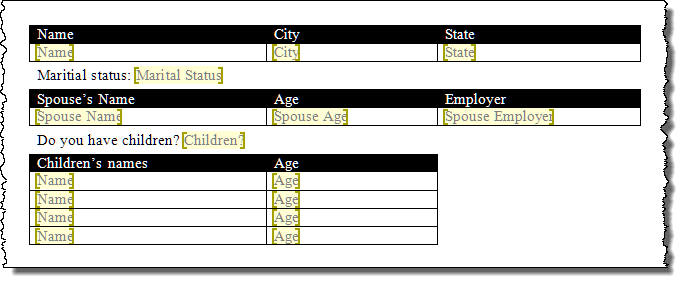
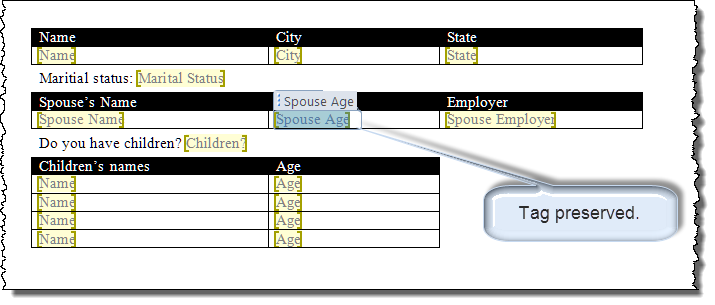
I'm pretty excited about this method. With the exception of the short delay mentioned above, it seems to perform well and hopefully with additional testing, I can confirm and recommend it as the best method.
The security offered by applying a password to traditional editing restrictions only protects you from the bumbling form user who may inadvertently remove groupings or the rich text control editing properties, or the malicious user who knows or discovers how to remove groupings and rich text editing properties.
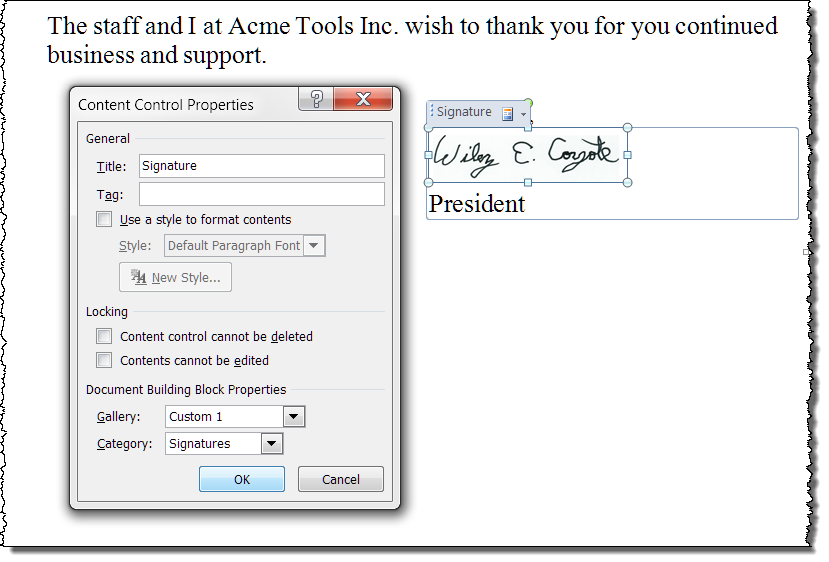
If you are still here and "all in" with the idea of shelving traditional restrict editing — Filling in forms, then there are a few more content control form capabilities that you can explore and use:

Preparing this tips page has been fun, but it has become longer than I envisioned and it is time to wrap it up.
Content controls certainly have a place in modern Word forms.
Their single overriding and completely insurmountable shortcoming is no backward compatibility. They simply don't work in Word versions before Word 2007. However, their advantages moving forward are certainly great!!
I've barely touched on their wizardry when used with data mapping or when VBA procedures are included in the built-in document content control on entry and on exit events.
Again, for a summary and complete listing of my tips on these applications and others related to content controls see: Content Controls.
So that's it! I hope you have found this tips page useful and informative.
The information, illustrations and code contained in my "Microsoft Word Tips" are provided free and without risk or obligation.


However, the work is mine. If you use it for commercial purposes or benefit from my efforts through income earned or time saved then a donation, however small, will help to ensure the continued availability of this resource.
If you would like to donate, please use the appropriate donate button to access PayPal. Thank you!