
The Anchorage
Personal website of Gregory K. Maxey, Commander USN (Retired)
The Anchorage
Personal website of Gregory K. Maxey, Commander USN (Retired)
The information, illustrations and code contained in my "Microsoft Word Tips" are provided free and without risk or obligation.

However, the work is mine. If you use it for commercial purposes or benefit from my efforts through income earned or time saved then a donation, however small, will help to ensure the continued availability of this resource.
If you would like to donate, please use the appropriate donate button to access PayPal. Thank you!
This Microsoft Word Tips & Microsoft Word Help page provides detailed instructions for use of my "Enhanced Merge (Merge Many to One) Utility Add-In."
Word's native letter type mail merge is strictly "One to One" (i.e., one data source record = one merge output). Mail merge is not my forte and the concept of a "Merge Many to One" process (i.e., merging multiple [one or more] data source records to a merge output) certainly didn't originate with me.
For the last dozen years or so years, two friends and Word MVP's Doug Robbins and Graham Mayor have published and maintained template add-ins for expanding Word's native mail merge capabilities (including Merge Many to One processes). Doug's Merge Tools is available at Doug Merge Tool and Graham Mayor's at Graham Merge Tool.
Both of these tools work remarkably well. My intention is not to compete with or try to out do Doug or Graham. I entered this arena because of my interest in content controls and with a goal to provide a utility that breaks completely any connection with Word's Mailings tab.
I have long felt that content controls were well suited to fill the role of legacy merge fields and by using a custom dialog which establishes an ADODB connection with the data source, I have eliminated the annoying "baggage" tied to establishing a data source via the ribbon Mailings tab.
It is very unlikely that I would have ever undertaken this project absent the foregoing work of Doug and Graham. Several processes performed behind the scenes are a direct result of some of Doug's work or a collaborative effort with Graham.
Additionally, Eric Delp has collaborated with the progress bar; the date picker used in the mail item transfer dialog, while extensively modified, originated with Trevor Eyre, Ron de Bruin's website provided a portal to countless articles on Outlook development and Graham Mayor and Jay Freedman's sharp eyes have caught many spelling and grammar errors.
Tips Page Graphics
I used Word 2010 while
developing the example merge processes and graphics in this tips page. Most
reflect the initial add-in version 1.0 in the dialog captions. When
updating the add-in version and this tips page, those graphics will not be
updated unless changed.
The add-in performs a pseudo Word Mail Merge "letter" process simplified and enhanced through the use of content controls and external data arranged in "record sets." In addition to one to one merge processes, the record set arrangement and processing instructions within the add-in allow multiple external data records "Many" to be combined to create a single merge output "One" for each record set.
The email features of the add-in require that Microsoft Outlook is installed and set as the default mail application.
Where the open source PDF Creator application is installed, additional options to use PDF Creator are available for both
Merge Many to One and Merge One to One. PDF Creator provides options to add security measures to the merged PDF files not available with Word's built-in process.
While some users may wish to simply dive right in, the
processes and facilities of this add-in are complex.
I encourage you to
read this tips page in its entirety before downloading and attempting to use the
add-in. As a minimum, you should read and understand these data source
concepts/requirements and the merge template requirements below.
I am
available to provide fee based personal assistance employing the add-in.
That fee applies even if that assistance is simply showing you what you should
have already read.
Before presenting the actual use of the add-in, it is essential that you understand the concepts of "record sets," "key field," "child fields"
and "list field"
as used with the add-in and the configuration and layout of
the external data source (Access or Excel) which you associate with your merge template.
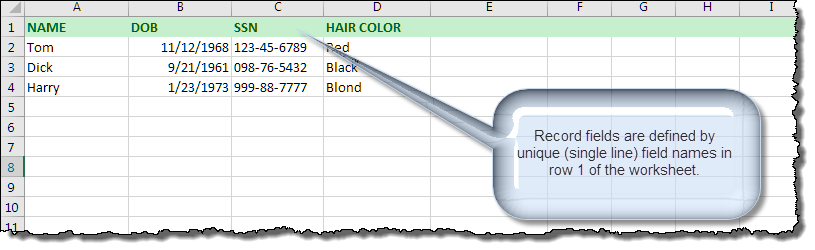
The data source can be an Excel worksheet or named range, or an Access table or query.
If using an Excel data source, row 1 must define unique data field names. The field names must be defined in a single line (multi-line field names are not permitted and will invalidate the data source with the add-in).
Excel Named Ranges
When an Excel
Named Range is set as the data source, the named range must include a duplicate
of the parent sheet first row (i.e., the column headings) as the first row of
the named range.
Likewise if using Access, the field names are defined as unique column headings in the table or query.
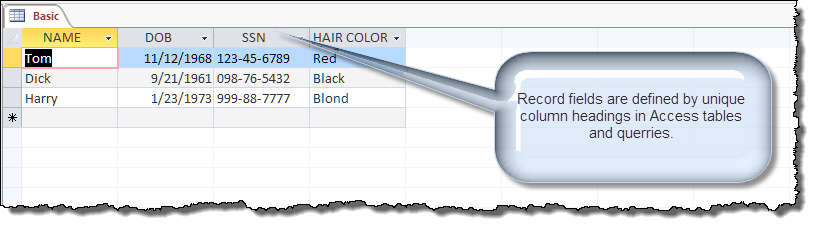
![]() Note: Use whichever data source (Access or Excel) you prefer. However since with Access you can't duplicate field names or have multi-line field names,
you might find Access easier to use.
Note: Use whichever data source (Access or Excel) you prefer. However since with Access you can't duplicate field names or have multi-line field names,
you might find Access easier to use.
The two data sources shown above have certain common attributes related to the add-in:
The following depicts the simple Excel data source shown above revised and configured for a "Merge Many to One" process. Note the two added columns (OCCUPATIONS and CHILDREN NAMES).

The data source shown above has certain attributes related to the add-in:
As used with Enhanced Merge (Merge Many to One), a record set is all of the data source records in a continuous unbroken sequence of records defined by the same unique "key" field value. A record set can have one record as with the first Excel example. Three or four as with the example above, or any different number of records.
As used with Enhanced Merge (Merge Many to One), a "key" field is that field assigned by the user which defines the record sets. Any non-child field can be defined as the key field. However, for best results the key field you define should be that field containing unique data not expected to be duplicated in multiple records sets. E.g., "HAIR COLOR" could be defined and would work as the "key" field for processing the small data sample above. However, in a larger data base it is highly likely that Red, Black or Blond would be repeated with other named individuals therefore making "HAIR COLOR" a very poor choice. If you are following along, you should see that "NAME" is a better choice and "SSN" even better.
Each record field in the defined "key" field must be filled in.
This is very important as any break or change in the key field value is used to
terminate the current merge output and initiate the next merge output.
As used with Enhanced Merge (Merge Many to One), "child" fields are those fields in the data source that define a variable number of values to a named attribute of the key field e.g., "OCCUPATIONS" (i.e., all the jobs the "NAME" person has had), and "CHILDREN NAMES" (the name of each "NAME" person's children).
Record fields in child fields may be blank (e.g., the three blank fields in the Wackford L. Squeers record set). However, the blanks must be at the end of the set.
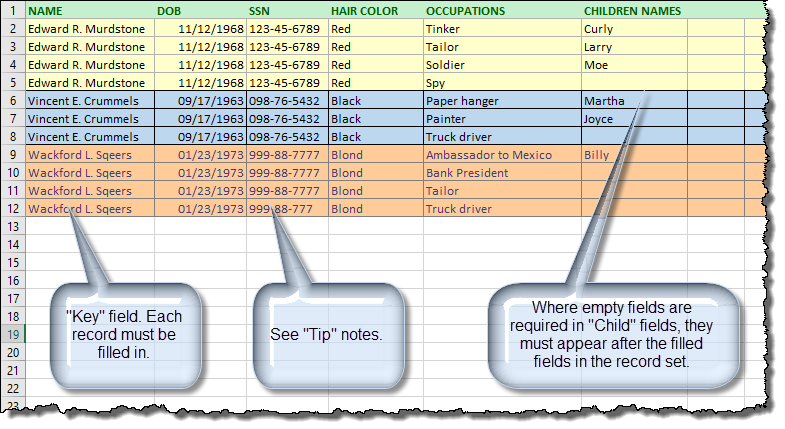
As depicted in the above graphic, the key field must be filled in for all records. During processing, it is the "change" in key field value (e.g., a change from Edward R. Murdstone to Vincent E. Crummels) that triggers the creations of a new merge output.
Obviously all named persons in your data base won't have the same number of children or the same number of current and previous occupations. Therefore empty record child fields are permitted out of necessity.
All other fields (non-key/non-child) should be completely filled in!
Fill-in is mandatory for any non-key/non-child field that you may wish to define as an
email recipient field, email subject field or filename field.
If this requirement/recommendation appears pointless or confusing,
consider a case where an advanced user wants to filter data and merge only records where the OCCUPATIONS field = "Tailor." In this case, two records would be returned. If those records didn't include the data for DOB, SSN and HAIR COLOR then the merge result would be missing that data!
The list field is a single unique field that you can define and populate in your database to associate with a single unique content control in the merge template. A list field provides an "independent list" that can be used to create highly customized content for closings, signature fields, etc.
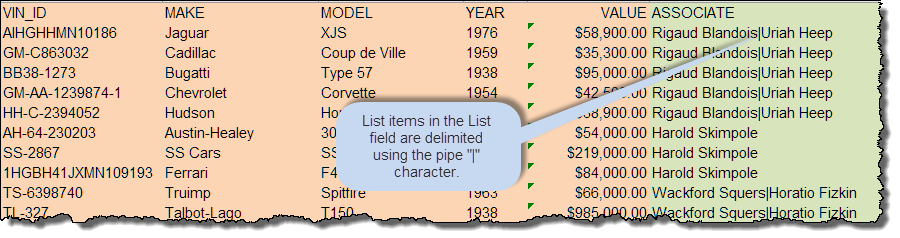
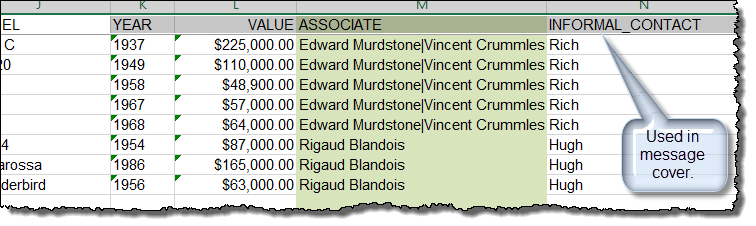
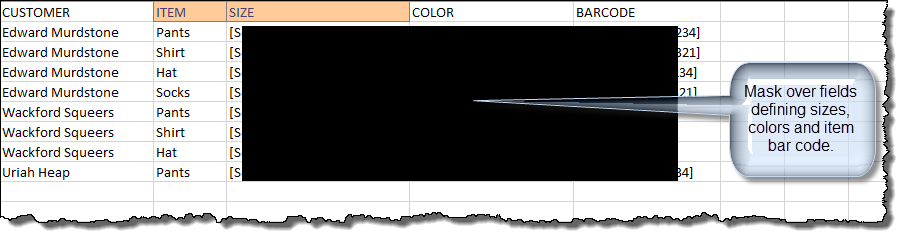
The database examples depicted above contain no list field. Going forward we will use a larger example database. A snippet of this database is shown below.

In our larger database, the key field "OWNER" is shown in pale blue, the child fields are shown in salmon and the list field is shown in olive green. Individual list field elements defined in the database must be delimited using the pipe "|" character.
Now that you are familiar with the data source requirements, let's turn to the merge template.
The merge template fills the role of a mail merge main document in a traditional Word mail merge process. The merge template uses content controls in place of merge fields as data field identifiers. It can be any Word .docx, .docm, .dotx or .dotm format file, but it cannot be a mail merge main document.
Note: Each data source field you include in the document
must be a "content control" type field inserted
using the Control group on the Ribbon Developer tab. If not showing, you
can enable the Ribbon Developer tab by selecting File>Options>Customize Ribbon
and checking the "Developer" tab to show in the ribbon.
The add-in Merge Template Tools - Convert Mail Merge Fields provides a basic utility for converting mail merge letter type main documents and associated merge fields into a merge template compatible with the add-in.
Note - It does not convert "Address Block" merge fields or conditional merge fields.
The add-in does support conditional If fields using content controls. A
complete discussion and examples are included in the add-in download package at
the conclusion of this tips page.
The following illustrates a merge template configured for a Merge Many to
One process
using the example data source shown above:
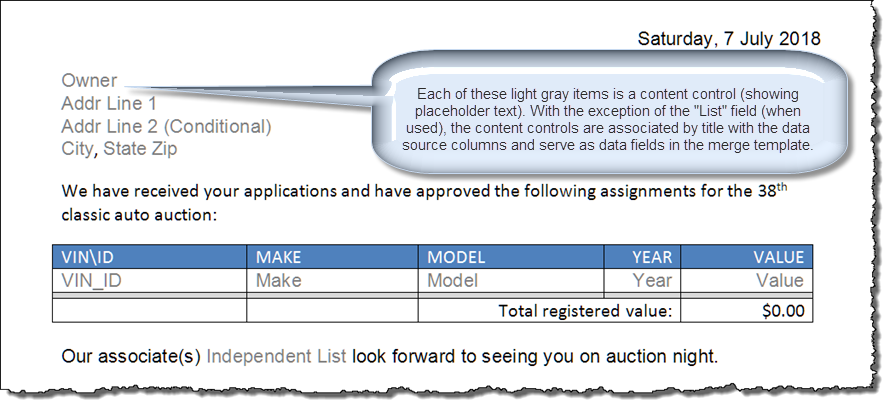
Eleven of the twelve content controls shown above are associated with the data sources by setting each content control's Title property equal to the corresponding column's heading.

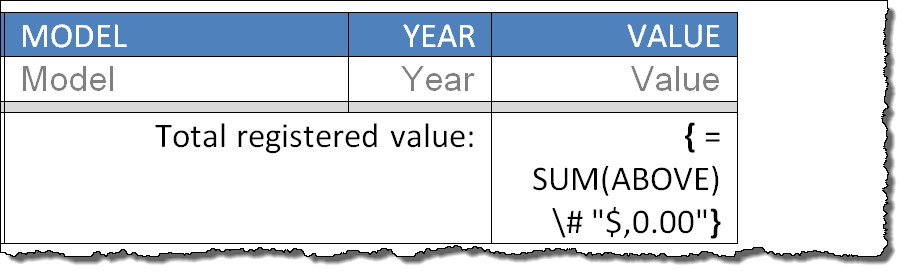
The column total is calculated using a traditional formula field.
The twelfth content control showing the placeholder text ("Independent List") is used to display the independent list. It is associated with the user defined data source list field by setting its Tag property to "Independent List".

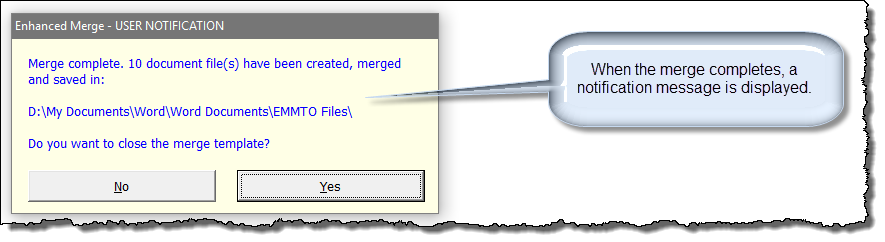
The following depicts a Merge Many to One output using the data source and merge template shown above:
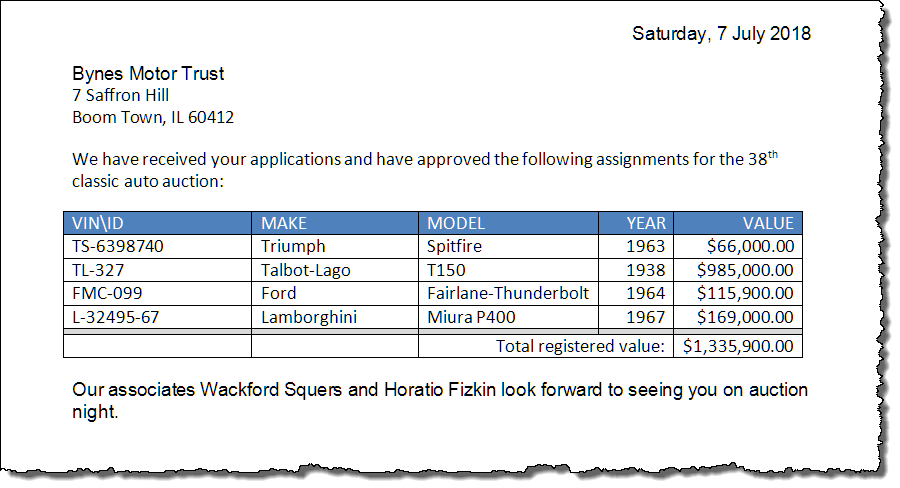
The child fields in the merge template shown above are arranged in a table and the results are delimited in individual table rows. While recommended, such arrangement is not mandatory. However, some advanced features of the add-in are not applicable when child fields are arranged as a simple list (paragraphs) or other character delimited (e.g., comma separated) list or if child fields in tables are not delimited using rows.
The add-in user interface consists of a custom ribbon tab, a primary userform dialog, a progress bar and several secondary userform dialogs. The custom ribbon tab appears when the template add-in is loaded either manually or automatically (when Word is started).
![]() Note: For more on template add-ins and how to load them, see: Organizing Your Macros/Template Add-ins at: Installing Macros
Note: For more on template add-ins and how to load them, see: Organizing Your Macros/Template Add-ins at: Installing Macros
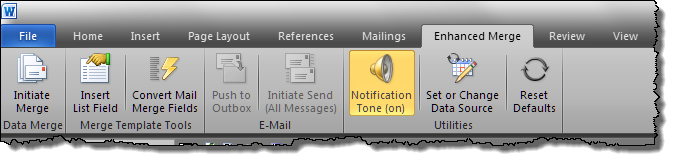
The Enhanced Merge (Merge Many to One) tab appears between the ribbon Mailings and Review ribbon tabs. It serves as the user's starting point for all functions associated with the add-in. With the ribbon tab you:
![]() In most places, I use the form email rather than e-mail. One, perhaps glaring
exceptions, is group label on the custom ribbon tab. I just think
E-Mail looks better than EMail or EMAIL.
In most places, I use the form email rather than e-mail. One, perhaps glaring
exceptions, is group label on the custom ribbon tab. I just think
E-Mail looks better than EMail or EMAIL.
Since associating a data source with a merge template is the first step in both Merge Many to One and Merge One to One processes, I will start with the Utilities group.
Several events can occur when using the add-in which display user notifications or action requirements. Notification Tone is a two-state toggle button that turns on\off a Windows media sound file.
Before a merge process can be performed, a data source must be associated with the merge template. This control launches a dialog from which you can select the Access file (table or query) or Excel file (sheet or named range) containing records to associate with the template.
If no data source is associated with the merge template or if a previously associated data source file is deleted or renamed, the following dialog is displayed.
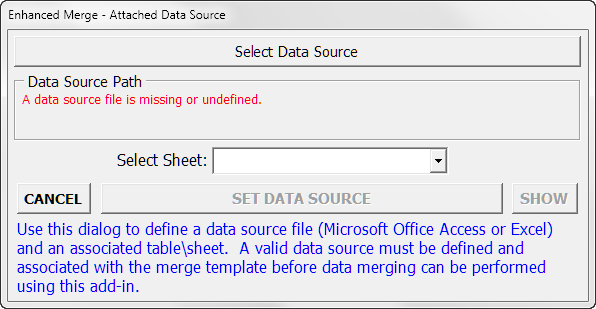
Click "Select Data Source" to display a file picker dialog from which you can select a data source file.

Then select a table or sheet.
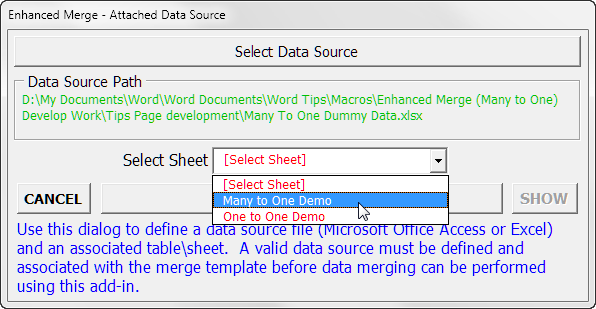
![]() Note:
Green and red font color is used in several of the add-in dialogs to indicate
go/no go conditions. As seen below, once a valid data source file is
selected, the file name is displayed in green. Due to the inherent
nature of the add-in userform dialogs, the sheet list is displayed in red until
a listed sheet is selected.
Note:
Green and red font color is used in several of the add-in dialogs to indicate
go/no go conditions. As seen below, once a valid data source file is
selected, the file name is displayed in green. Due to the inherent
nature of the add-in userform dialogs, the sheet list is displayed in red until
a listed sheet is selected.
Finally, set the data source to associate it with the current merge template.

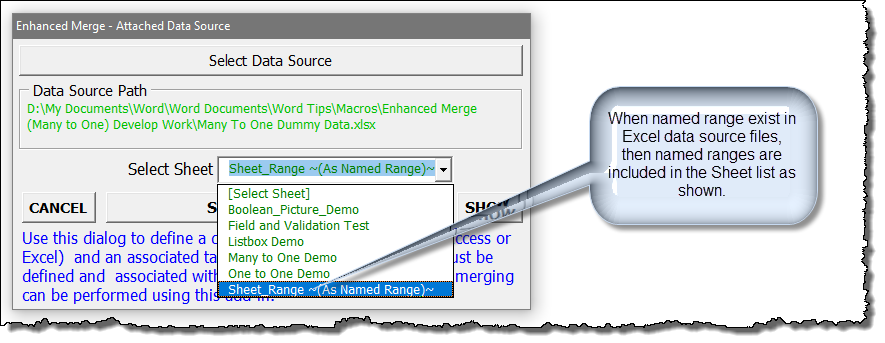
Excel Named Ranges
When an Excel
Named Range is set as the data source, the named range must include a duplicate
of the parent sheet first row (i.e., the column headings) as the first row of
the named range.
![]() Note: Click the "SHOW" command button to review the data source and data structure.
Note: Click the "SHOW" command button to review the data source and data structure.
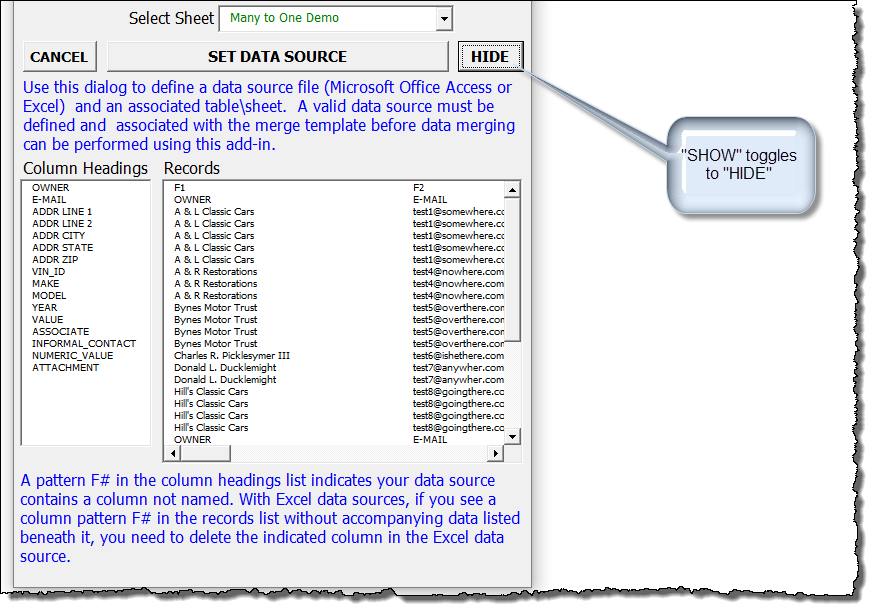
Excel is not a true database. The ADODB data
structure can be corrupted if after an Excel file is associated with a merge template the columns are rearranged or renamed, or if data in a complete record row is deleted.
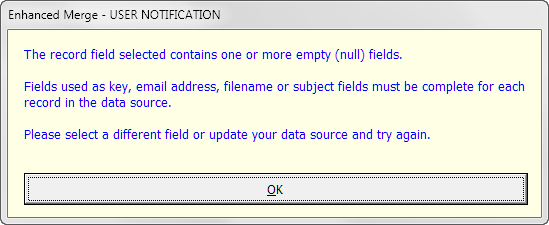
In these cases, you may see "F" series column headings in the column headings lists or receive notification during merge setup that null values were encountered in Key,
email, filename fields etc.
Should either occur you will need to open your Excel file and physically delete the problematic columns or rows.
Resets the add-in default settings and configuration.
In the Data Merge group, the Initiate Merge button launches primary userform dialog. The primary userform dialog (hereafter referred to as U\I) is the user interface for all merge processes.
![]() Note:
Before initiating a merge, you should open your prepared merge template.
Note:
Before initiating a merge, you should open your prepared merge template.
On first use, the U\I is displayed as shown below.
![]() Note: When published, the add-in was compatible with Word versions 2007-2016.
I expect it will be compatible with Word 2019. This tips page was produced using screen graphics from Word 2010. With future revisions and updates some of the captions in the graphics may reflect earlier versions.
Note: When published, the add-in was compatible with Word versions 2007-2016.
I expect it will be compatible with Word 2019. This tips page was produced using screen graphics from Word 2010. With future revisions and updates some of the captions in the graphics may reflect earlier versions.
The U\I consists of a multi-page control, a "Resting Anchor" logo link, a Donate link, a CANCEL command button and a variable captioned primary execution command button.
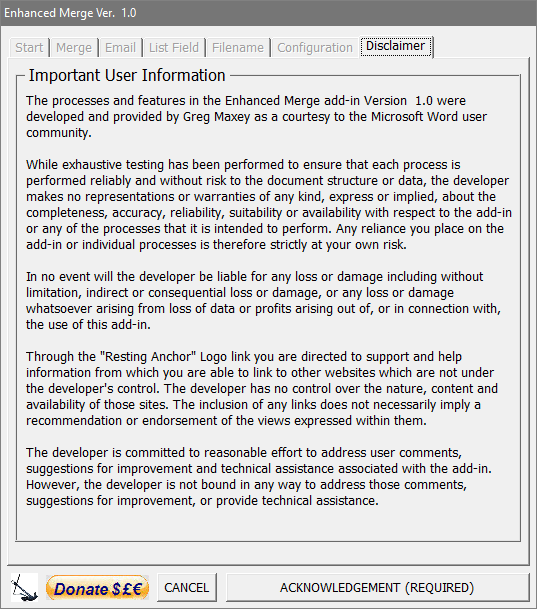
The disclaimer releases the developer from any responsibility associated with use of the add-in. It must be acknowledged before any other add-in processes can be enabled.
![]() Note: The U\I is presented with the Disclaimer showing on first use, with each user change, with each revision to the add-in and each time the add-in default values are reset.
Note: The U\I is presented with the Disclaimer showing on first use, with each user change, with each revision to the add-in and each time the add-in default values are reset.
After the disclaimer is acknowledged, the Configuration tab page is displayed.
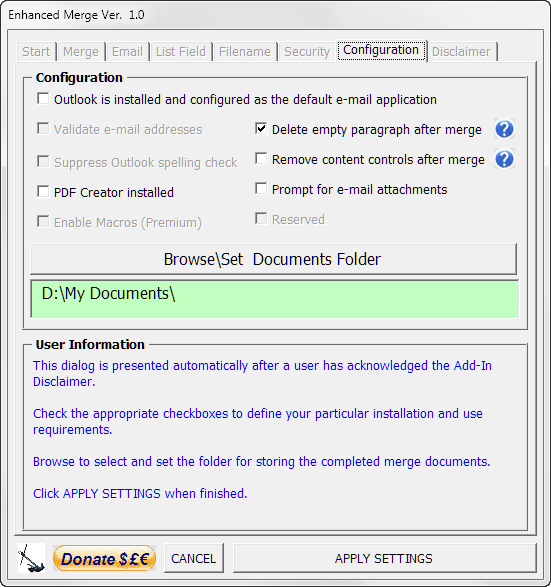
Three of the possible seven merge output modes involve email. To enable and use the email modes, Microsoft Outlook must be installed and configured as the default email application. Check this box if your system meets this requirement and you desire to use one of the output modes using email.
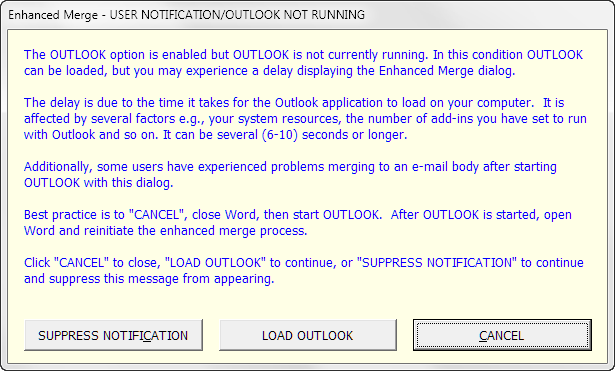
When the add-in is configured for use with Outlook,
Outlook must be running regardless of the merge mode selected. While
Outlook can be launched from the add-in, some users have experienced difficulty merging to the body of a
email message if Outlook is started with the add-in or after Word is started.
Best practice is to start
Outlook before starting Word or initiating a merge process.
If configured for use with Outlook and Outlook is not running when a merge process is initiated, the following notification dialog is presented:
Applicable only when the "Outlook is installed" option is selected. The default value is checked.
It is essential that the email addresses in the data source are both present and valid when an option to merge to email is selected. In these cases, and with this option applied, the add-in examines all the email addresses in the record set. When a required address does not meet email address format standards, you will be notified of the erroneous email address and associated record. For example, here I have deliberately attempted a merge process with invalid email addresses:
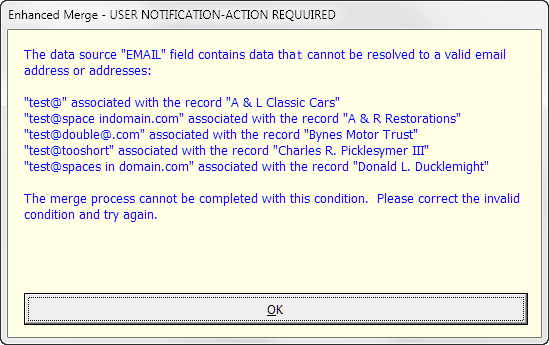
You are strongly encouraged to leave this option checked unless you use an Exchange Server with recipient nicknames that are not recognized by the add-in as
email addresses.
Applicable only when the "Outlook is installed" option is selected. The default value is checked.
If you have your Outlook application configured to check spelling before sending, the automatic bulk sending of messages generated by the add-in could result in a tedious requirement to step through each message to validate spelling error flags. You can turn this feature off in Outlook or override Outlook's spell checking with the Suppress Outlook spell checking option of the add-in.
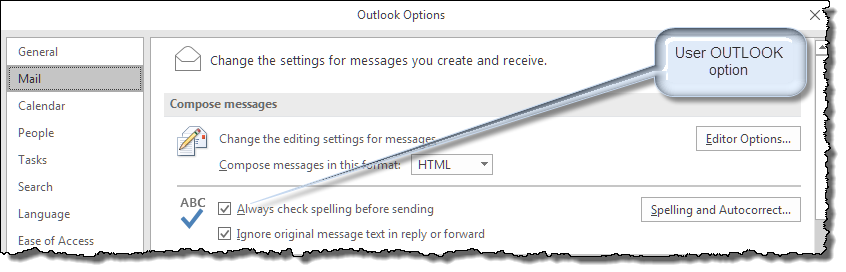
Either way, email body content is not spell checked, so ensure your message content is accurate and appropriate for sending.
Two of the seven possible merge output modes utilize the open-source third-party application PDF Creator. Check this option if you have PDFCreator Ver. 2.5 or higher installed and wish to use it with the add-in.
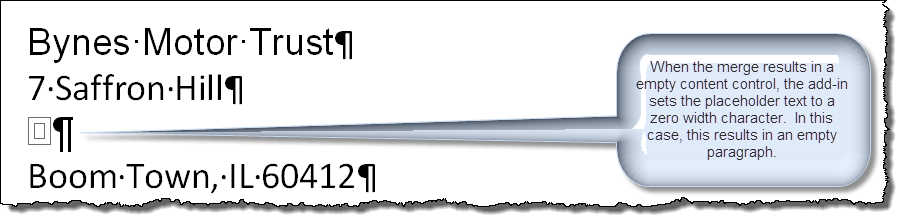
Deletes any empty paragraph resulting after a merge. Default value is checked.
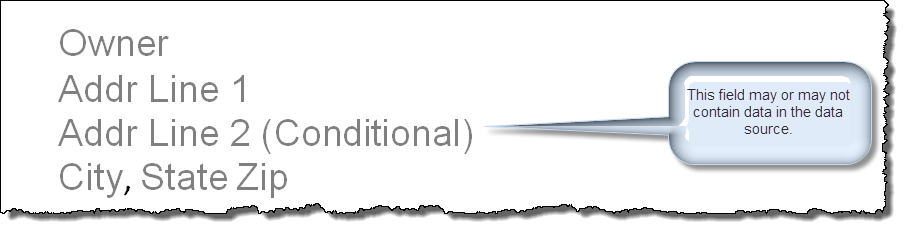
In certain cases when the data field for a content control is empty, the merge results in an empty paragraph. Consider our example merge template and resulting output shown previously. In that example, we have a conditional ADDR LINE 2. Some records will contain data in the ADDR LINE 2 field and some likely will not.

Removes all content controls (preserves content) from the resulting merge document after the merge. Default is unchecked.
![]() Note:
Fill-in type content controls created as part of an advanced merge output are
not removed.
Note:
Fill-in type content controls created as part of an advanced merge output are
not removed.
Alerts when you have not defined at least one attachment when the merge is configured for email.
This advanced feature is available to private licensed clients. It permits additional automated processes to be developed and run as the individual merge outputs are created. Contact the developer for more information on licensing arrangements.
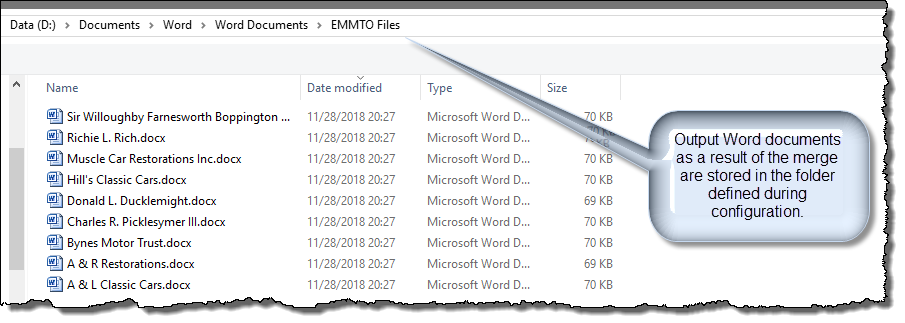
Identifies and allows the user to select and set the folder sued to store the merge output documents.
Click to set and apply the individual configuration settings. Refreshes the Add-In and advances U/I to the "Start" tab.
![]() Note:
Before initiating a merge, you should open your prepared merge template.
Note:
Before initiating a merge, you should open your prepared merge template.
Start Tab
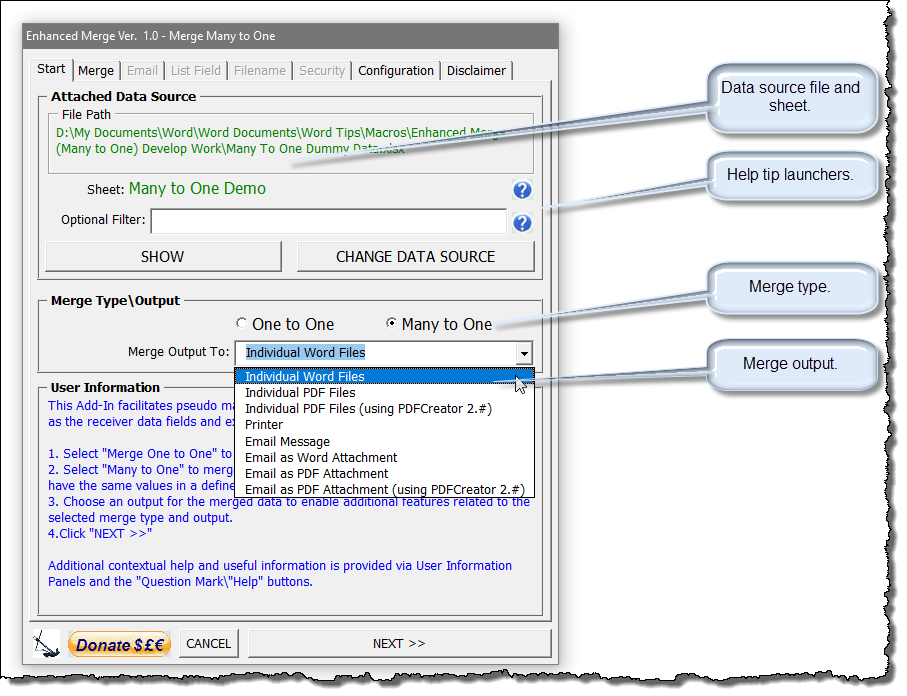
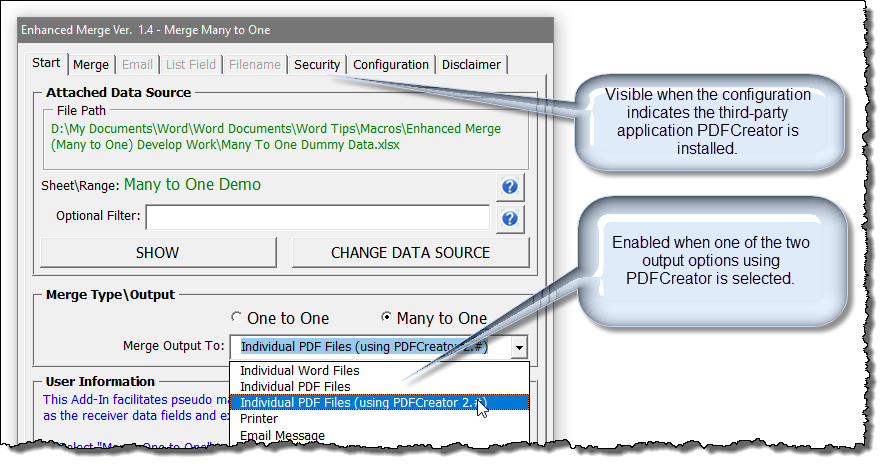
After Disclaimer acknowledgment and Configuration, Start is the default tab when initiating a merge process. Using this tab, you can:
![]() Note:
The "Merge" tab is enabled automatically after an output option is selected.
Note:
The "Merge" tab is enabled automatically after an output option is selected.
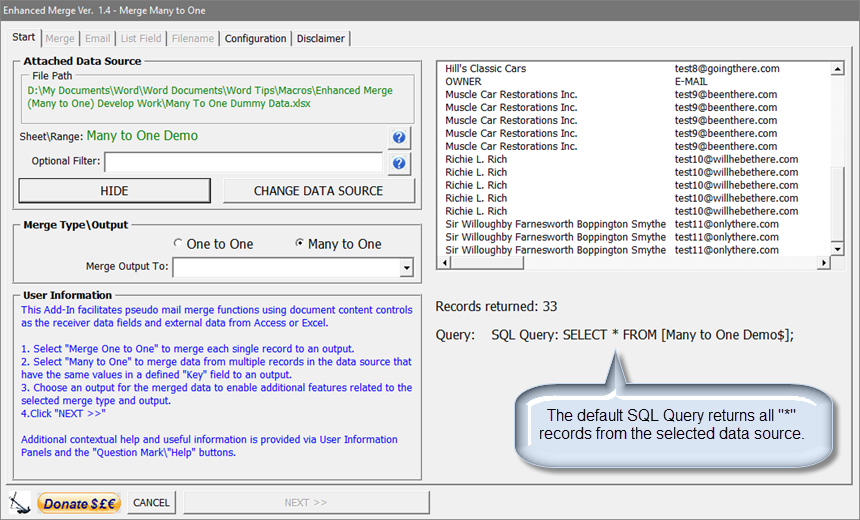
If you show the data source, you can review the available records and see the number of records returned. With no filter applied, the default SQL Query returns all records in the data source.
After selecting or verifying the data source, selecting the merge type and output, click "Next >>." This moves the U/I to the "Merge" tab.
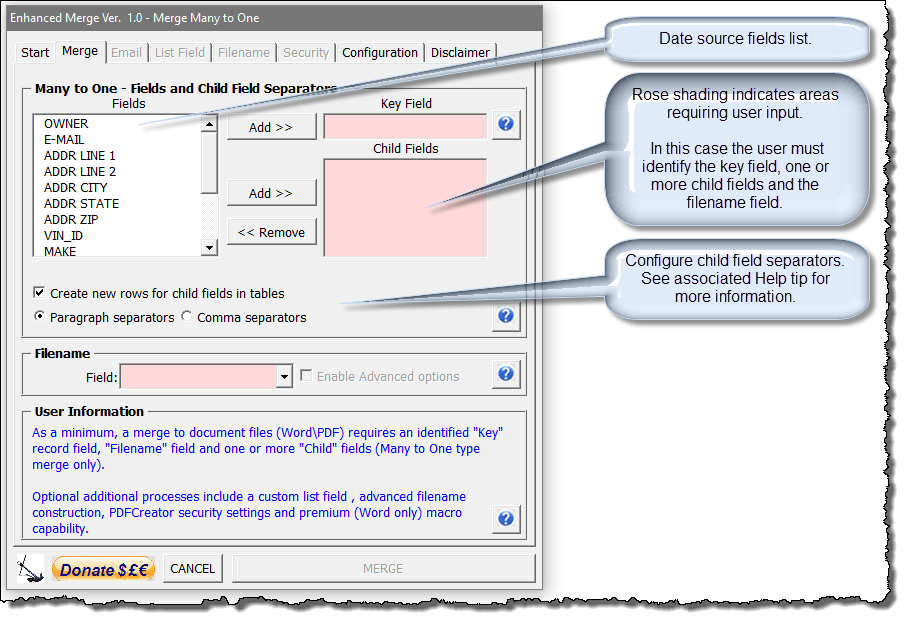
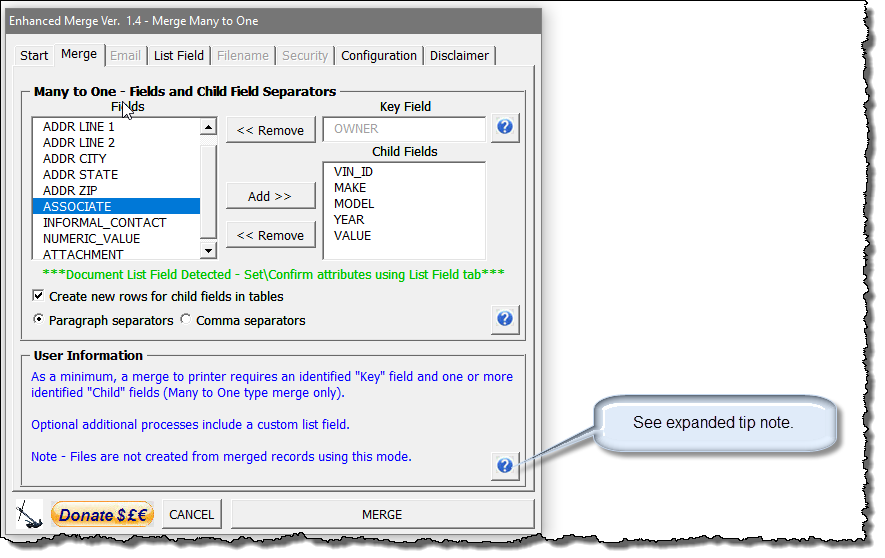
Using the controls on the Merge tab, you select the Key field and one or more child fields, and the Filename field.
Here you also configure how any child field data in the record set is delimited in your output merge fields. "Create new rows for child fields in tables" is checked by default. "Paragraph separators" is the default for any child fields in the merge template which are not in tables.
![]() Note:
See the associated Help tip for more information on delimiting child field
data.
Note:
See the associated Help tip for more information on delimiting child field
data.
"Enable Advanced options" is enabled after identifying the filename field. If that box is checked, the "Filename" tab is enabled.
The illustration below depicts the Merge tab as first displayed with the data source and merge type and output selected from the Start tab. The "Fields" list indicates all of the fields defined in the data source. The rose shaded areas require user input to complete the merge process.
This next illustration depicts the Merge tab after making typical selections for a merge based on the examples given above.
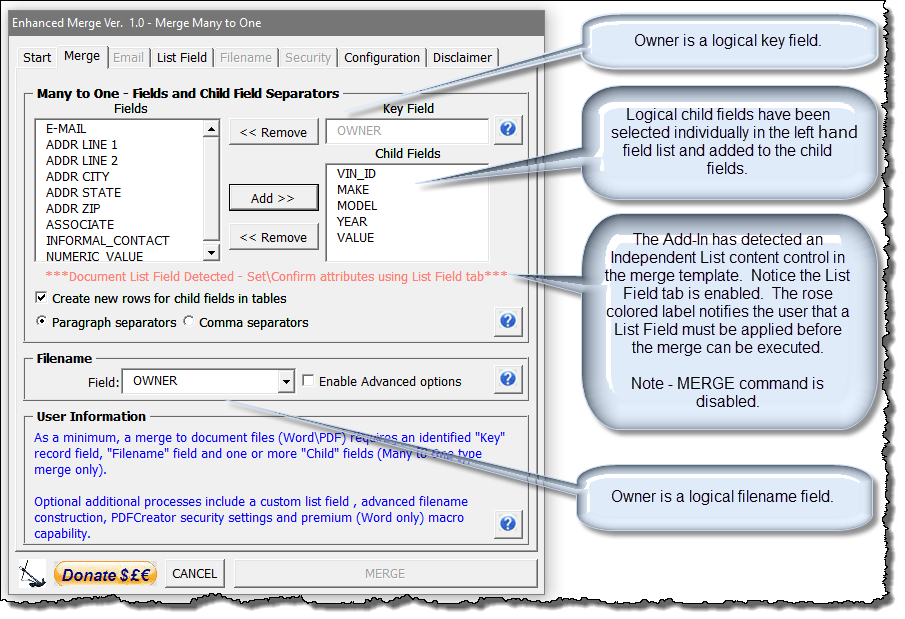
The functionality and use of the Merge tab is similar for other merge types and output options.
The MERGE button becomes enabled, after all requirements for the merge are complete. In this example, the Independent List option is enabled so to enable the MERGE command button and complete the merge, the list field needs to be defined.
After the "Key" field is set on the Merge tab, the Add-In detects if the merge template contains a content control with the tag "Independent List." If found, the List Field tab is enabled. The List Field tab is used to link a user defined data source field with the merge template content control tagged "Independent List Field."
![]() Note:
See the Merge Template example discussed previously.
Note:
See the Merge Template example discussed previously.
In the example template, the content for the Independent List content control is developed using the data source "ASSOCIATE" field. Any data source field not previously selected as the key or a child field may be used to define the template independent list field content.
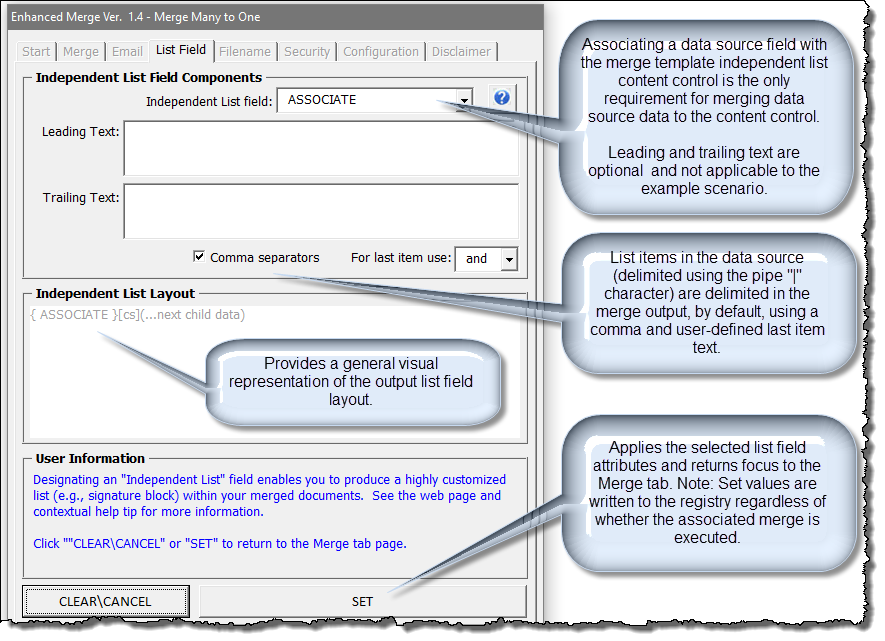
While not illustrated in the running example scenario, the leading and trailing text fields could be used to create highly customized independent lists including signature lists.
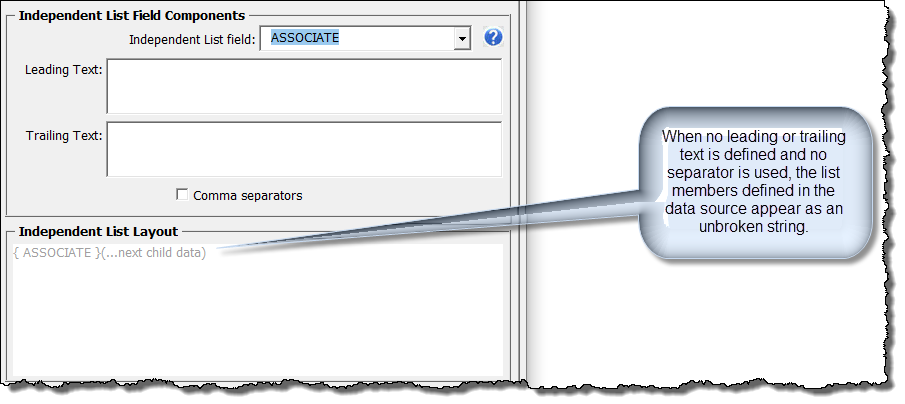
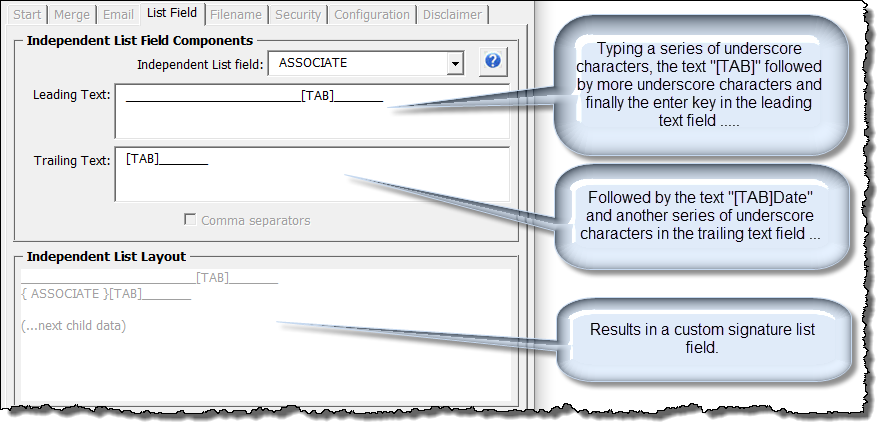
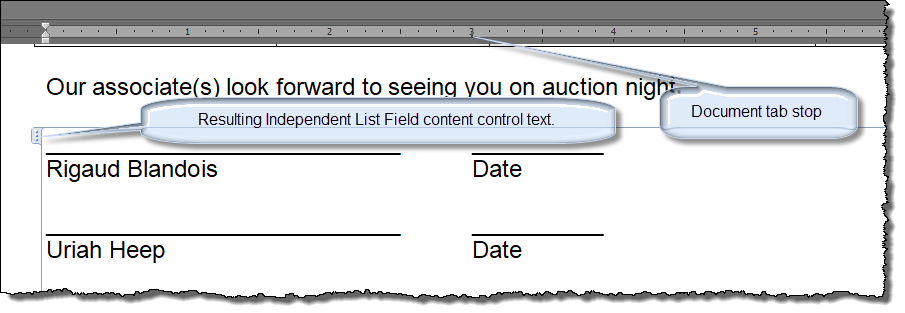
By using any combination of spacing (including the enter key) or text in the Leading and Trailing text boxes you can create custom lists with a wide variety of formatting. Typing "[TAB]" in either text box as shown below results in actual tabs in the output document text when the merge is run.
The Independent List Layout field does not indicate the actual spacing provided by the pseudo tab character. That is determined by the actual tab stops in the merge template.
See the two illustrations below which show how this function may be applied in practice.
Values entered in the List Field tab are stored in the registry
by the SET
command and remain stored until cleared or reset. Stored values
automatically repopulate in the List Field tab fields on subsequent add-in use.
After setting the required and any optional List Field attributes, the U\I is returned to the Merge tab where the user can now execute the merge.


Merge type, merge output format, key and filename field values are stored in the
registry after executing each merge process. These values automatically
repopulate the respective U\I fields on add-in reuse. Stored values can be
reset using the Reset Defaults button in the Utilities group of the custom tab.
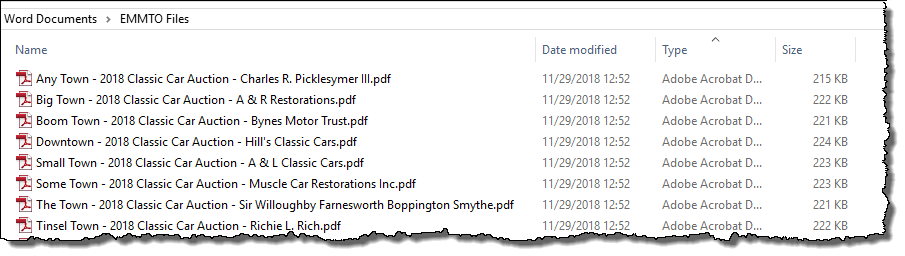
The process to merge output to Individual PDF Files is identical to the process to merge to Individual Word Documents. In the next example, I will output to Individual PDF files and illustrate how to use the advanced file naming features.

Using the same Merge and List Field tab settings illustrated in the previous example, check the box to enable advanced options.

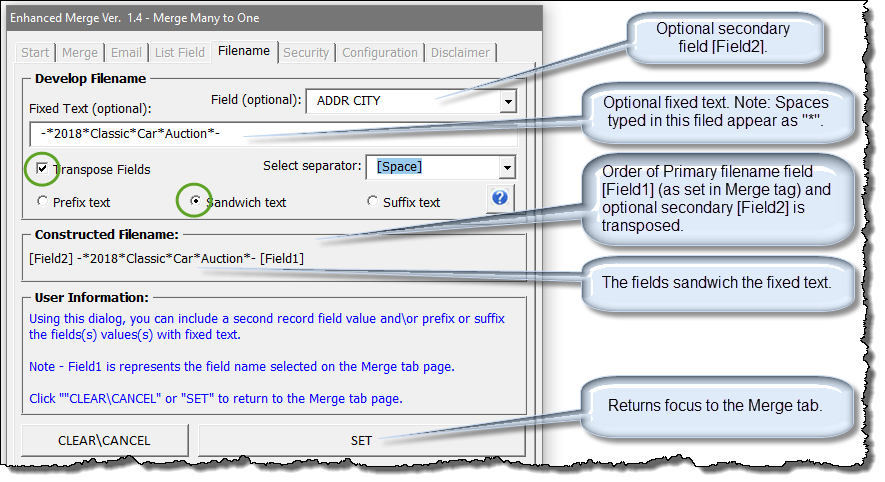
This enables and sets U\I focus in the Filename tab.
Using the Filename tab, you can define an optional second data source field for use in file naming and/or fixed text, and/or define optional fixed text for use in the filename. The content of the primary filename field as set in the Merge tab [Field1] and optional secondary field [Field2] can be transposed. Additionally, the fixed text can prefix the field content, suffix the field content, or be sandwiched between the [Field1] and [Field2] content. The following provides an example using the advanced filename options.
Values entered in the Filename tab fields are single-use-only values
that are applied
to the current merge process. They are not stored in the registry for
later recall or reuse.
The Security tab is associated with and only appears on the U\I if the open-source third-party application PDFCreator is installed and the add-in user has indicated so in the add-in Configuration tab.
PDFCreator is an open-source third-party application
offered by pdfForge. The two
add-in PDFCreator output modes were initially developed using PDFCreator version
2.5 (freeware) and follow-on development used version 3.3.2. (freeware). The
add-in developer can't guarantee or comment on performance with any other
PDFCreator version or level.
Note: When downloading PDFCreator, from the pdfForge website, the download may include PDF Architect which is not required
for the add-in, and the installation may offer various plug-ins. If
you are installing PDFCreator, I recommend that you use the 'Expert' installation settings
and choose any additional applications or plug-ins to suit your preferences.
The Security tab is enabled only when one of the two available PDFCreator output options
is selected as the merge output format.
When the merge output is one of the PDFCreator formats, the default output format is unsecure PDF.
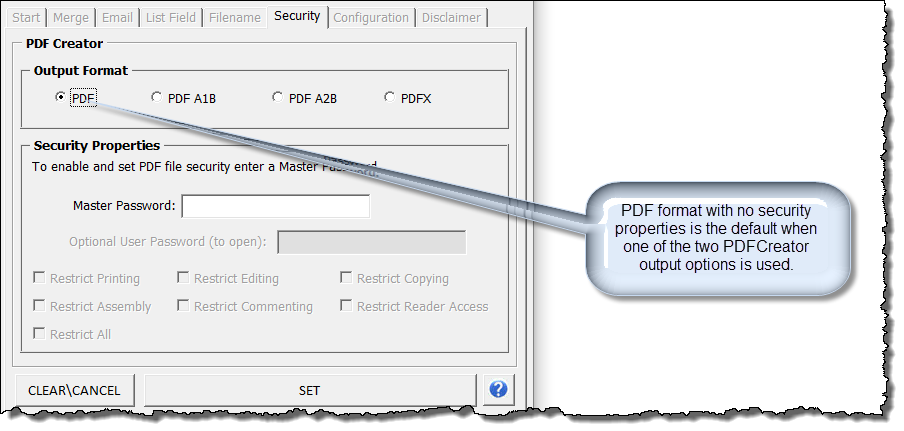
The PDFCreator application supports four PDF output formats. PDF security features are available only in the base PDF output format and after a Master Password has been defined.
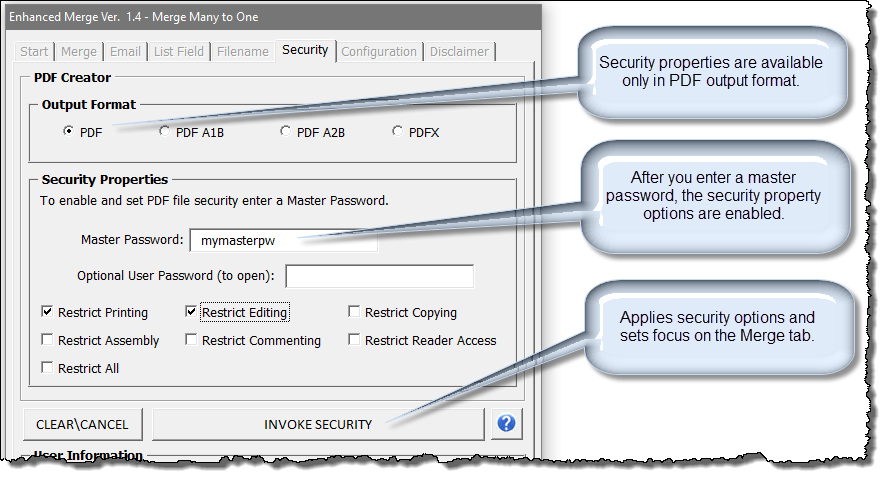
An attempt to execute a merge in either of the PDFCreator output modes without first verifying\setting security attributes presents the following user notification:
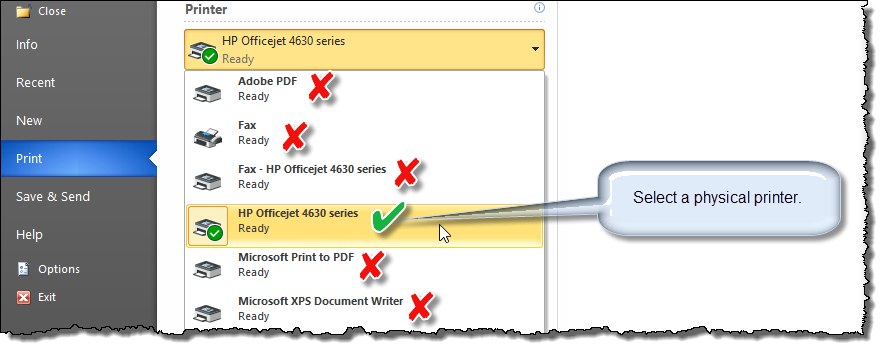
The process for merge to printer is similar to the previous processes. The primary difference is that there is no requirement to provide an output filename.
This mode is intended for merging output to a physical
printer (i.e., one that produces a paper copy) where each resulting merge output
is sent as a separate print job.
While you may have limited success with
using non-physical printers (e.g., Adobe PDF, OneNote ), an output filename
is not supplied to the printer and selecting a non-physical printer may require
direct user interaction with the selected printer.
This concludes the discussion on the four direct output options. Next, I will illustrate and describe using the add-in with Outlook and the four email output modes.
The Email tab is enabled when one of the four email associated output modes is selected and all other required Merge and List Field (if applicable) requirements are met.
I will not address each of the four email associated output mode processes separately in detail as they are basically the same as the process for performing a direct merge.
Similar to Merge to Printer, Merge to Email Message differs from the other three email modes in that the content of the merge output constitutes the body of the email message.
Since I am just publishing this add-in and have admittedly taken much from Doug and Graham in its development, I have a dearth of feedback and experience on problems or bugs. Fortunately, Graham has had plenty over the years and has expertly tuned the content of his tips page to accommodate. Parts of the following are from his site.
IMPORTANT NOTE
When merging to the body of an
email message (and that will include
using one of the three Email with * Attachment options and using a personalized
HTML cover message), you should always start
the Outlook applications before Word. Otherwise the merged output content
(or cover page content) may not be transferred to the email message bodies.
This is due to a peculiarity in the link between Word and Outlook that
has not been resolved.
Flicker and Flash
The process for merging content
directly to an email message body requires Outlook to briefly, but physically,
open and close each merge output email message.
This opening and closing
of the email message is in focus on the screen and will cause screen flickering
and flashing as the individual merge output messages are created. You
should avoid watching the screen and the merge process if flashing or
flickering light aggravates your vision or other health issues.
Document vs. Email
They are not the same. A
Word document and formatted email messages are quite different in their presentation and capabilities.
For example, email does not support pages nor headers and footers. If you are going to send the
merge content as a message body, you must check its layout carefully in Word's Web view, and it would be advisable to create a dummy merge run with a limited record set to ensure that the results are what you expect.
If you want to be certain that the recipient will see the merge content
as it appears in a document, merging as an attachment - preferably in PDF format
- is the best way forward.
The following depicts the Merge tab configured for a Merge to Email Message with all required Merge tab and List Field tab conditions met. The Email tab is enabled and the primary command button caption reads "NEXT >>."

The Email tab provides the U\I to fully develop the merge output email messages. It is arranged in three sections using tabs; Message, Attachments and Copy To/Reply To as shown below:
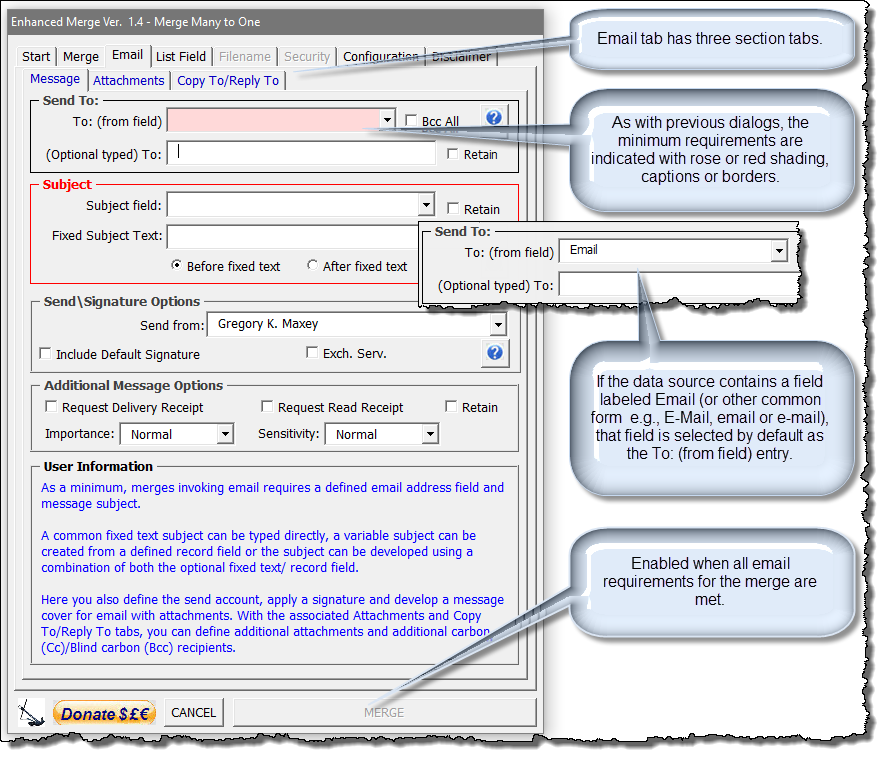
As the illustration shows, after all other Merge and List Field (if applicable) tab requirements are met, the minimum email requirements to complete the merge are one or more email addressees and subject.
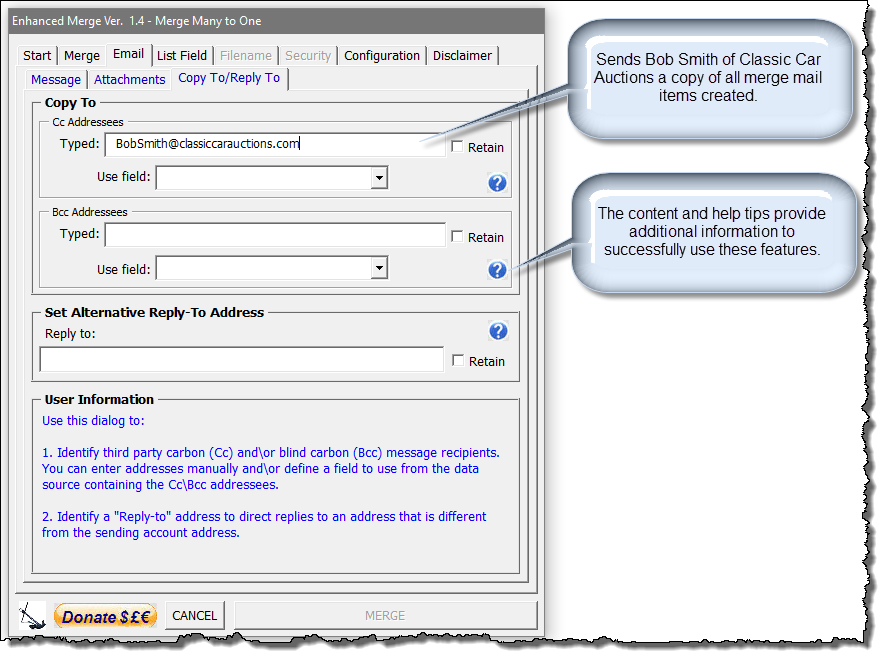
The Send To frame is used to select the required data source field containing the primary addressee email address and to type any other optional primary addressee email addresses. When checked, the checkbox Bcc All directs that all addressees be treated as blind carbon copy addresses. When checked, the checkbox Retain stores all Send To frame data in the registry, which is recalled and applied if applicable with the next email merge.
The Subject frame is used to define the email subject. The subject can be constructed using an optional data source field, optional fixed text, or a combination of both. When field and fixed content are used together, the option buttons are used to arrange the subject field either before or after the fixed text. The checkbox Retain functions as previously described.
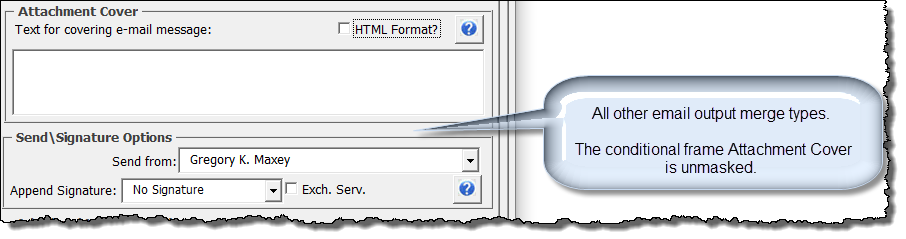
If the Merge to Email Message output mode is selected, only the Send\Signature Options frame appears on the Message tab. If any of the other three email output modes is selected, the Attachment Cover frame also appears as shown below.
The Send from dropdown lists all the email accounts associated with the user's Outlook profile. If checked, the checkbox "Include Default Signature" appends the user's default email signature (if defined) to the email message body. The Append Signature dropdown lists all defined signature in the user's Outlook profile. If checked, the checkbox Exch. Serv. assists users who have Exchange Server email accounts. See tip note below.
Exchange Server Accounts
The add-in may be problematic for some users, when used with Exchange Server
email accounts in Outlook. This relates to the way the accounts are configured and a difficulty to send the messages created in the temporary folder.
However the differences fall into two camps and I have therefore made the alternatives selectable via a 'Quotes' check box that is available on the userform when the Exchange Server option is selected. One or
the other setting of the 'Quotes' check box should suit most Exchange Server users.

The Attachment Cover frame when displayed is used to define the email cover message content and format. The content can be text typed directly in the U\I textbox provided. If checked, the checkbox "HTML Format?" enables the user to browse for and select a Word .docx format file to select and apply as rich HTML content.


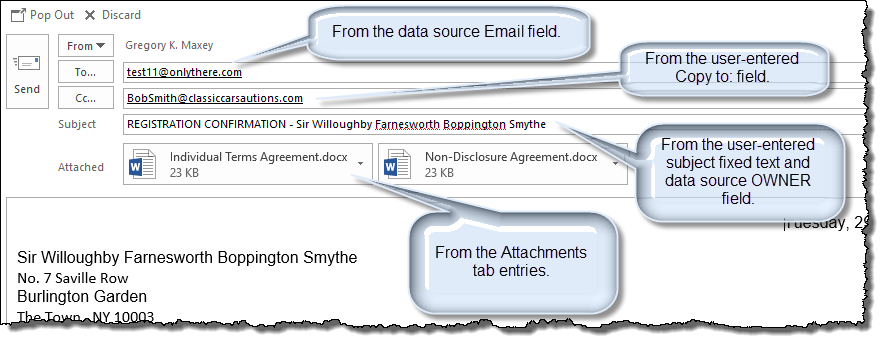
The following provides an example of a suitable personalized message cover document for a merge to email as attachment process and a representation of an output mail item.

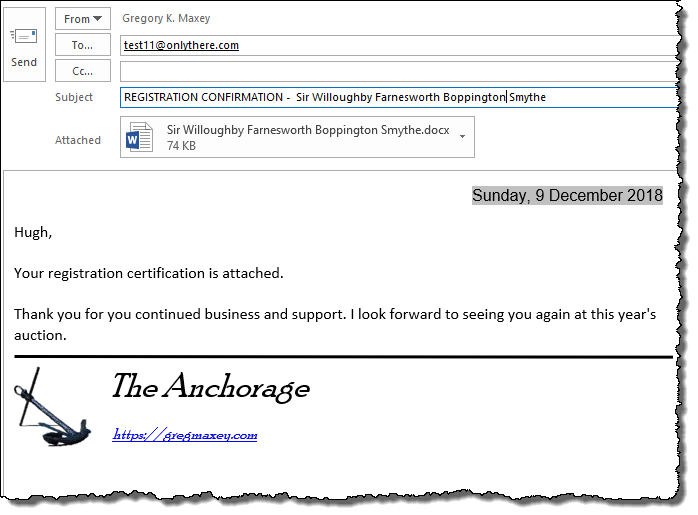
The Additional Message Options features should be self explanatory.
The attachments tab is provided to define and apply attachments to email messages created using one of the four email merge output methods. The attachments can be defined using one or more data source record fields which contain the file path of the attachment or by browsing and selecting a file for attachment using the U\I.
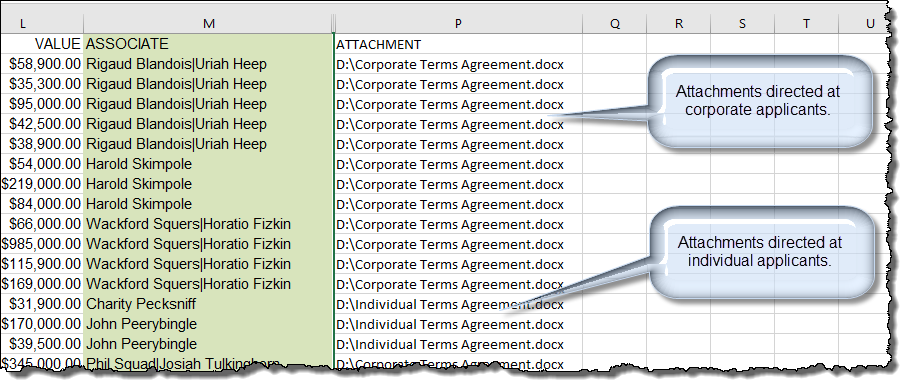
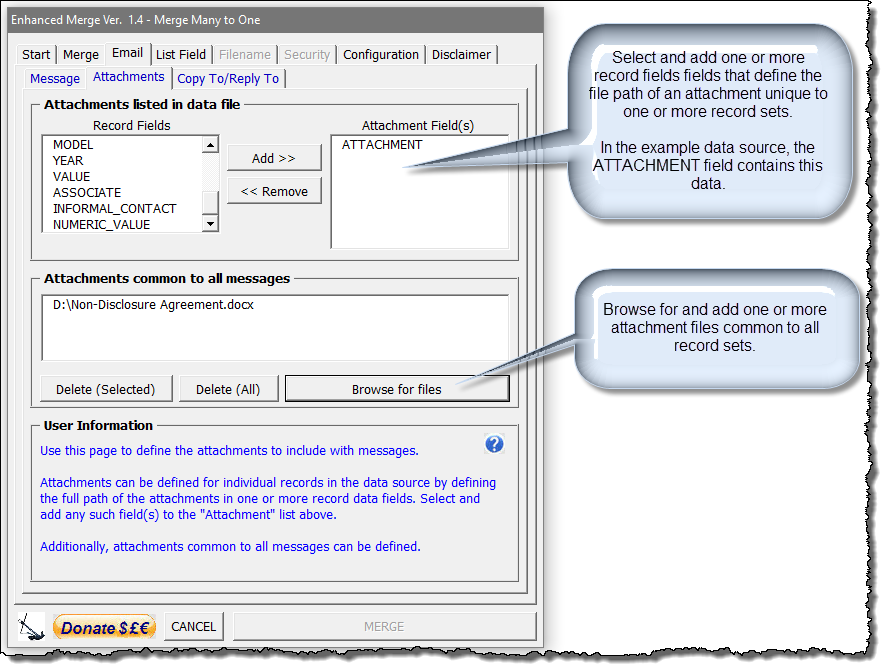
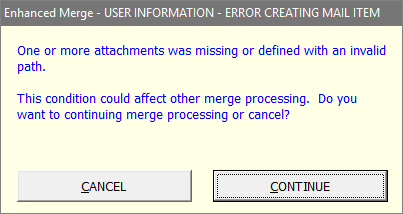
Ensure that any content in a data source field selected to define the attachment path resolves to a valid file path. Otherwise, Outlook will error and not create a mail item for the associated record\record set. This error is handled via user notification during processing.
The Copy To/Reply To tab is provided to define and apply CC and BCC addressees to the mail item.
One To One Merges
The merge examples I've provided
illustrated the Many To One features of the add-in only. The One To One merge
processes do not utilize child fields but are otherwise similar.
An
example One To One merge template and associated data source is provided in the
add-in download package using the link at the end of this tips page.
Outlook Mail Items created by any of the four mail options are never sent
automatically or directly by the add-in.
Instead, the add-in
attempts to create a sub-folder in the user's Outlook Drafts folder labeled "Enhanced
Merge." This folder is used to store any mail items created by a merge output
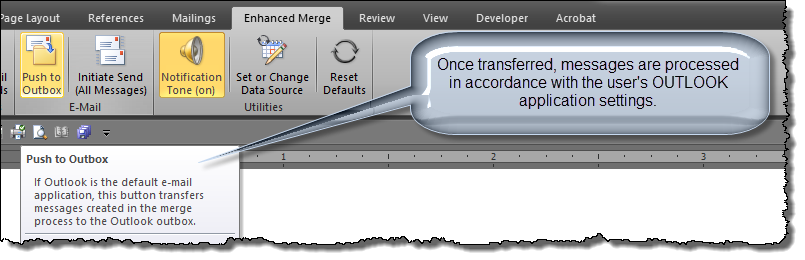
process. Mail items in this draft folder can later be pushed to the user's
Outlook outbox using
additional add-in features or transferred and send directly by the user from
within Outlook.
There are many
variations of Outlook and email account types. In some cases, and
particularly IMAP accounts, the specific
configuration may prevent the add-in from creating the "Enhanced Merge" sub-folder.
In these cases, the merge output mail items are stored directly in the Outlook
Drafts folder. In these cases, the add-in feature "Push to Outbox" will
not function to transfer draft mail items to the Outlook outbox. The user must
use Outlook directly to transfer and send mail items.
The following images illustrate the Enhanced Merge sub-folder created under the user's Outlook application Drafts folder and several of the associated mail items created after completing the merge discussed above.
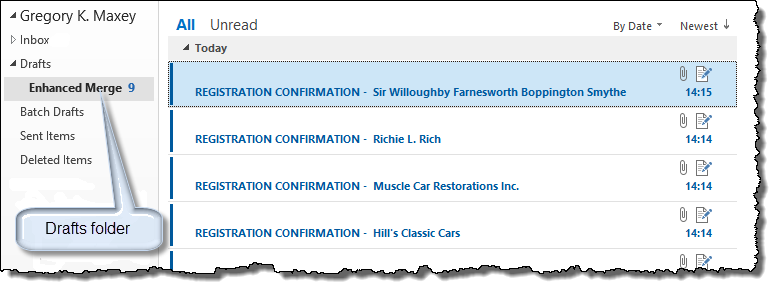
The Enhanced Merge sub-folder allows the safe examination of the merge output mail items and any attached documents, before committing to sending them. Mail items remain in the Enhanced Merge sub-folder until the E-Mail Group "Push to Outbox" is executed or they are sent manually from within the user's Outlook application.
Push to Outbox opens a mail item transfer dialog which:
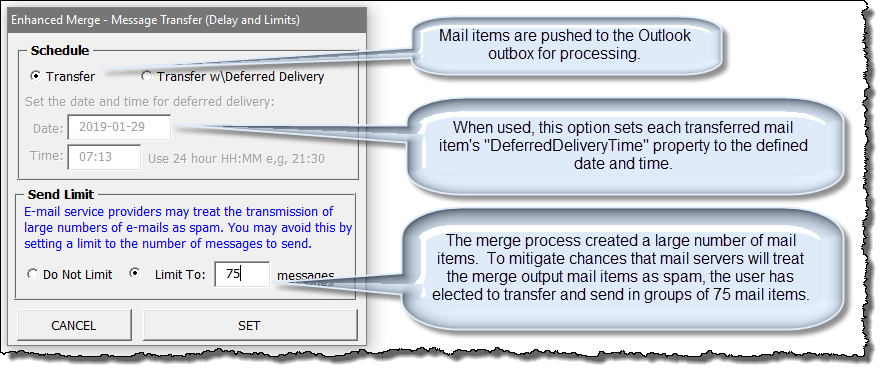
The deferred delivery date and time fields are validated to ensure appropriate entries. The date field employs an enhanced custom VBA date picker form originally developed by Trevor Eyre.
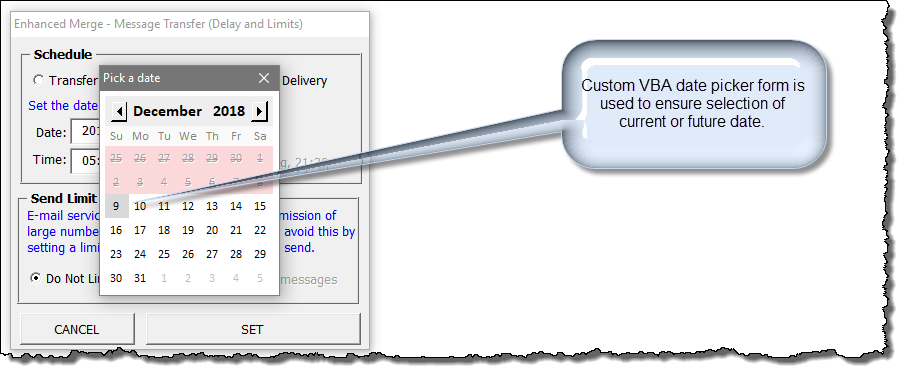
![]() Since
its original release, Trevor and I have collaborated extensively to enhance the
date picker form. You
can review my dedicated tips page on the date picker and download it for
your personal use in other projects here.
Since
its original release, Trevor and I have collaborated extensively to enhance the
date picker form. You
can review my dedicated tips page on the date picker and download it for
your personal use in other projects here.
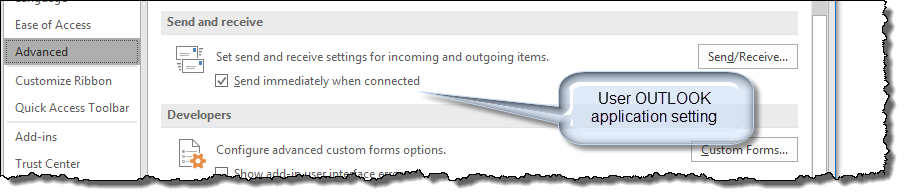
When the Message Transfer dialog "SET" is executed, the resulting action is determined by the user's Outlook application settings. If the user's Outlook application is configured to "Send immediately when connected", then any mail item transferred will be sent when Outlook is connected. Otherwise, the transferred mail items will remain in the Outlook outbox until connected and synchronized (i.e., manual send/receive) through further user action either with the add-in features or directly from within Outlook.
Executing "SET" displays one of two dialogs shown below.
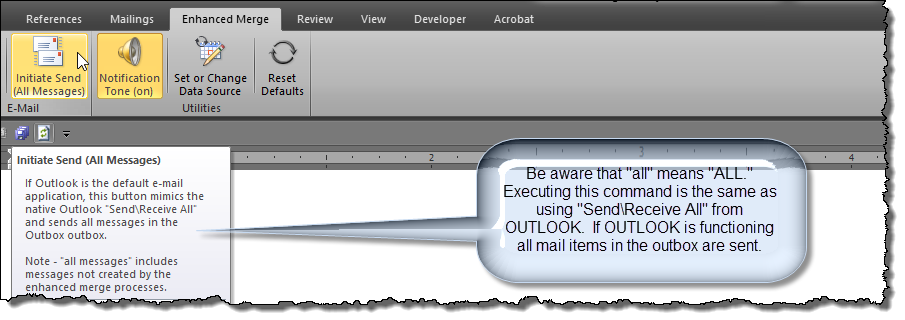
Be aware that executing "Push to Outbox" will send ALL the mail items in the Enhanced Merge sub-folder to the Outlook Outbox- INCLUDING ANY TEST MESSAGES YOU MAY HAVE LEFT THERE!!! If Outlook is configured to send items immediately, then all those mail items will be sent.


This is aimed at mail items which appear to be stuck in the Outbox. Instead of having to switch to Outlook and open and send each such message again, the function aims to automate that task. It does not affect messages in the Enhanced Merge sub-folder created by the add-in. For that you should use "Push to Outbox."
The two buttons in the Merge Template Tools group are provided to assist users in developing merge templates for use with the add-in.
As discussed above, a special content control tagged "Independent List" can be used in the merge template to develop a highly customizable list. This command inserts the "Independent List" content control at the selection.
While you can use this command repeatedly to insert multiple "Independent List" titled content controls in a merge template, only one will serve as the independent list associated with the add-in merge processes. Use with discretion.
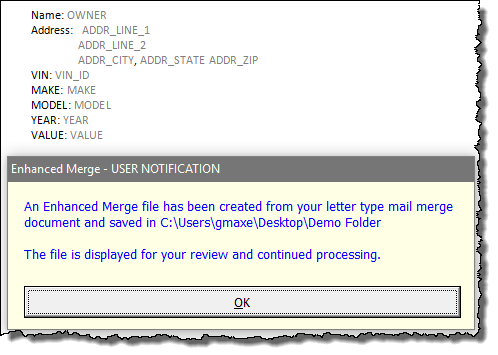
Recall that one of the main reasons for creating Enhanced Merge (Merge Many to One) was to break dependence on Word's native mail merge utility. This means out with the old and in with the new! If you initiate and enhanced merge with a traditional mail merge document open as the active document, you receive the following notification.

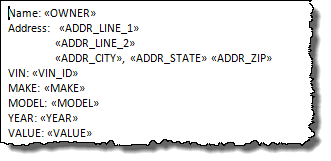
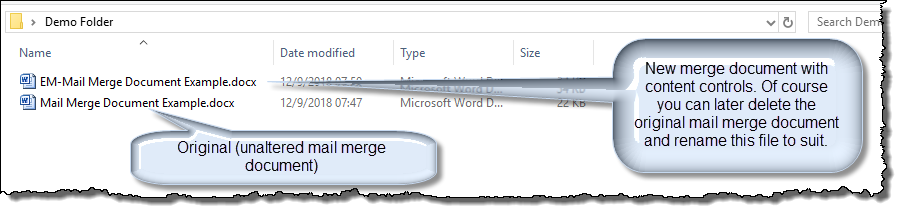
Executing "Convert Mail Merge Fields" does not alter your existing mail merge document. Instead it creates and saves a new file in the same folder containing the open mail merge document file. The new file is named "EM - *." where * represents the original mail merge document file name. The image below left depicts a simple mail merge document showing merge fields. The image below right depicts the resulting new document. Notice the merge fields have been replaced with content controls. The placeholder text of the content control and its title are set to the old merge field name.
 |
 |
The add-in Merge Template Tools - Convert Mail Merge Fields provides a basic utility for converting mail merge letter type main documents and associated merge fields into a merge template compatible with the add-in.
Note - It does not convert "Address Block" merge fields or conditional merge fields.
The advantages of using conditional IF fields in merge templates is fully discussed by Word MVP Dave Rado in his article Making Your Mail Merge Intelligent by Using Fields. These techniques can easily be adapted to use content controls in merge templates. The add-in download package at the conclusion of this tips page provides a demonstration merge template and database providing a full description and examples.
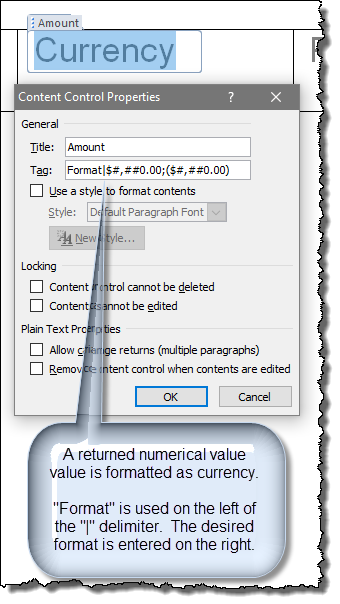
In most cases, it is more efficient to merge formatted data directly from the data source. For example, if you want the dates from the data source to appear as MMMM d, yyyy (e.g., December 31, 2018) in the output merge document then use that format in the data source.
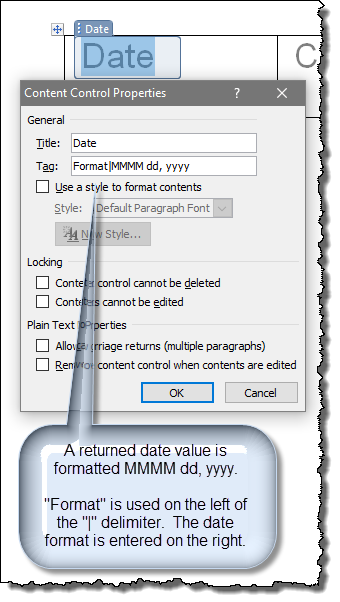
Data formatting can also be done by using the merge template content
control tag property. The following illustrations are provided as
examples.
 |
 |
In a similar manner, a data source date value can be advanced or regressed.
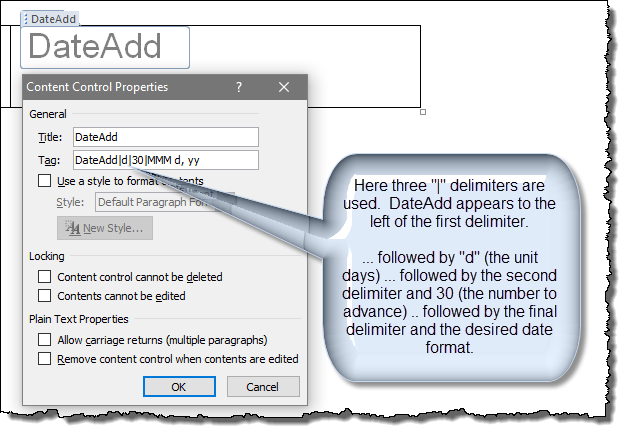
The following are just a few of the many possible formatting options available using these methods:
It would be very difficult if not impossible to create a "stock" add-in capable of meeting every user's requirements. It wouldn't make much sense to make it all for free, served up on a platter either. After all, and to paraphrase Josey Wales: developer got to eat same as the worm.
While working through the fledgling processes and examples I realized that in some cases a post merge macro process could resolve nagging anomalies in the output. For example, in the merge document used in this example the resulting paragraph containing the "Independent List" isn't exactly right and if you are a stickler for grammar it can be flat out wrong.
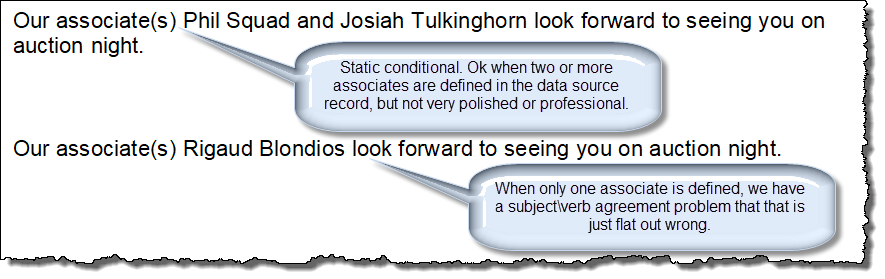
Fortunately by modifying the template text slightly and employing a post merge macro, we can have the best of both worlds and correct text regardless of the number of associates defined in the data source.
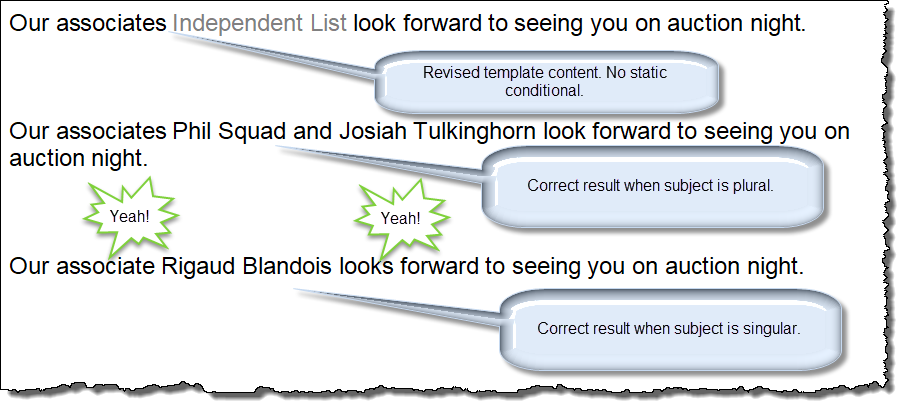
The specific VBA procedure (macro) to achieve this result is stored in a specific module of the VB Project of the merge template. The procedure is then called by name during the merge process. The following illustrates the macro used (with module name and procedure named masked).
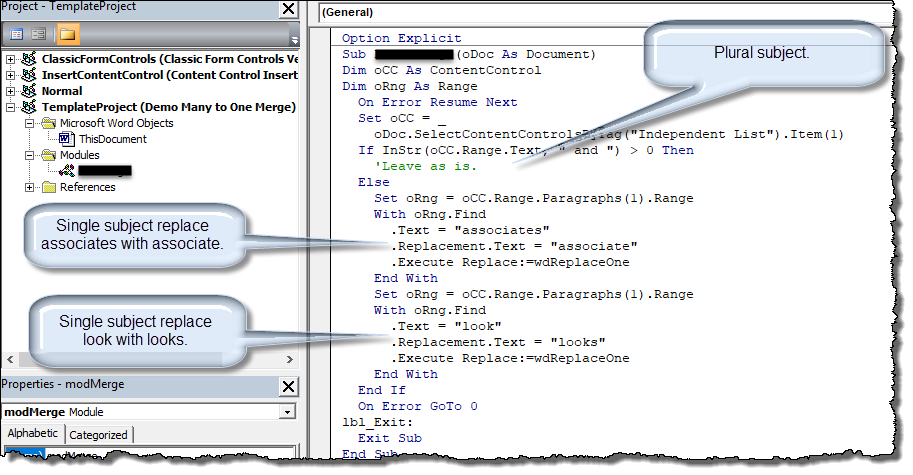
If you are familiar with code you should readily see that the procedure simply evaluates the content of the Independent List content control to determine if it contains two or more names and replaces text as appropriate.
VBA procedures like the one shown above can be used in any case where the merge output is conditional.
Contact the developer via the site feedback form to purchase a licensed version of this add-in with macro capability enabled.
Of course my old friend Graham Mayor was asked to preview the previously described features of this add-in and to offer his feedback. As is often the case and always in fun, Graham seems to enjoy offering challenging suggestions. Two of them are implemented below.
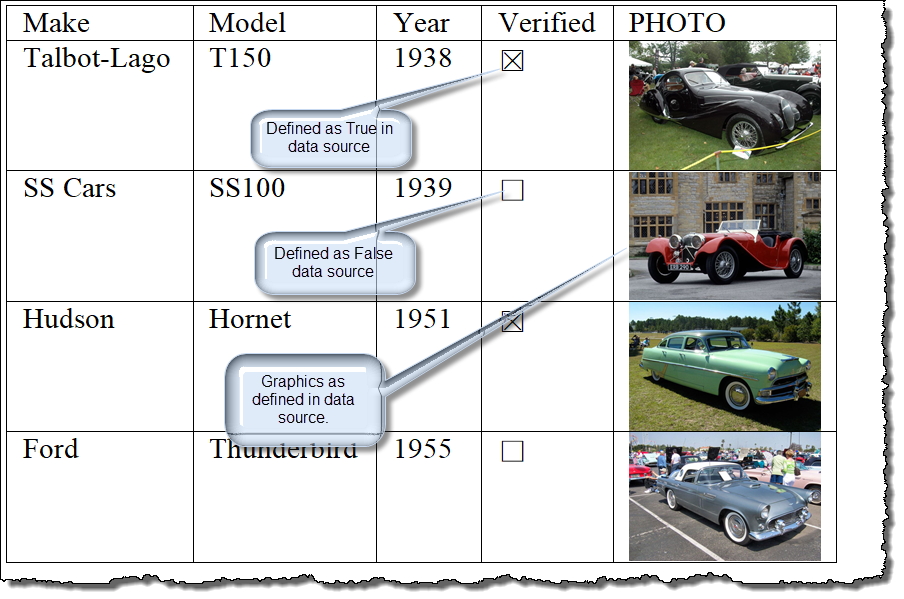
Photos can be defined in the data source and be displayed in merge outputs. Boolean values (e.g., True\False, Yes\No or 1\0) can be defined in the data source and displayed as checkboxes in the merge outputs.
With the right content controls and defined source data, you can merge to and fill dropdown lists or display a bar code (Word 2016 and higher only) in the merge output.
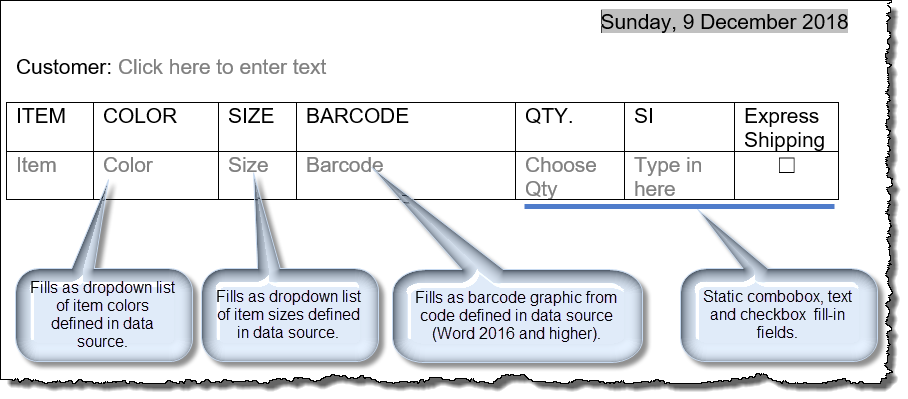
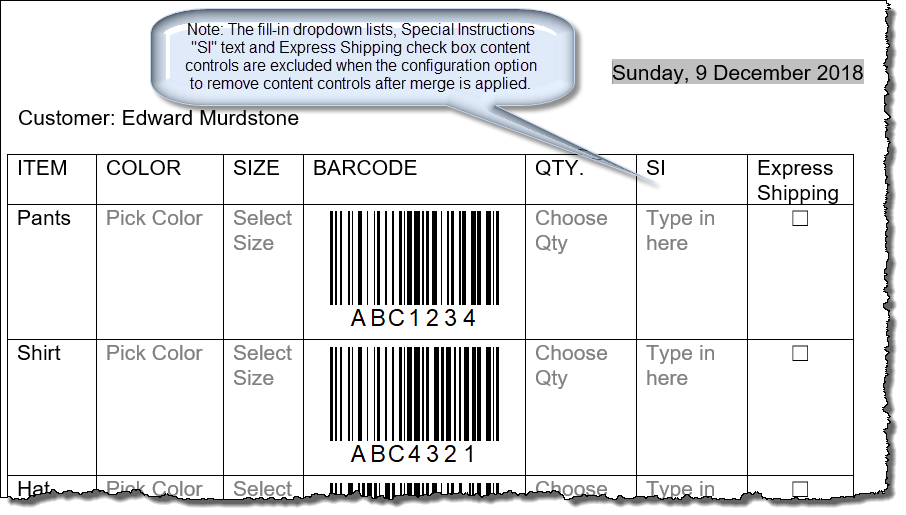
REMOVE CONTENT CONTROLS AFTER MERGE
Dropdown list
and combo box content controls used in the merge template are not removed when
the configuration option remove content controls after merge is applied.
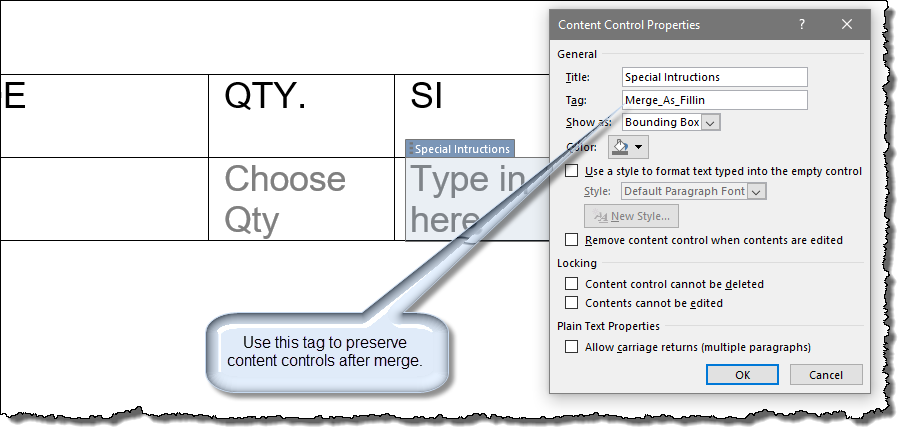
To preserve other type controls such as the Special Instructions text control
and Express Shipping checkbox shown above you must tag the content control
"Merge_As_Fillin."
Assistance with these advanced merges as well as assistance with other advance merge requirements or macros can be obtained by contacting the developer via the site feedback from. Current consulting rates will apply.
You can download Enhanced Merge (Merge Many to One) and some of the templates and data sources used in these examples here: Enhanced Merge (Merge Many to One) Download Package.
![]() For more on template add-ins and how to load them, see: Organizing Your Macros/Template Add-ins at: Installing Macros
For more on template add-ins and how to load them, see: Organizing Your Macros/Template Add-ins at: Installing Macros
That's it! I hope you find the add-in and this tips page useful and informative.
The information, illustrations and code contained in my "Microsoft Word Tips" are provided free and without risk or obligation.
However, the work is mine. If you use it for commercial purposes or benefit from my efforts through income earned or time saved then a donation, however small, will help to ensure the continued availability of this resource.
If you would like to donate, please use the appropriate donate button to access PayPal. Thank you!
This page was last updated on
January 05, 2022
Website
Privacy Statement
Back to top ![]() Back to
Word Tips
Back to
Word Tips