
The Anchorage
Personal website of Gregory K. Maxey, Commander USN (Retired)

The Anchorage
Personal website of Gregory K. Maxey, Commander USN (Retired)
The information, illustrations and code contained in my "Microsoft Word Tips" are provided free and without risk or obligation.


However, the work is mine. If you use it for commercial purposes or benefit from my efforts through income earned or time saved then a donation, however small, will help to ensure the continued availability of this resource.
If you would like to donate, please use the appropriate donate button to access PayPal. Thank you!
This tips page was inspired by a frequently viewed post in a popular Word support forum and addresses the question "How to import an Excel list into a Word dropdown list?" See: MSOffice Forums Link
With Word, the document designer can employ one or more of several different "list" types which enable the document user to make a single (or in some cases multiple) selection. These are:
![]() Notes:
Notes:
1. Since an ActiveX Listbox is not presented in a "Dropdown" format, it is mentioned for completeness only.
2. To make an ActiveX ComboBox function as a dropdown list, set the MatchRequired property = True and the Style property = frmStyleDropdownList
3. Useform lists and comboboxes are also available for use by a document developer. However, these are beyond the scope of this tips page. See: Populate Userform ListBox or ComboBox
For a demonstration of importing a simple list, I will use data from an Excel Workbook sheet named "Simple List." Representative Excel data and data imported into an associated document content control is shown below:
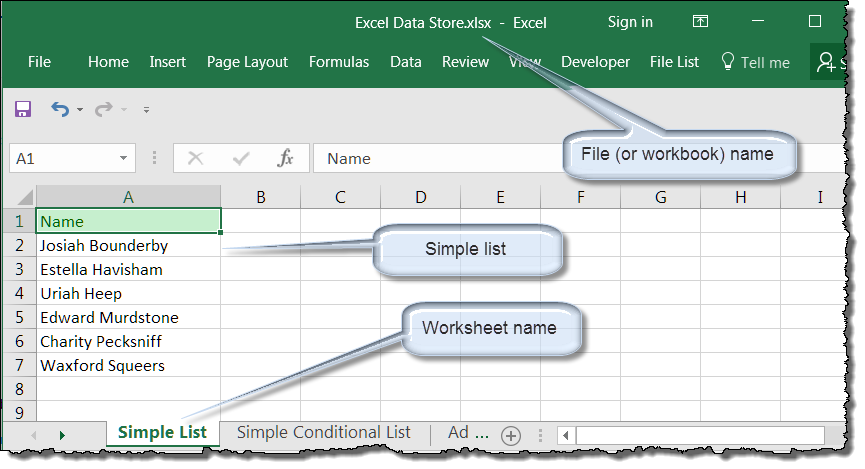

Various methods can be used to extract list data from Excel. These include office interoperability methods using late or early binding and ADODB using early or late binding.
![]() Note: An early binding method is demonstrated in the support forum discussion referenced above.
Note: An early binding method is demonstrated in the support forum discussion referenced above.
I like using ADODB with late binding because:
The following is a function I use to return Excel data (either an entire sheet range or named range) as a two dimensional variant array. The optional parameters determine the range for data to used, whether that range is an entire sheet or named range and whether the first row (often used as a header row) is included in the returned data:
Private Function fcnExcelDataToArray(strWorkbook As String, _
                                     Optional strRange As String = "Sheet1", _
                                     Optional bIsSheet As Boolean = True, _
                                     Optional bHeaderRow As Boolean = True) As Variant
'Default parameters include "Sheet1" as the named sheet, range of the full named sheet _
and a header row is used.
Dim oRS As Object, oConn As Object
Dim lngRows As Long
Dim strHeaderYES_NO As String
  strHeaderYES_NO = "YES"
  If Not bHeaderRow Then strHeaderYES_NO = "NO"
  If bIsSheet Then strRange = strRange & "$]" Else strRange = strRange & "]"
  Set oConn = CreateObject("ADODB.Connection")
  oConn.Open ConnectionString:="Provider=Microsoft.ACE.OLEDB.12.0;" & _
        "Data Source=" & strWorkbook & ";" & _
        "Extended Properties=""Excel 12.0 Xml;HDR=" & strHeaderYES_NO & """;"
  Set oRS = CreateObject("ADODB.Recordset")
  oRS.Open "SELECT * FROM [" & strRange, oConn, 2, 1
  With oRS
    .MoveLast
    lngRows = .RecordCount
    .MoveFirst
  End With
  fcnExcelDataToArray = oRS.GetRows(lngRows)
lbl_Exit:
  If oRS.State = 1 Then oRS.Close
  Set oRS = Nothing
  If oConn.State = 1 Then oConn.Close
  Set oConn = Nothing
  Exit Function
End Function
For the "Simple List" example, the arguments passed to the function and resulting array returned are shown below. You should notice that the data (the simple list) is defined in an Excel workbook named "Excel Data Store.xlsx" The workbook path and and sheet name "Simple List" are passed as arguments to the function shown above.
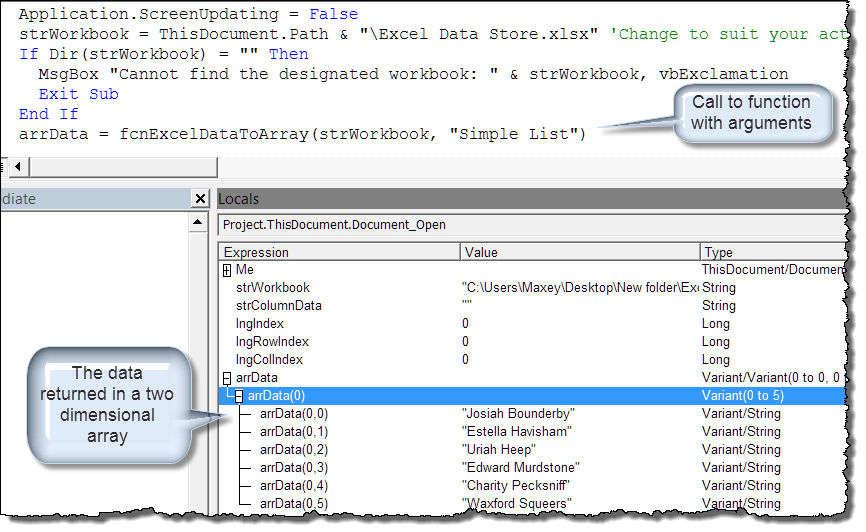
![]() Note: By default, arrays are zero based. In the array represented above, arrData(0) represents column 1 of the sheet range. Likewise, arrData(0, 0) contains the data defined in column 1, row 2 of the sheet. Why row 2? Because the header row (row 1) is excluded from the data returned due the default value of the optional parameter bHeaderRow.
Note: By default, arrays are zero based. In the array represented above, arrData(0) represents column 1 of the sheet range. Likewise, arrData(0, 0) contains the data defined in column 1, row 2 of the sheet. Why row 2? Because the header row (row 1) is excluded from the data returned due the default value of the optional parameter bHeaderRow.
From here it is a simple matter of populating the content control, formfield or ActiveX combobox with the data in the array. The complete code to populate a content control dropdown list titled "CC Dropdown List", a formfield dropdown list bookmarked "FormField Dropdown List" and an ActiveX combobox named ActiveX_ComboBox" when the document is first opened is provided here:
Sub Document_Open()
Dim strWorkbook As String
Dim lngIndex As Long
Dim arrData As Variant
Dim oCC As ContentControl, oFF As FormField
Dim bReprotect As Boolean
  Application.ScreenUpdating = False
  'The Excel file defining the simple list.  Change to suit.
  strWorkbook = ThisDocument.Path & "\Excel Data Store.xlsx"
  If Dir(strWorkbook) = "" Then
    MsgBox "Cannot find the designated workbook: " & strWorkbook, vbExclamation
    Exit Sub
  End If
  'Get the data. Change sheet name to suit.
  arrData = fcnExcelDataToArray(strWorkbook, "Simple List")
  Set oCC = ActiveDocument.SelectContentControlsByTitle("CC Dropdown List").Item(1)
  'Populate the CC
  If oCC.DropdownListEntries.Item(1).Value = vbNullString Then
    'Assumes the CC has a placeholder "Choose Item" entry with no defined value. _
    Preserve the placeholder entry.
    For lngIndex = oCC.DropdownListEntries.Count To 2 Step -1
      oCC.DropdownListEntries.Item(lngIndex).Delete
    Next lngIndex
  Else
    'Assumes no placeholder entry.  Simple clear list.
    oCC.DropdownListEntries.Clear
  End If
  For lngIndex = 0 To UBound(arrData, 2)
    oCC.DropdownListEntries.Add arrData(0, lngIndex), arrData(0, lngIndex)
  Next
  'Populate the FF
  Set oFF = ActiveDocument.FormFields("Formfield_DD_List")
  bReprotect = False
  If ActiveDocument.ProtectionType <> wdNoProtection Then
    ActiveDocument.Unprotect
    bReprotect = True
  End If
  oFF.DropDown.ListEntries.Clear
  For lngIndex = 0 To UBound(arrData, 2)
    oFF.DropDown.ListEntries.Add arrData(0, lngIndex)
  Next
  If bReprotect Then ActiveDocument.Protect wdAllowOnlyFormFields, True
  'Populate the ActiveX control
  With ActiveX_ComboBox
    .Clear
    .AddItem "        "
    For lngIndex = 0 To UBound(arrData, 2)
     .AddItem arrData(0, lngIndex)
    Next
    .MatchRequired = True
    .Style = fmStyleDropDownList
  End With
lbl_Exit:
  Application.ScreenUpdating = True
  Exit Sub
End Sub
The simply list demonstrated above will surely find a purpose, but the real benefit of using an ADODB method to associate a list of Excel data with a content control dropdown list is that the array returned includes all data associated with the list (or record) item. With this ability, you can create conditional lists. For example, consider the following Excel data:
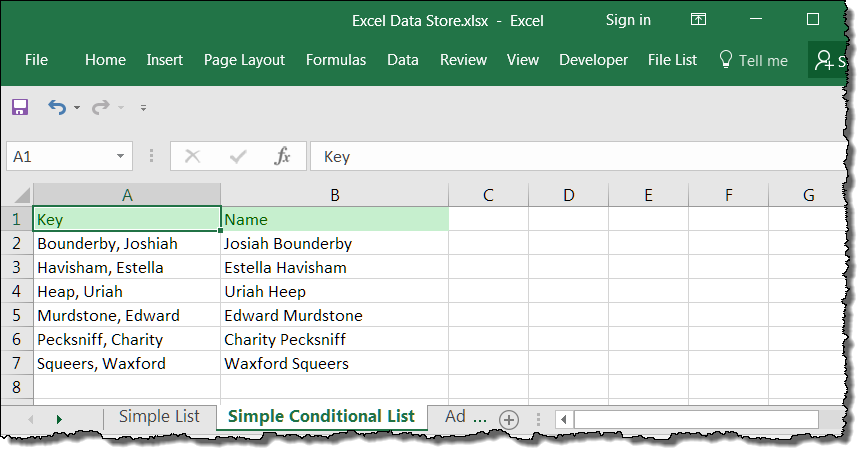
Look at the array returned. The scope of the first dimension (columns) is now 0 To 1 (or two columns). The array includes data from both the "Key" and "Name" columns.
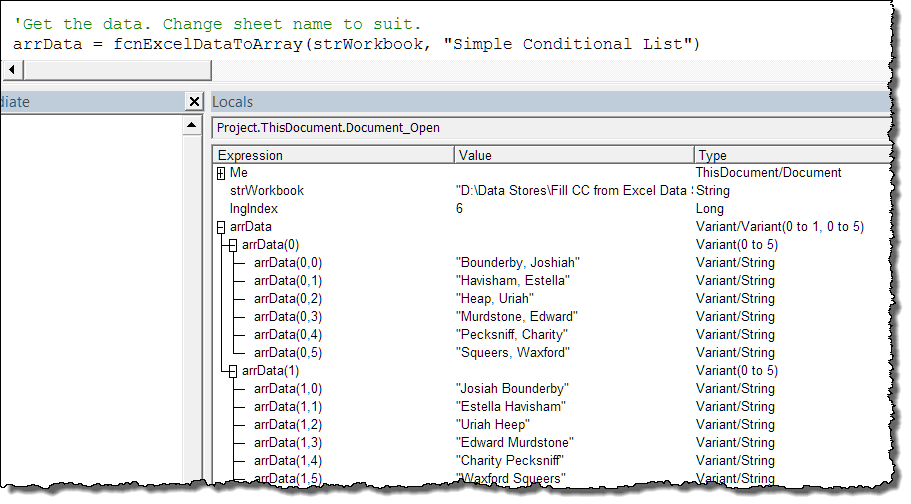
Leveraging the document content control on exit event, we can use this array to create a conditional list. For example, using the following code ...
Private Sub Document_ContentControlOnExit(ByVal oCC As ContentControl, Cancel As Boolean)
Dim strData As String
Dim lngIndex As Long
  Select Case oCC.Title
    Case "CC Conditional Dropdown List"
      With oCC
        If Not .ShowingPlaceholderText Then
          'Determine which dropdown list entry was selected. _
           Note: The object model has no direct way to do this.
          For lngIndex = 1 To .DropdownListEntries.Count
            If .Range.Text = .DropdownListEntries.Item(lngIndex) Then
              strData = .DropdownListEntries.Item(lngIndex).Value
              .Type = wdContentControlText
              .Range.Text = strData
              .Type = wdContentControlDropdownList
              Exit For
            End If
          Next lngIndex
        End If
      End With
    Case Else
      'Do nothing
  End Select
lbl_Exit:
  Exit Sub
End Sub
... we can select one thing from the displayed list e.g., "Heap, Uriah" (the condition), and display "Uriah Heep" (the result).


Next we can expand the basic conditional list and associate dependent fields. Here I have defined a conditional CC dropdown list with four dependent fields. The CCs are shown using design mode so you can see the associated tag\titles:
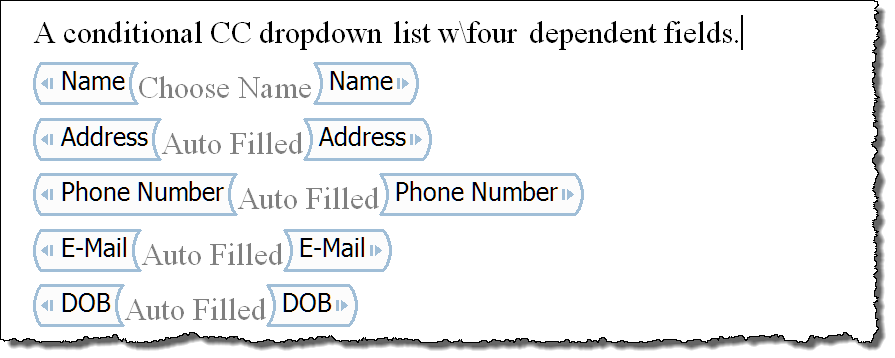
The Excel data is represented below:

![]() Note the "~" used in the Excel data to delimit the address field line.
Note the "~" used in the Excel data to delimit the address field line.
Now with just a few adjustments to the Document_ContentControlOnExit event procedure, we can select a listed item and based on the item selected display the appropriate result and fill the dependent fields.

The document, all the code and the Excel data sheet used to create this tips page and examples can be down loaded here Demo Pack. Just unzip the contents to the same folder and open the Word document.
![]() Note: This tips page, illustrations and examples were developed using Word 2010. It is wholly functional with Word 2007 through 2016.
Note: This tips page, illustrations and examples were developed using Word 2010. It is wholly functional with Word 2007 through 2016.
That's it! I hope you have found this tips page useful and informative.
The information, illustrations and code contained in my "Microsoft Word Tips" are provided free and without risk or obligation.


However, the work is mine. If you use it for commercial purposes or benefit from my efforts through income earned or time saved then a donation, however small, will help to ensure the continued availability of this resource.
If you would like to donate, please use the appropriate donate button to access PayPal. Thank you!