
The Anchorage
Personal website of Gregory K. Maxey, Commander USN (Retired)
The Anchorage
Personal website of Gregory K. Maxey, Commander USN (Retired)
The information, illustrations and code contained in my "Microsoft Word Tips" are provided free and without risk or obligation.

However, the work is mine. If you use it for commercial purposes or benefit from my efforts through income earned or time saved then a donation, however small, will help to ensure the continued availability of this resource.
If you would like to donate, please use the appropriate donate button to access PayPal. Thank you!
This Microsoft Word Help & Microsoft Word Tips page provides the home or small business Word user with a fully automated, interactive template for creating invoice documents. The template is based on a previous template that I co-developed with Microsoft Word MVP and longtime friend MVP Graham Mayor Interactive Invoice Template, and a VBA method that I have refined to monitor table cell events described here: Table Cell Events.
I want mention and thank Jeff Vandervoort for sharing with me the basic range monitoring technique that I employed in this project, Jason Frost Simpson for his interest in the project and assistance with structured code and Graham Mayor as, is customary, his comments, suggestions and critical eye always results in improvements.
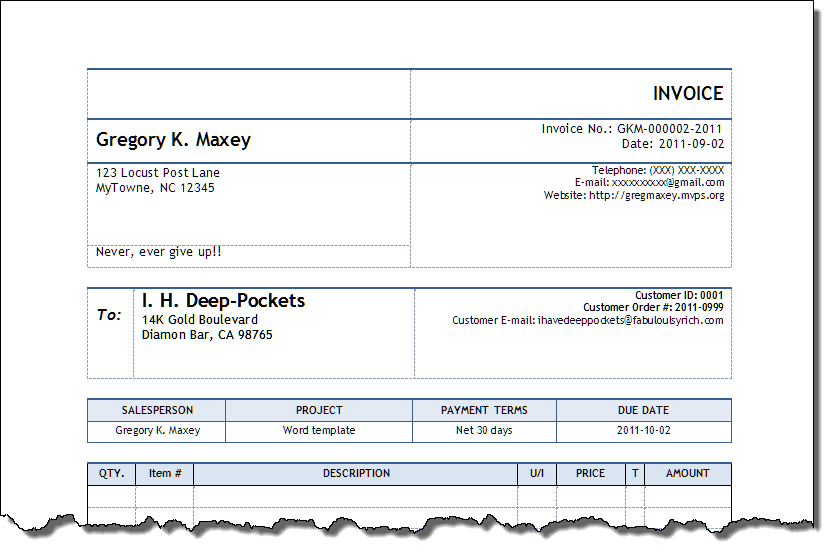
The basic template layout is shown below. It consist of a company information section, customer information section, general invoice information section, and a section for invoice product and service line item entries.
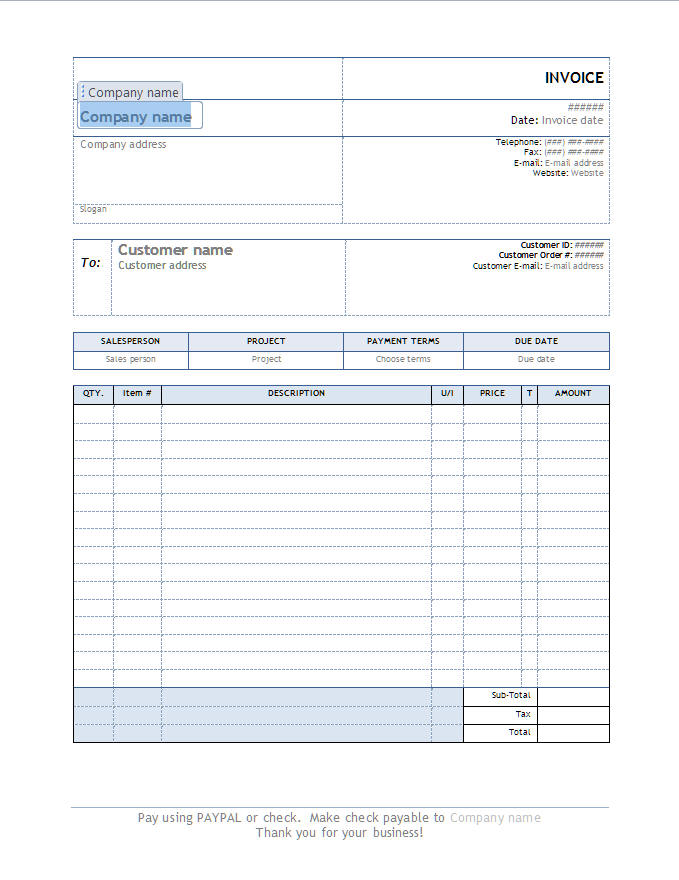
![]() Notes:
Notes:
1. Mapped content controls are placed in the invoice footers and multi-page headers that display company name, invoice number and date.
2. "Invoice number and Due date" are a calculated values and cannot be edited directly using their associated content control in the invoice document.
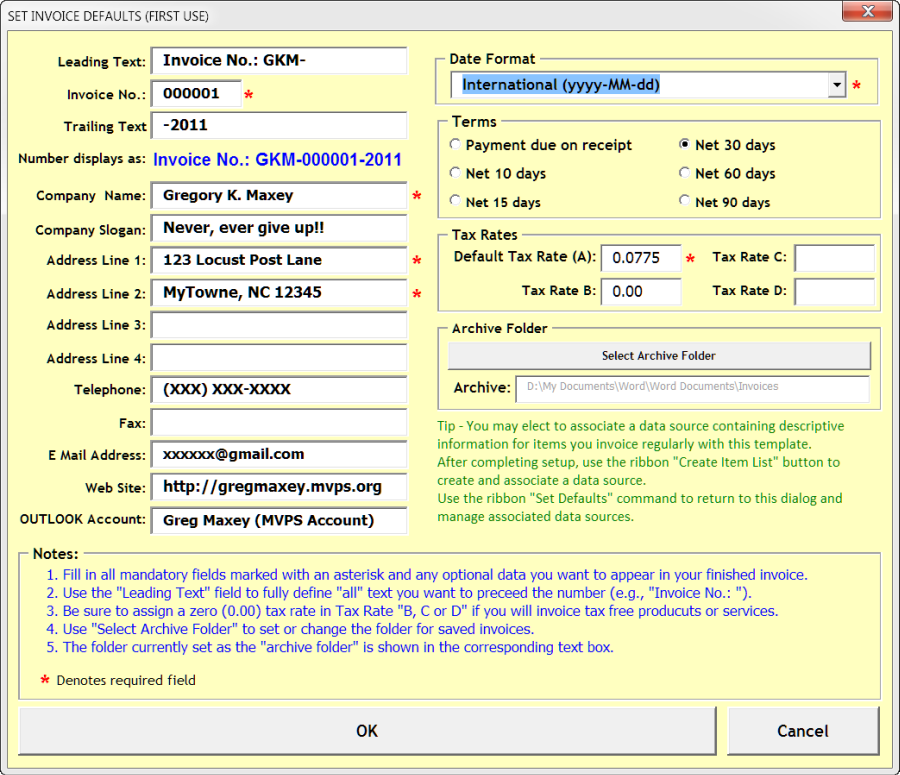
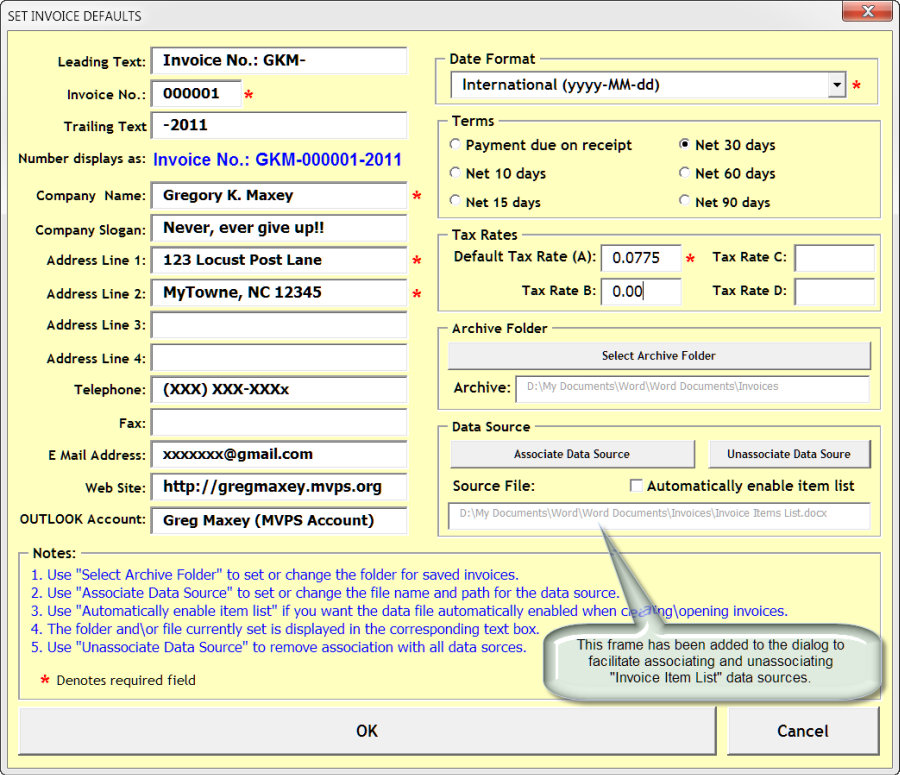
Default company information is defined by the user during setup with the template displayed userform "SET INVOICE DEFAULTS (FIRST USE)" shown below. This form displays automatically on first use to allow the user to set the default values for new invoices. It can be displayed again at any time that an invoice document is open should the user wish to change default data, the archive folder location, or associate\unassociated an external data source with the invoice.
![]() Notes:
Notes:
1. Due to the method used in sequencing the invoice number the starting number must be defined in the "Invoice No." field including any desired leading zeros. This field is limited to six characters.
2. Use the "Leading Text" field to fully define "all" text you want to prefix the numerical invoice number (e.g., in the example below the invoice number will be prefixed with "Invoice No.: GKM-").
3. "Invoice No., Company Name, Address Lines 1 & 2, Date Format and Default Tax Rate
(A)" are mandatory fields that must be completed before the defaults can be saved and applied.
4. The "Default Tax Rate (A)" defines the tax rate applied to all invoice lines items when an individual line item tax rate is not explicitly defined in the invoice column "T" using tax rate B, C, or D. This includes line items in which column "T" is left blank. Tax rates "B, C, and D" are optional, but if you invoice products or services that are not taxed then you must define a tax rate "0.00" as shown in the "Tax Rate B" field enter "B" in the ""T" column of the invoice when invoicing those products or services.
5. The template automatically creates an "Archive Folder" named "Invoices" in your Word documents folder. Users can change the "Archive Folder" location using the "Select Archive Folder" command button
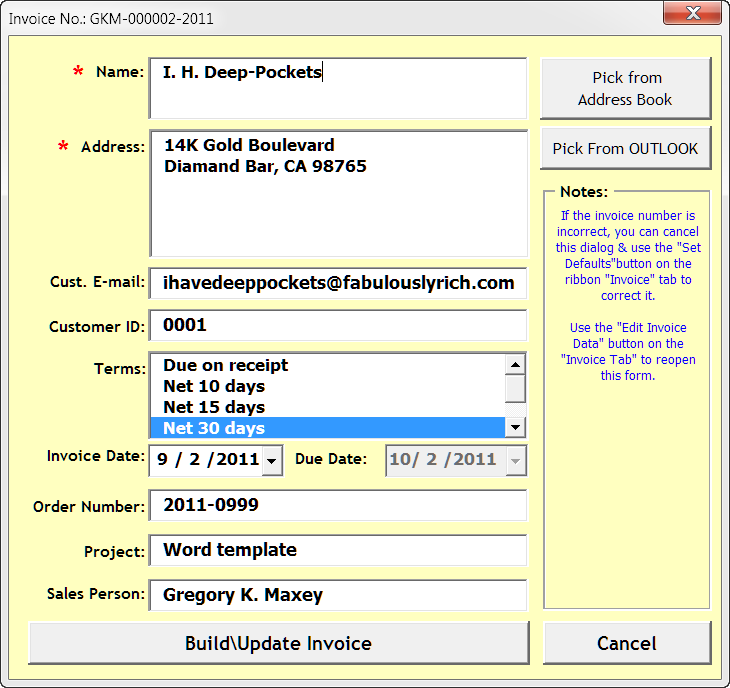
Once the default values are set, the user is ready to create the first invoice. Initial data entry for the invoice is accomplished using the interactive template displayed userform shown below.
![]() Notes:
Notes:
1. Customer name and address are mandatory fields.
2. The template user can enter customer information manually or use the "Pick from Address Book" or "Pick From OUTLOOK" command buttons to retrieve customer data.
- Both buttons function to retrieve that data that you have stored in your address book or OUTLOOK contacts folder.
- The "Pick from Address Book" will probably provide a quicker response as it doesn't require starting an instance of OUTLOOK, but the data available for retrieval is limited to name, address and e-mail address.
- While its use is very limited in the template published here, "Pick from OUTLOOK" provides a method to access "all" OUTLOOK contact properties (e.g., Customer ID, used in this application). Using the "Pick from OUTLOOK" may take a little longer or be noticeably slower for users with a large OUTLOOK contact list.
- If OUTLOOK is not already running, the presence of 3rd party add-ins may cause OUTLOOK to crash. If you use this method and experience OUTLOOK problems then always start OUTLOOK before preparing invoice documents using this template.
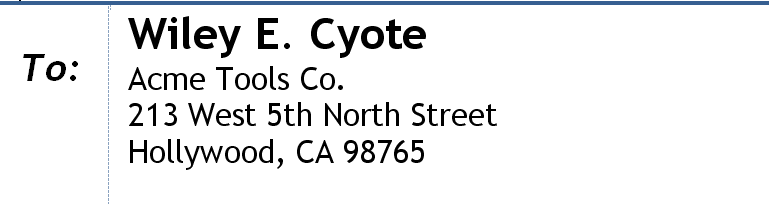
3. If you use either the address book or OUTLOOK to enter customer information, addressing to customer contacts with an associated "company name" is automatically formatted as follows:
4. "Due Date" is a calculated value determined by the invoice date and terms selected.
5. The form can be redisplayed at any time in an open invoice document if the user wishes to make changes.
When the user clicks the "Build\Update Invoice" command button the basic invoice appears and the user can begin creating invoice line item entries.
![]() Notes:
Notes:
1. With the exception of "Invoice number, Invoice date and Due date," users can edit invoice data in the current invoice directly using the content controls.
2. As depicted above, if you don't assign a default value for your company telephone number, fax number, e-mail address or website address during setup the corresponding line\content control is removed from your invoice documents. Here, I have left the "Fax" field blank in my setup and the corresponding "Fax:" field has been removed.
3. If you later decide that you want to restore a deleted information field in new invoices then you will need to perform the following:
- Create a new invoice document.
- Open the "Invoice Defaults" dialog by selecting the "Set Defaults" control in the "Invoice Control" group of the "Invoice Manager" ribbon tab.
- Enter the appropriate default data and click "OK" to save the revised default data and close the dialog.
- To preserve your invoice numbering sequence, close the new invoice just created without saving changes.
- Create a new invoice document and the new defaults will display.
4. Similarly, if you do not provide information in the "Customer E-mail, Customer ID o r Order Number" fields when you create new invoice documents the corresponding
line\content control will be removed from the invoice document. Click "Edit Invoice Data" if you decide later to add the deleted information to the current invoice.
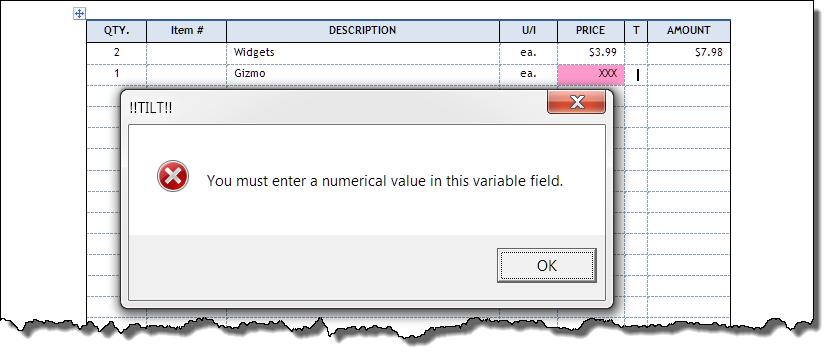
Creating the invoice line item entries takes full advantage of the active cell events described in Table Cell Events.


![]() Note:
Should the user tab or click in the last cell i.e., the invoice "Total" cell, the OnChange redirects the insertion point to the first line item entry.
This prevents the user from accidently using the tab key in the final cell as this would add a new row and corrupt the structure of the calculated table.
Note:
Should the user tab or click in the last cell i.e., the invoice "Total" cell, the OnChange redirects the insertion point to the first line item entry.
This prevents the user from accidently using the tab key in the final cell as this would add a new row and corrupt the structure of the calculated table.
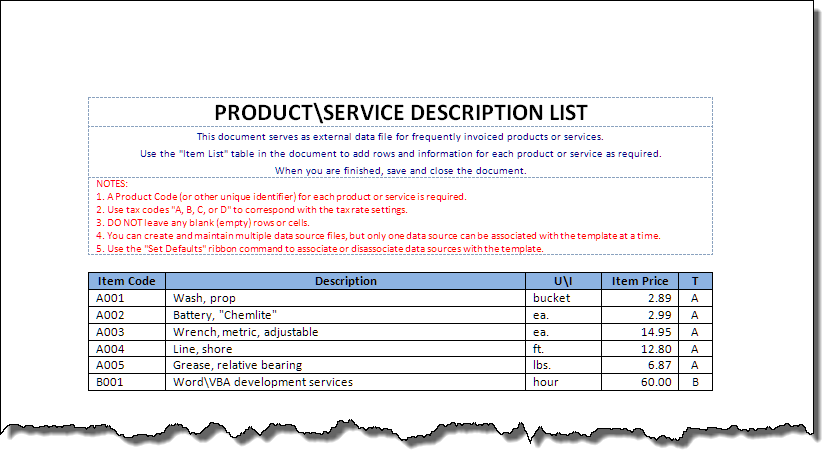
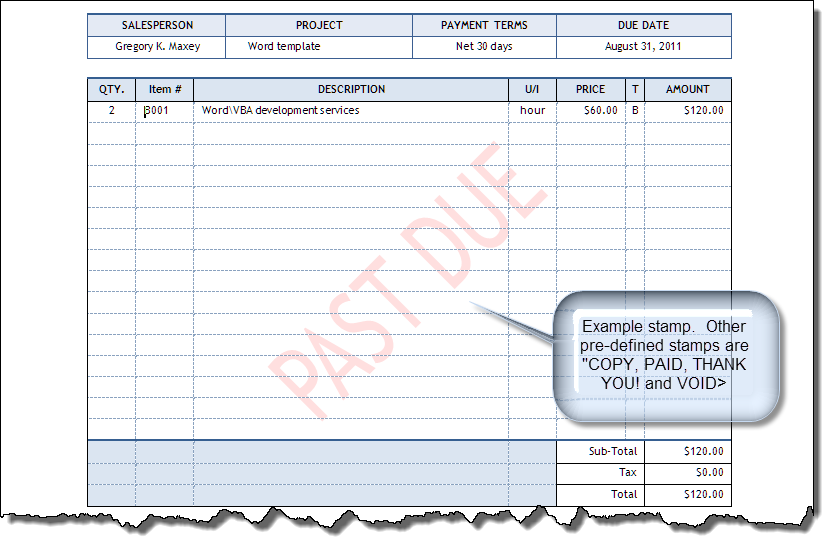
Item #, DESCRIPTION and U/I cell entries can be done manually by simply tabbing between fields and entering data or by using an external data source associated with the template. Associating an external data source or "Invoice Item List" simplifies entering frequently invoiced products or services. The "Invoice Item List" is simply a formatted Word document that lists these items and associated details. A sample formatted "Invoice Item List" is shown below.
With an invoice item list is associated and enabled when the user enters the "Item #" cell the defined products and services are displayed in a template displayed userform.
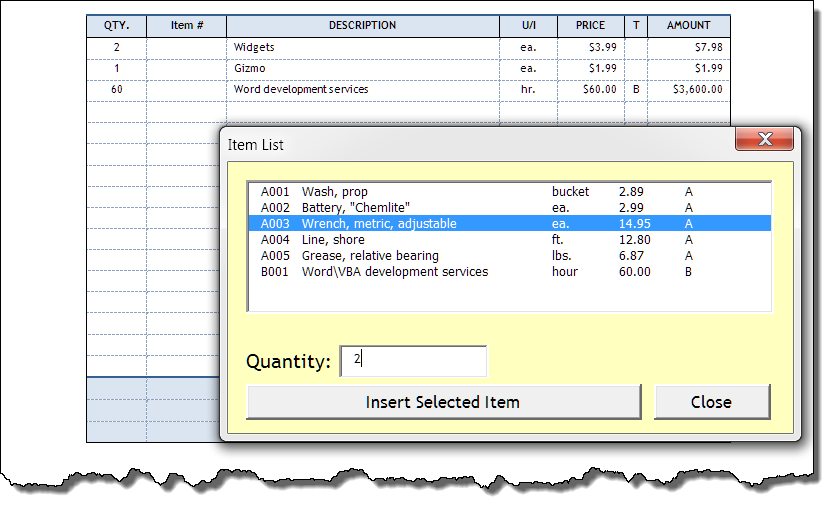
The item selected and quantity entered is placed in the selected row of the invoice when the user clicks the "Insert Selected Item" command button. The line item total and invoice totals are automatically calculated when the entry is made.
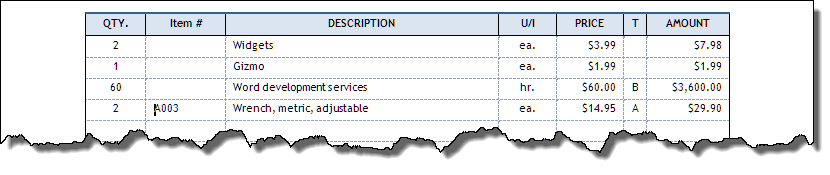
To create and associate an "Invoice Item List" with the template use the "Create Item List" command button in the "Invoice List Tools" group of the "Invoice Manager" ribbon tab. This creates a new pre-formatted products and services item list like the example shown above that you can customize for you own use. The new item list is automatically named "Invoice Item List.docx," saved in the default "Archive Folder" and associated with the template.
![]() Notes:
Notes:
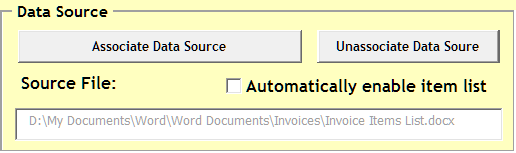
1. User's with more than one business may create multiple item list but only one item list can be associated with the template at a given time.
2. Item lists can be associated or disassociated with the template using the "Data Source" section of the template displayed Userform "SET INVOICE DEFAULTS" dialog shown below. Call this dialog using the "Set Defaults" ribbon command button.
The user interface (U/I) associated with the template is shown in the two split images below.


The U/I is arranged in five functional groups "Invoice Control, Item List Tools, Current Invoice, Symbols & Rates and Template Information." A brief description of each control is provided using ribbon super-tip text when the user pauses the mouse over a control. Additional information is provided below.
![]() Note:
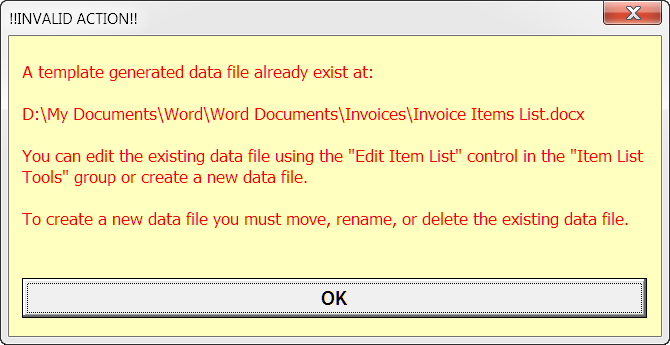
Each product and service item list created using the "Create Item List" control is named "Invoice Item List.docx" and saved in the default "Archive Folder."
Therefore, before attempting to create multiple data source files the current "Invoice Items List.docx" must be moved, renamed or deleted.
Otherwise the template displays the following user notification:
Note:
Each product and service item list created using the "Create Item List" control is named "Invoice Item List.docx" and saved in the default "Archive Folder."
Therefore, before attempting to create multiple data source files the current "Invoice Items List.docx" must be moved, renamed or deleted.
Otherwise the template displays the following user notification:
![]() Note:
Since it is possible to associate an item list to an open invoice that could contain revised data, the template
notifies the user if the item list was created or saved after the current invoice was last saved.
Note:
Since it is possible to associate an item list to an open invoice that could contain revised data, the template
notifies the user if the item list was created or saved after the current invoice was last saved.

![]() Note
To minimize risk of corrupting the invoice table structure and calculation process, users should avoid using Word's built-in table row add and delete controls
Note
To minimize risk of corrupting the invoice table structure and calculation process, users should avoid using Word's built-in table row add and delete controls
![]() Notes:
Notes:
1. Any existing "stamp" is automatically removed when this control is executed.
2. Any stamp text that exceeds (won't fit) in the invoice line item rows will be masked by the shading applied to the heading and total rows.
Therefore you should ensure any stamp text is sized to fit within the white space defined by the line item rows.
![]() Notes:
Notes:
1. OUTLOOK must be installed on the user's PC and set as the default mail handler.
2. Uses the default mail account or the account defined by the user during setup.
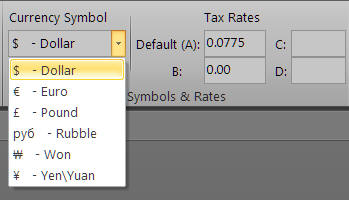
![]() Note: The default currency symbol is determined by the users regional settings.
Note: The default currency symbol is determined by the users regional settings.
Download the template here: Invoice (with Auto Table Calculate). When you attempt to use the template for the first time to create a new invoice, you will be required to acknowledge the "Credits & Disclaimer" and you will be prompted to define the defaults.
![]() For more on template add-ins and how to load them, see: Organizing Your Macros/Template Add-ins at: Installing Macros
For more on template add-ins and how to load them, see: Organizing Your Macros/Template Add-ins at: Installing Macros
That's it! I hope you have found this tips page useful and informative.
Well that is almost it. I have refrained from making this statement in other tips pages but feel that it is appropriate here. I am not a formally trained, professional programmer or Word developer. While what have demonstrated and provided here may be rudimentary in some circles, it represents over 60 hours of tedious and often frustrating work, testing, and re-work. I was happy to do it because I enjoy the challenge and I am pleased to share it with the Word user community. However, I will not respond to requests to further refine or customize this project without demonstrated willingness from the requester to compensate me for the work.
The information, illustrations and code contained in my "Microsoft Word Tips" are provided free and without risk or obligation.
However, the work is mine. If you use it for commercial purposes or benefit from my efforts through income earned or time saved then a donation, however small, will help to ensure the continued availability of this resource.
If you would like to donate, please use the appropriate donate button to access PayPal. Thank you!
This page was last updated on
March 09, 2021
Website
Privacy Statement
Back to top ![]() Back to
Word Tips
Back to
Word Tips