The Anchorage
Personal website of Gregory K. Maxey, Commander USN (Retired)

The Anchorage
Personal website of Gregory K. Maxey, Commander USN (Retired)
The information, illustrations and code contained in my "Microsoft Word Tips" are provided free and without risk or obligation.


However, the work is mine. If you use it for commercial purposes or benefit from my efforts through income earned or time saved then a donation, however small, will help to ensure the continued availability of this resource.
If you would like to donate, please use the appropriate donate button to access PayPal. Thank you!
This Microsoft Word Tips & Microsoft Word Help page will show you how you can modify the button icons or icon label text displayed on your global or template\document specific customized Quick Access Toolbar (QAT)
Additionally, you can use the techniques shown here to modify the button icons displayed on your ribbon customized using the Word 2010 or 2013 built-in user interface.
For reasons unknown, Microsoft provided a limited collection of icons (180) to use for QAT customization and more regrettably it first appeared that they didn't want users to have any flexibility to change the default button image assigned to the built-in commands.
![]() Note: For tips on adding a custom command (or macro) to the QAT and selecting one of the available button face images see my: Add a Macro to the Quick Access Toolbar (QAT)
Note: For tips on adding a custom command (or macro) to the QAT and selecting one of the available button face images see my: Add a Macro to the Quick Access Toolbar (QAT)
QAT customizations can be global (available in all documents) or template\document specific.
![]() Note: If you have both Word 2010 and 2013 installed on your computer. Both versions will share and update the same Word.customUI file. This means if you want a "global" customization to appear in Word 2013 but NOT Word 2010 (and vice versa), you will need to open and create a customized QAT in the appropriate version's Normal.dotm.
Note: If you have both Word 2010 and 2013 installed on your computer. Both versions will share and update the same Word.customUI file. This means if you want a "global" customization to appear in Word 2013 but NOT Word 2010 (and vice versa), you will need to open and create a customized QAT in the appropriate version's Normal.dotm.
![]() Bonus Tip: QAT icons are arranged according to the following protocol:
Bonus Tip: QAT icons are arranged according to the following protocol:
- The application .customUI or .qat file
- Any other global template add-ins (in alphabetical order)
- Normal template
- The active document attached template
The following images depicts my personal global QAT and its associated Word.customUI file content.
![]() Note: The .customUI file can be opened using any standard text editor. I'm using Notepad in this demonstration.
Note: The .customUI file can be opened using any standard text editor. I'm using Notepad in this demonstration.
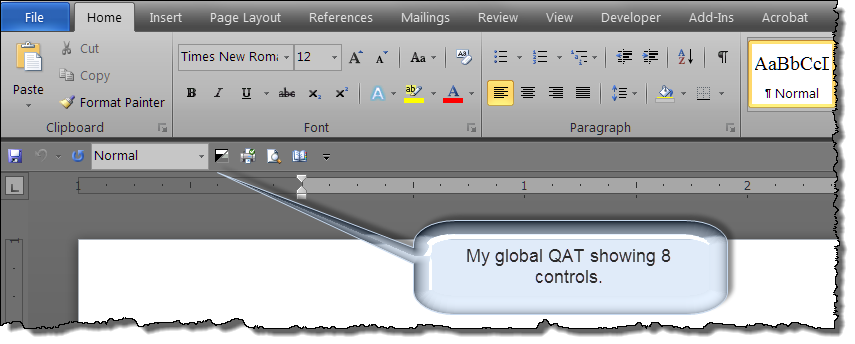
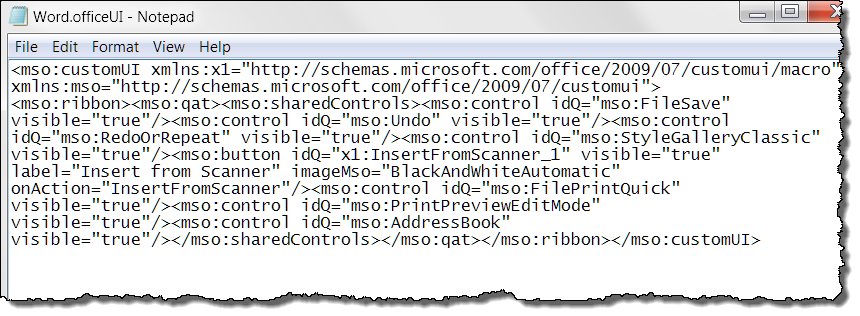
Don't be alarmed at the initial appearance of the content of the .customUI file. It is arranged using XML structure and you can easily make it appear so it makes more sense. For example, here it is rearranged with some added comments:
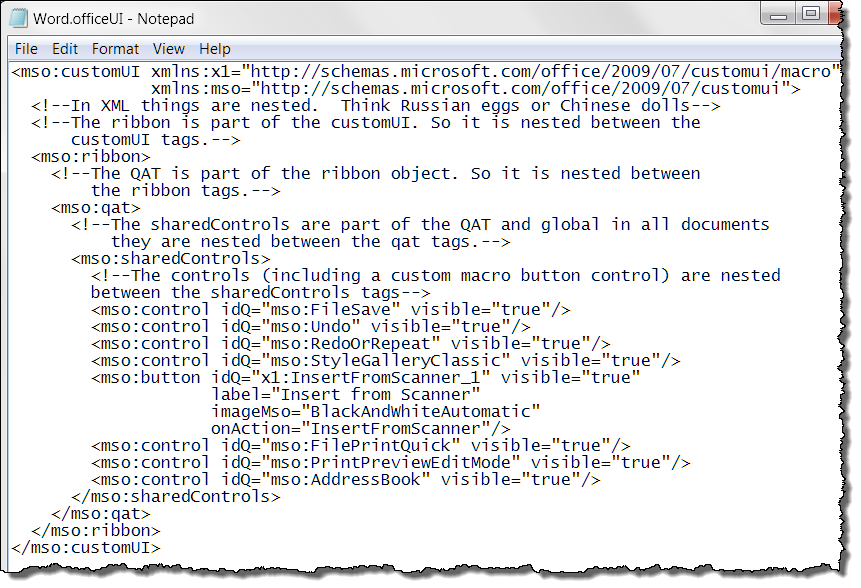
I'm satisfied with my global QAT the way it is. So let's move on to a template\document specific QAT and solve some problems with icons and labels.
Many built-in commands do not have an associated button face or (imageMso). When you add one or more of these commands to the QAT they appear with a default green circular button face as shown in the illustrations below.
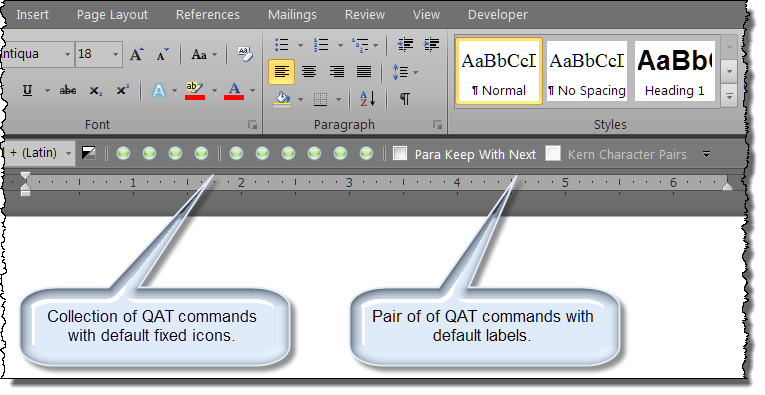
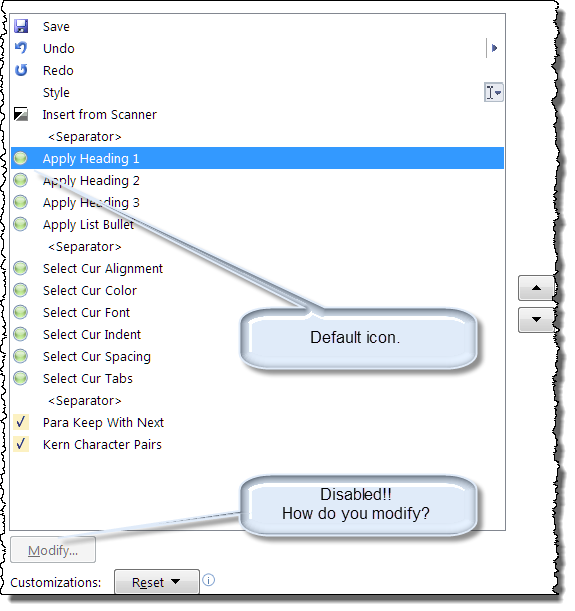
With the user interface, Microsoft only permits users to modify the image and label of "Macros" added to the QAT. An example is "Insert from Scanner" button control in my global QAT illustrated above.
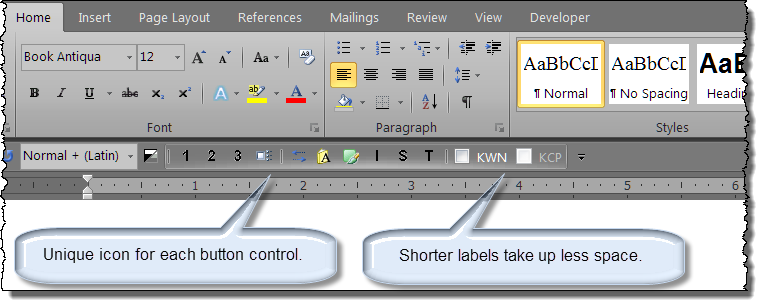
The default fixed icons and labels can make it difficult to locate a command or in the case of the fixed labels quickly eat up QAT real estate.
All is not lost!! Remember, template\document specific QAT customizations are stored in a separate XML file named "CustomUI" in a folder named "userCustomization" that is part of the Office Open XML File Format document package.
This CustomUI file can be opened and edited similarly to the .customUI and .qat global files.
![]() Note: The "userCustomization" folder is present only in file packages where a user has created file customizations.
Note: The "userCustomization" folder is present only in file packages where a user has created file customizations.
The XML file for the customization used in the above example is shown below. I've restructured the format to make it easier to read.
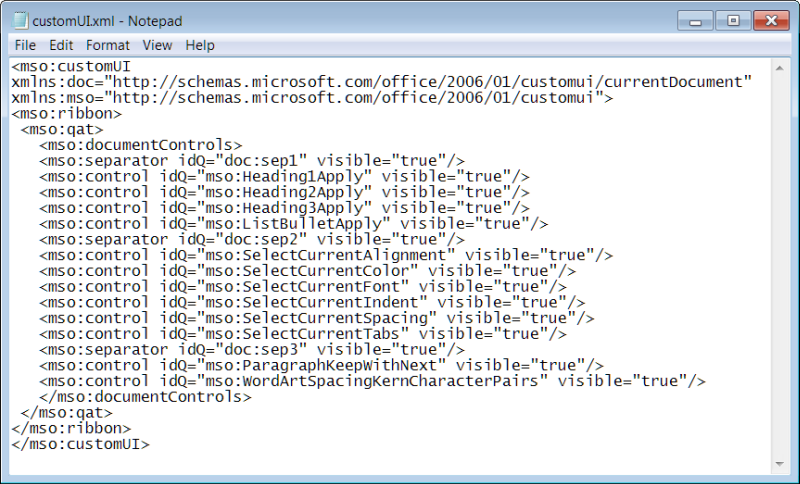
By adding your own imageMso and label attributes to this file you can assign a different button face image to each control and modify the labels displayed. You can use any of the available office imageMso names.
![]() Tip: "imageMso" corresponds with the fixed "idMso" for all office built-in controls. You can determine the idMso of most Word built-in controls by pausing your mouse over the control displayed in the QAT customization dialog. The idMso appears in screen tip in parenthesis e.g., Popular Commands | File (FileSave). Additionally, a complete list of office Ribbon UI control names and types can be downloaded from Microsoft. See my: Customize Ribbon for links. content.
Tip: "imageMso" corresponds with the fixed "idMso" for all office built-in controls. You can determine the idMso of most Word built-in controls by pausing your mouse over the control displayed in the QAT customization dialog. The idMso appears in screen tip in parenthesis e.g., Popular Commands | File (FileSave). Additionally, a complete list of office Ribbon UI control names and types can be downloaded from Microsoft. See my: Customize Ribbon for links. content.
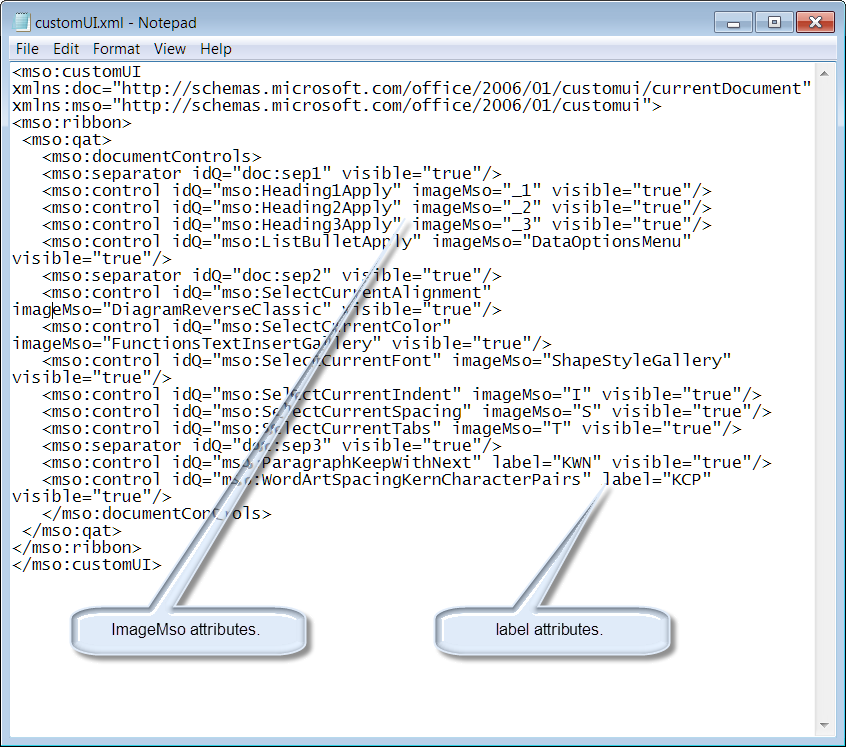
![]() Note: The "label attribute" callout pointer in the image above should be pointing about an inch more to the right under label="KCP." I realized thist long after I created the image and I've since lost or deleted the file.
Note: The "label attribute" callout pointer in the image above should be pointing about an inch more to the right under label="KCP." I realized thist long after I created the image and I've since lost or deleted the file.
After saving these changes and updating the Office Open XML File Format document container, the customized QAT will appear as shown below:
While tinkering with the contents of this page, Wisconsin attorney and regular Word support group contributor, Charles Kenyon discovered that custom screentip and supertip attributes could also be used to enhance the user QAT experience.
The screentip attribute replaces the label attribute causing the pseudo label text to appear bold.
The supertip attribute is used to add additional explanatory text or notes and can consist of multiple lines.
The following illustrates the XML used to create custom supertip and screentip text and the result.

Steps for accessing and modifying the "customUI" file in the Office Open XML File Format document container are simple and straightforward:
Adding custom icons (icons that are not part of the Office imageMso collection) to the QAT is also possible, but take a bit more effort.
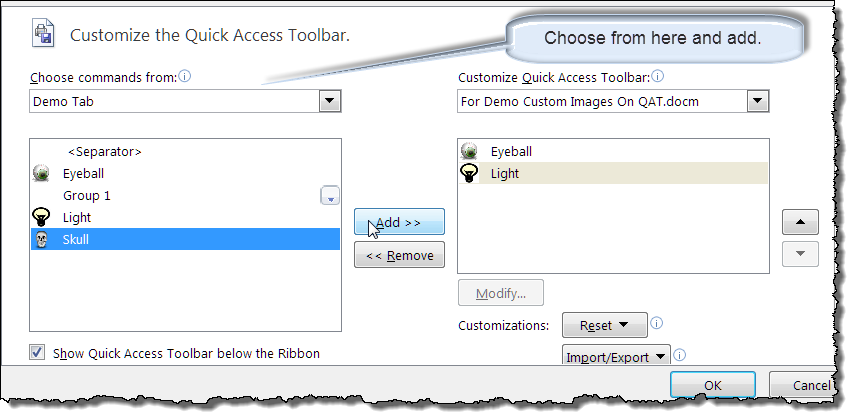
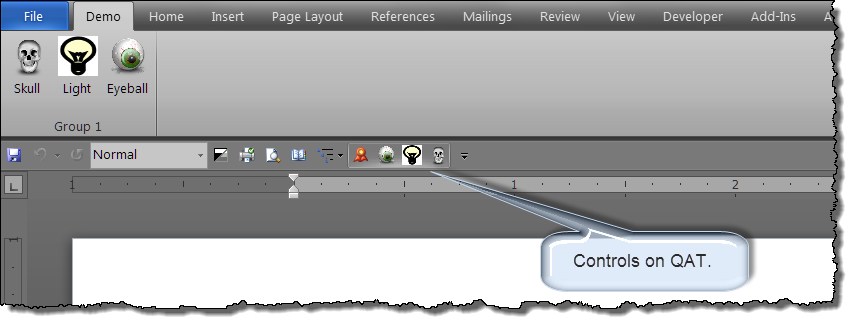
First you must create a custom ribbon tab containing the controls and custom images that you want to appear on the QAT. For more on customizing the ribbon see: Customize the Ribbon
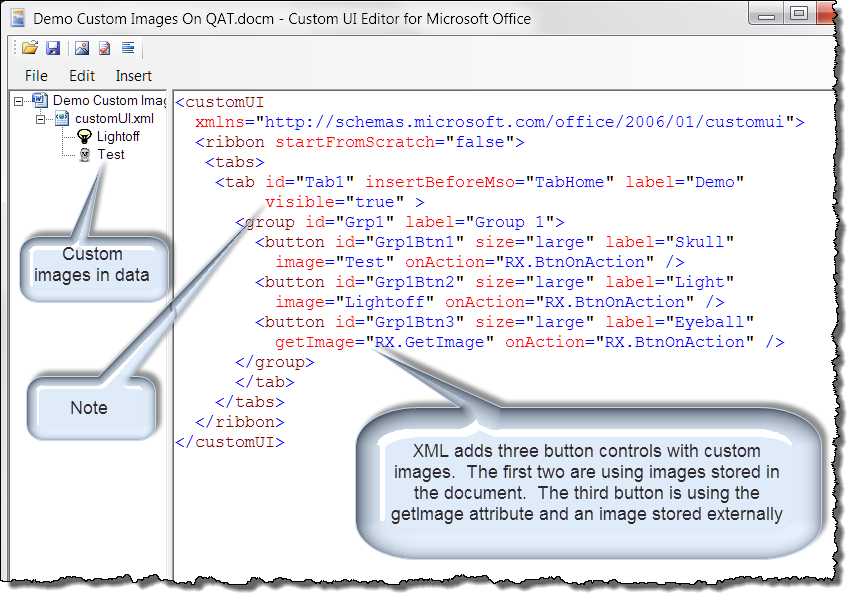
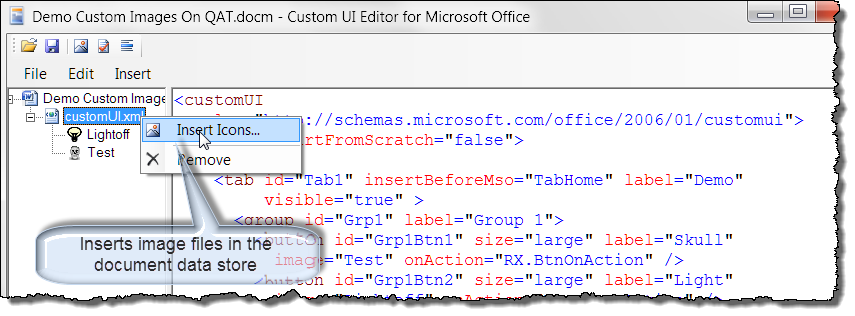

![]() Note: PNG image files (the Skull and Eyeball) are best suited for ribbon and QAT control images as their background is transparent. Compare their look to the light image which is a .gif file with a white visible background.
Note: PNG image files (the Skull and Eyeball) are best suited for ribbon and QAT control images as their background is transparent. Compare their look to the light image which is a .gif file with a white visible background.
The code required to get and load the external image is provided by VBA Callback:
Sub GetImage(control As IRibbonControl, ByRef returnedVal)
'Create an object variable
Dim oImage As Object
Select Case control.ID
  Case "Grp1Btn3"
    'Define the external image file path and name
    Set oImage = LoadPictureGDI("D:\Ribbon Demo Images\Eyeball.png")
    Set returnedVal = oImage
  Case Else
    'Do Nothing
End Select
Set oImage = Nothing
Exit Sub
End Sub
While .png format image files look best on the ribbon and QAT, loading them is not as straightforward as loading most other image format files.
The built-in VBA LoadPicture function won't work and a special function LoadPictureGDI created and posted by Stephen Bullen is needed. For more on the LoadPicture and LoadPictureGDI functions and access to the code see: Ribbon Images & Labels Part III
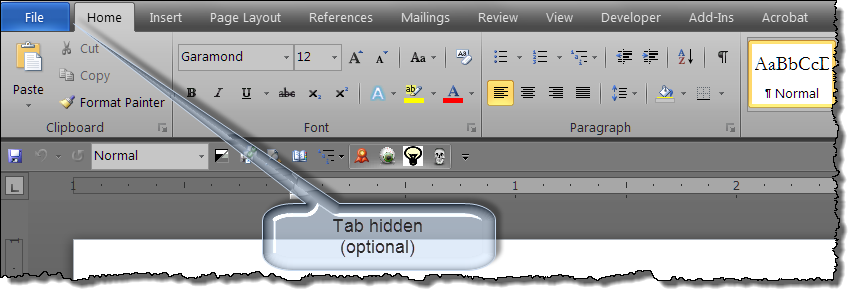
Now that the controls with custom images are available on the ribbon, you can add them to your QAT. For more on adding controls to the QAT, see: Add Control to QAT
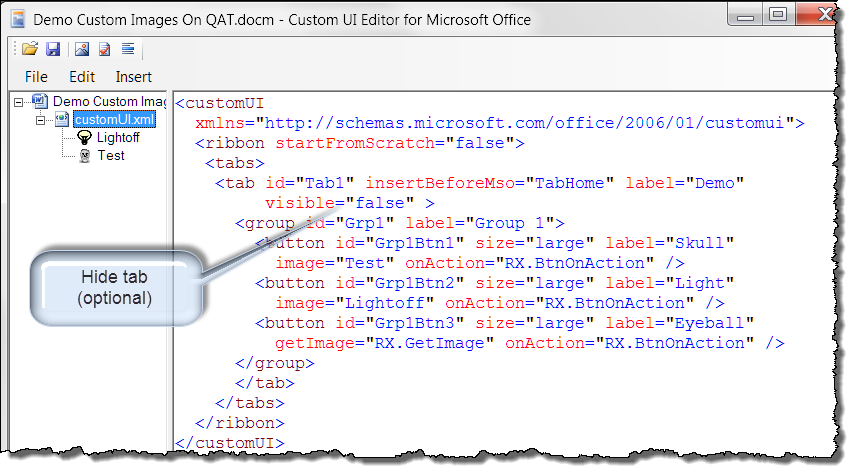
I am not a big fan of the ribbon customization features available in Word 2010/2013 and prefer using a RibbonXLM script: Customize Ribbon. However, if you want to use the built-in utility, you can enhance it significantly by editing the UI customization file that you create using an XML editor application:
![]() Note: You can only use the imageMso attribute and available Microsoft icons for customizations using this method. For an alternative method see my:
Custom Ribbon Icons
Note: You can only use the imageMso attribute and available Microsoft icons for customizations using this method. For an alternative method see my:
Custom Ribbon Icons
That's it! I hope you have found this tips page useful and informative.
The information, illustrations and code contained in my "Microsoft Word Tips" are provided free and without risk or obligation.


However, the work is mine. If you use it for commercial purposes or benefit from my efforts through income earned or time saved then a donation, however small, will help to ensure the continued availability of this resource.
If you would like to donate, please use the appropriate donate button to access PayPal. Thank you!