
The Anchorage
Personal website of Gregory K. Maxey, Commander USN (Retired)
The Anchorage
Personal website of Gregory K. Maxey, Commander USN (Retired)
The information, illustrations and code contained in my "Microsoft Word Tips" are provided free and without risk or obligation.

However, the work is mine. If you use it for commercial purposes or benefit from my efforts through income earned or time saved then a donation, however small, will help to ensure the continued availability of this resource.
If you would like to donate, please use the appropriate donate button to access PayPal. Thank you!
The purpose of this Microsoft Word Tips & Microsoft Word Help page is to publish and describe my CustomXMLParts form class (and auxiliary elements) template addin. The form class represents over 100 hours of head scratching and coding and consolidates processes to:
What are CustomXMLParts? Basically, CustomXMLParts are XML documents that are a "Part" of the Office Open XML format file bundle which constitutes your Word document. An XML document is simply:
![]() Note:
See my Custom XML "Helpful" Help for Word
for a more detailed introduction to CustomXMLParts.
Note:
See my Custom XML "Helpful" Help for Word
for a more detailed introduction to CustomXMLParts.
A stated and described in the linked tip pages above, a CustomXMLPart is simply structured data embedded in (or part of) your Word document.
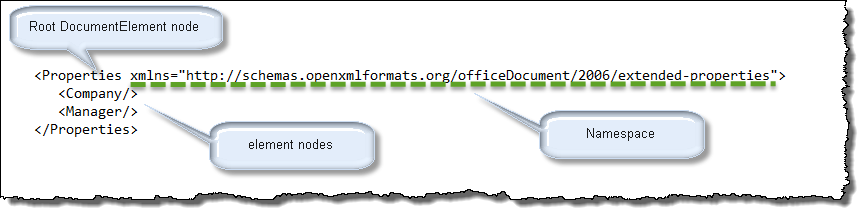
The basic form of the XML defining a CustomXMLPart is a root DocumentElement node, Namespace and one or more element nodes. The following depicts the basic underlying XML of one of the built-in document CustomXMLParts:
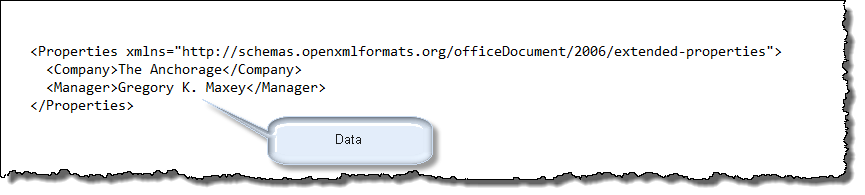
This XML simply defines a data structure. It contains no data. If I later define a Company and\or Manager document property to the document, that data is stored in the CustomXMLPart:
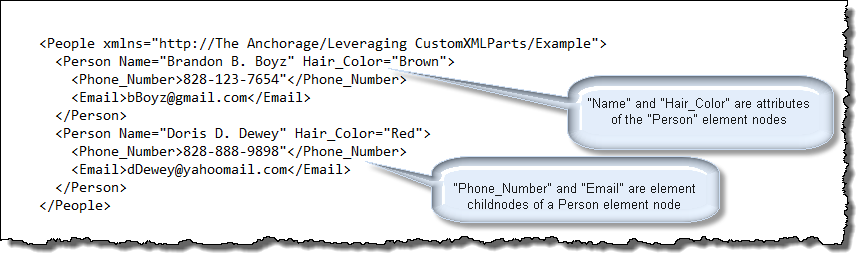
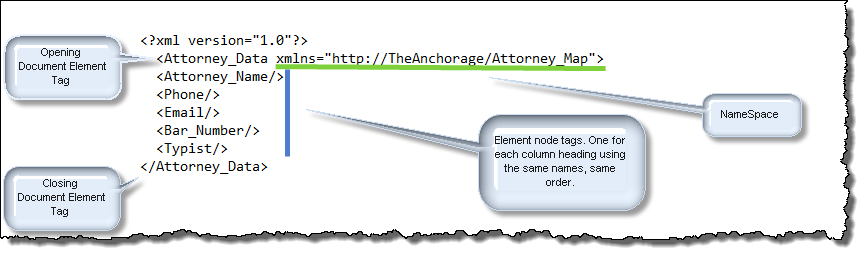
The XML above is very basic. XML can be expanded to produce complex data structures. The following depicts a slightly more complex XML script. In addition to the root DocumentElement, namespace and element nodes, this XML defines several attribute nodes and element childnodes:
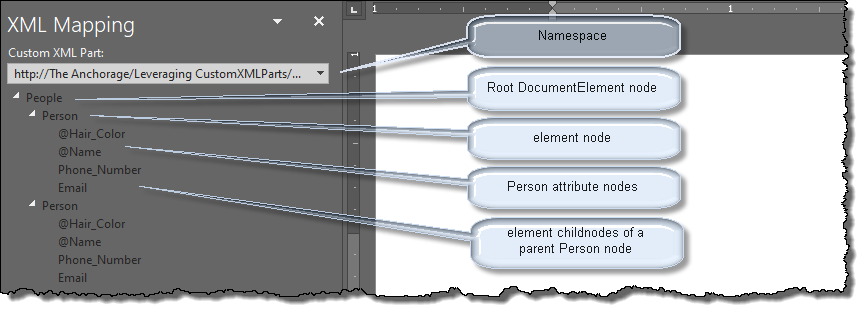
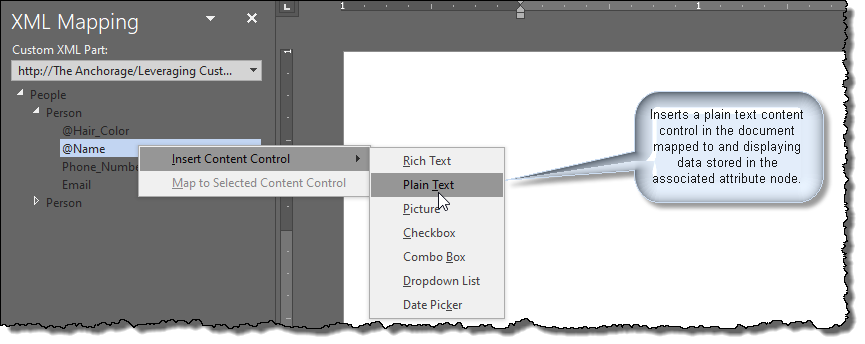
If this XML were added as a CustomXMLPart to a Word document, it would appear in the XML Mapping Pane as:
![]() Note:
The XML Mapping Pane was added with Word 2013. My
Content Control Tools AddIn can
also be used (actually better) to load an view document CustomXMLParts.
Note:
The XML Mapping Pane was added with Word 2013. My
Content Control Tools AddIn can
also be used (actually better) to load an view document CustomXMLParts.
As with the built-in CustomXMLParts, data in any document CustomXMLPart can be inserted in the document as a mapped content control:
![]() Note:
Mapping content controls to CustomXMLParts is discussed in detail in my Repeating Data,
Mapped Content Controls and Mayor & Maxey CC/V/B and DP Tools Add-In tip
pages.
Note:
Mapping content controls to CustomXMLParts is discussed in detail in my Repeating Data,
Mapped Content Controls and Mayor & Maxey CC/V/B and DP Tools Add-In tip
pages.
Consider the following simple XML:

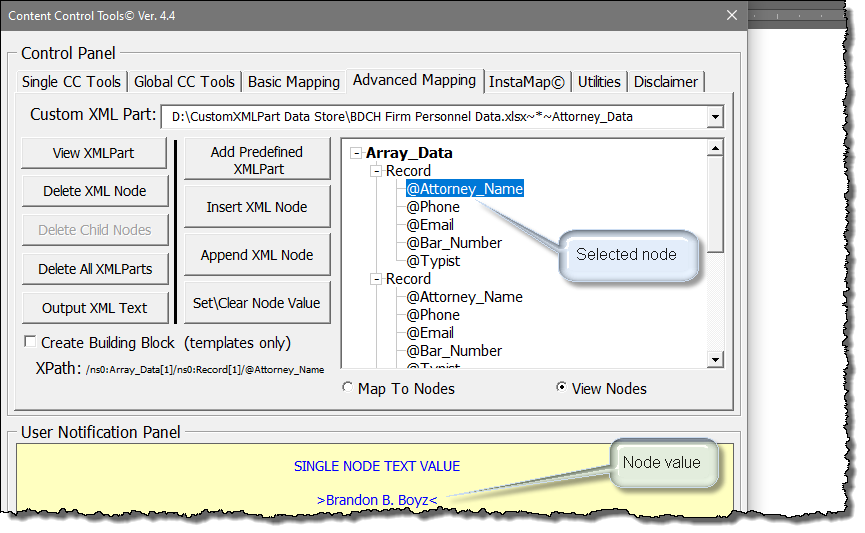
It meets the prescribed XML rules for data structure. If added to a Word document as a CustomXMLPart, it would appear using my addin as:
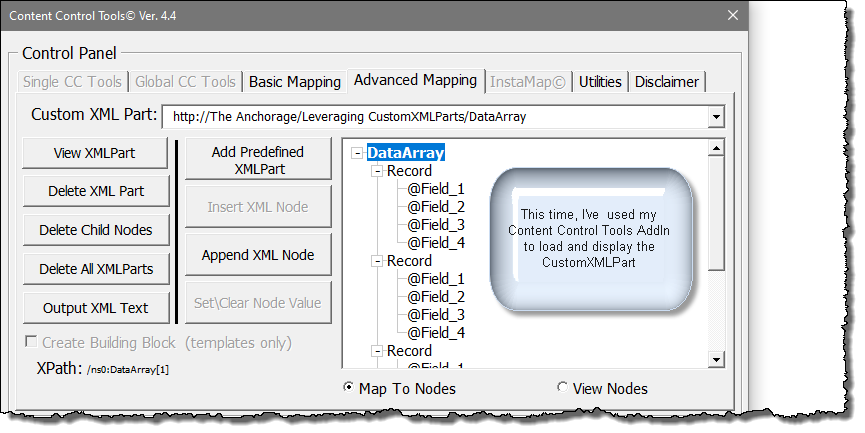
If you are familiar with Excel and or Access, you should readily see that the underlying XML for the CustomXMLPart looks an awfully lot like the data structure of an Excel worksheet and Access table. Consider this:
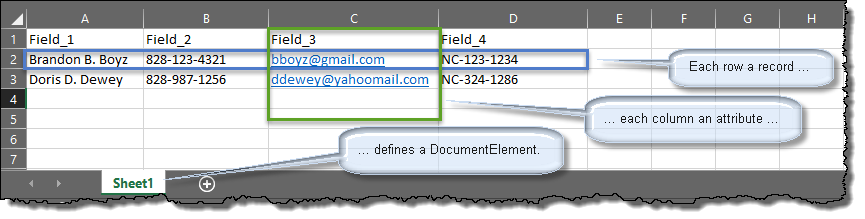
You should see were this is going! Next I am going to show you how to import an external Excel worksheet (or Access table) containing data about employees, clients, products, suppliers etc., as a CustomXMLPart.
In this section, I introduce my CustomXMLPart form class and show you how to employ it to import and store external Excel or Access data as a document CustomXMLPart data store.
Embed in the document, a CustomXMLPart data store is transportable to other document users who may or may not have access to the external data file.
Mastering data is mastering advanced document development. As a document owner\developer, you might routinely need external data to populate a userform listbox, populate lists in content controls, link key data to dependent data fields, etc.
As a document owner\designer, I'll also show you how easy it is to keep your CustomXMLPart data store synched with the external data content.
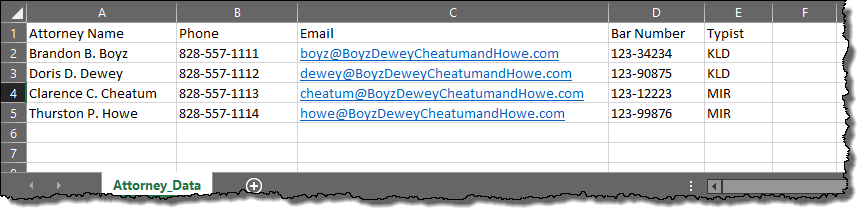
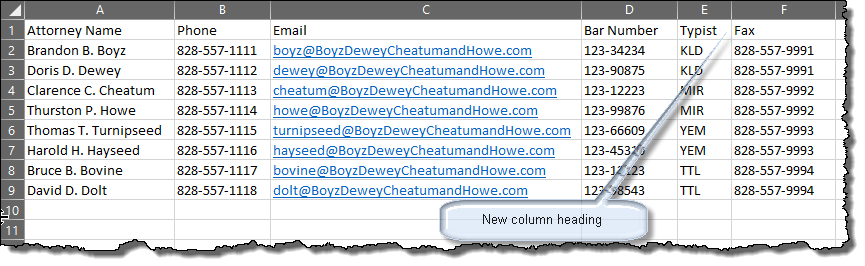
The following depicts an Excel worksheet with data related to the attorneys in a fictional law firm. It looks similar to the Excel content shown earlier but here I have applied meaningful field (or attribute) names and a meaning full worksheet name:
The process for converting the Excel data shown above to XML script and an embedded document CustomXMLPart is fairly complicated. If involves quite a bit of knowledge of XML data structure and VBA. To simplify (or package) the process and make it easier for you to use, I've created and consolidated a CustomXMLPart form class and supporting VBA procedures in a Word template addin.
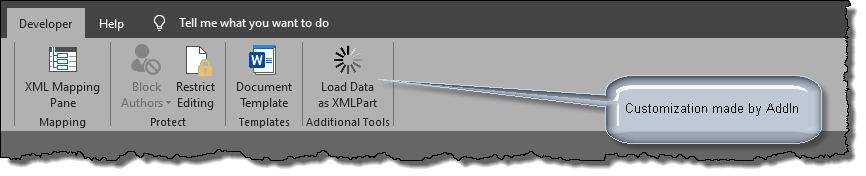
When loaded, the addin makes the following modification to the Word Developer ribbon tab:
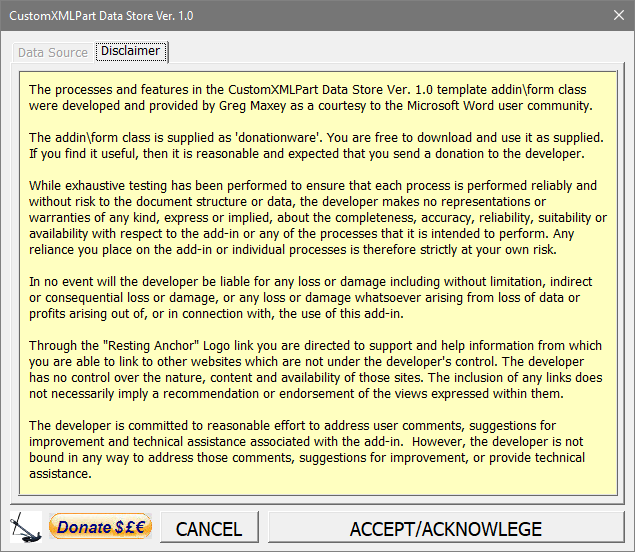
On first use (and on revision changes), the disclaimer is displayed:
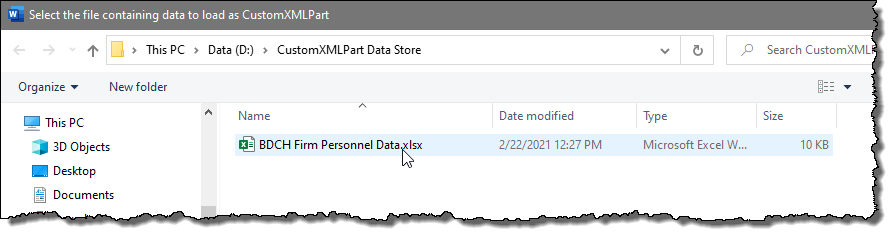
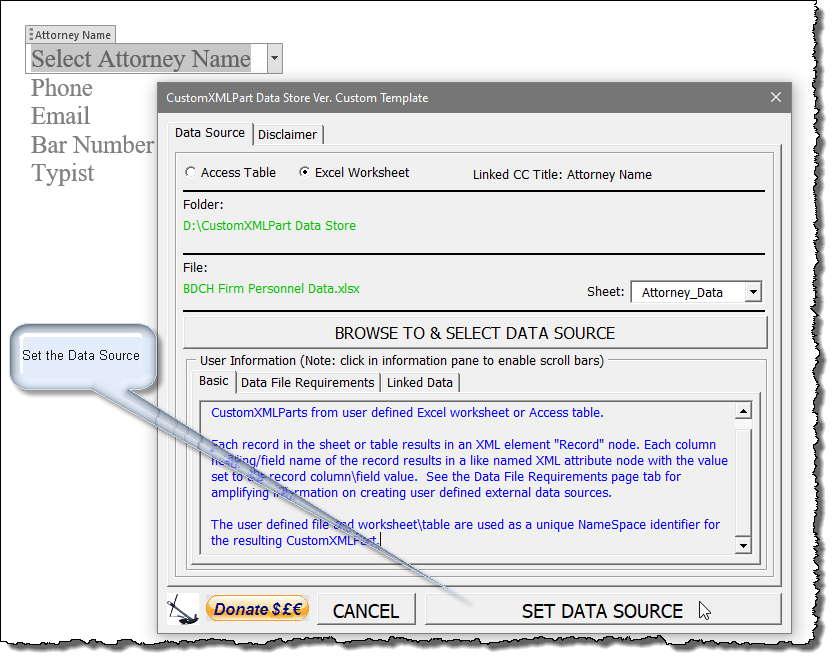
After accepting the disclaimer statement. The dialog to select the external data source file is displayed:
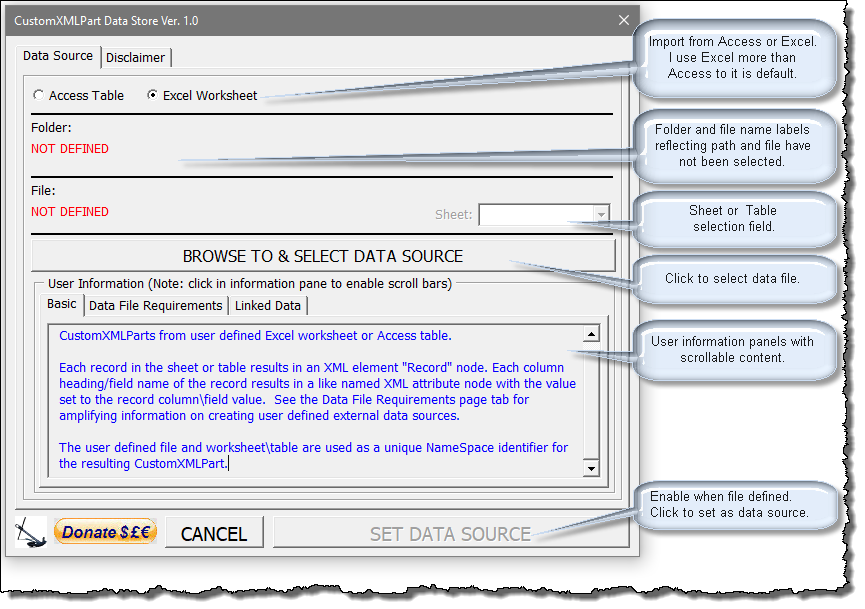
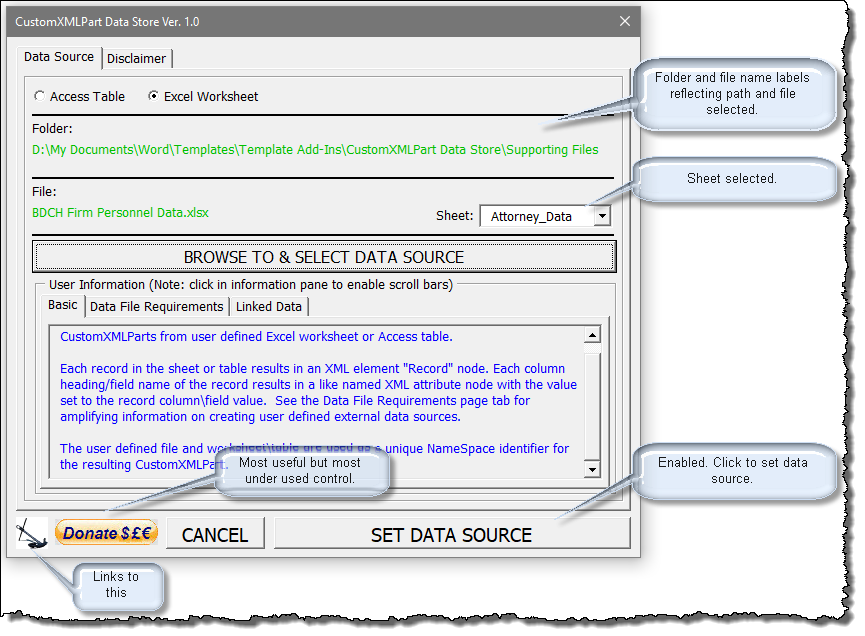
![]() Note:
If the selected data file contains only one sheet or table, that sheet or table
is auto-selected in the above dialog. If a data file contains multiple sheets or
tables, user action is required to select the appropriate sheet or table.
Note:
If the selected data file contains only one sheet or table, that sheet or table
is auto-selected in the above dialog. If a data file contains multiple sheets or
tables, user action is required to select the appropriate sheet or table.
After "SET DATA SOURCE" is executed, the data from the external file is embedded in the document as a CustomXMLPart data store:
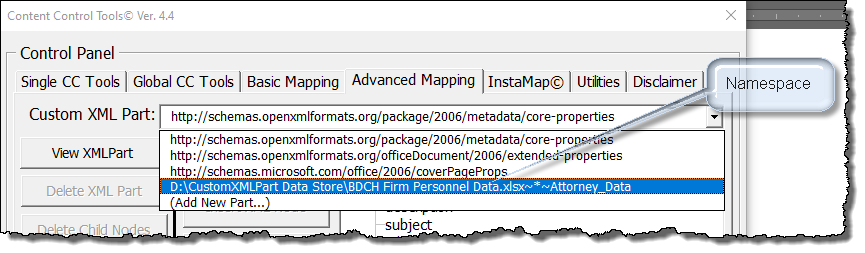
![]() Note:
The namespace for CustomXMLPart data stores created using the CustomXMLPart
form class consists of the full path of the data file and the sheet or table
name delimited using the characters set ~*~
Note:
The namespace for CustomXMLPart data stores created using the CustomXMLPart
form class consists of the full path of the data file and the sheet or table
name delimited using the characters set ~*~
The sole purpose for loading and employing the addin as just described, is to import external data as a CustomXMLPart data store. By themselves, these data stores might serve little purpose other than being an extension of the already provided built-in CustomXMLParts.
The real value of these CustomXMLPart data stores is realized when combined with the CustomXMLPart form class and its supporting elements in your own customized templates. In addition to the form class, the follow supporting elements can be used:
All that might be daunting and creating your own Custom Template may seem like a lot of work. It does take some work, but after watching the following demonstration, I think you might be motivated to give it a try. After the first time, it becomes relatively simple. This video illustrates employment of the CustomXMLPart form class and supporting elements.
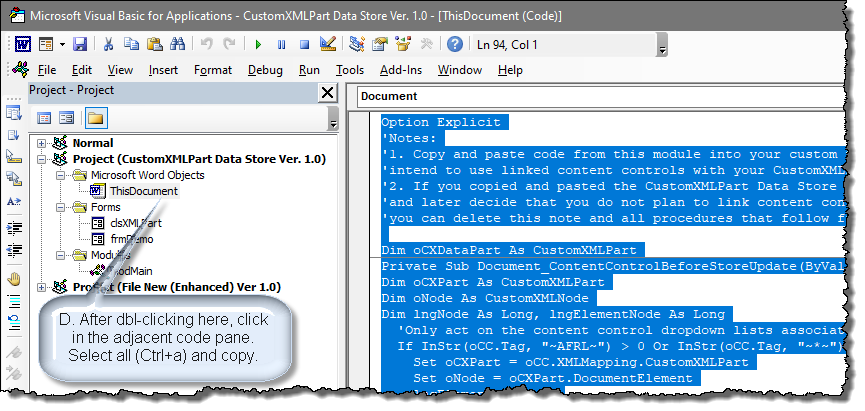
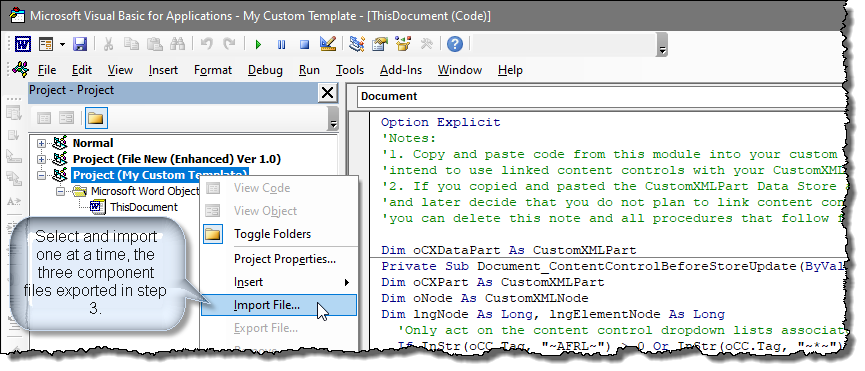
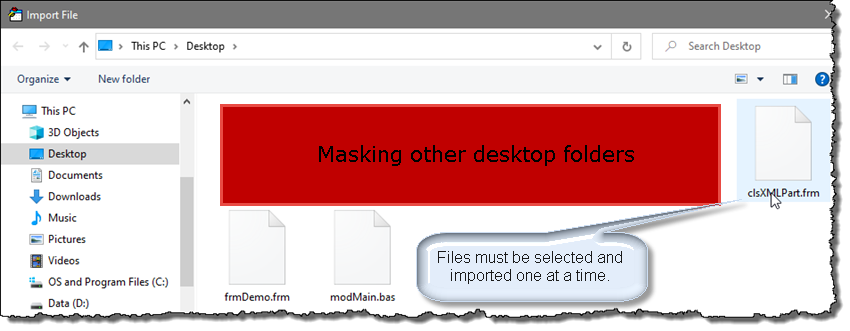
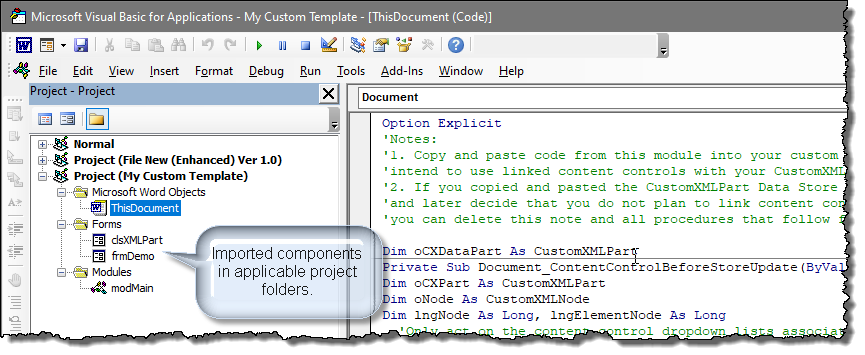
Here are all the steps (in groups) that you will need to perform to produced the results you just saw in your own template file.

![]() Note, the custom template file you created following steps 1 though 11 above
can now be used as your custom baseline template. There is no need to repeat
those steps again.
Note, the custom template file you created following steps 1 though 11 above
can now be used as your custom baseline template. There is no need to repeat
those steps again.
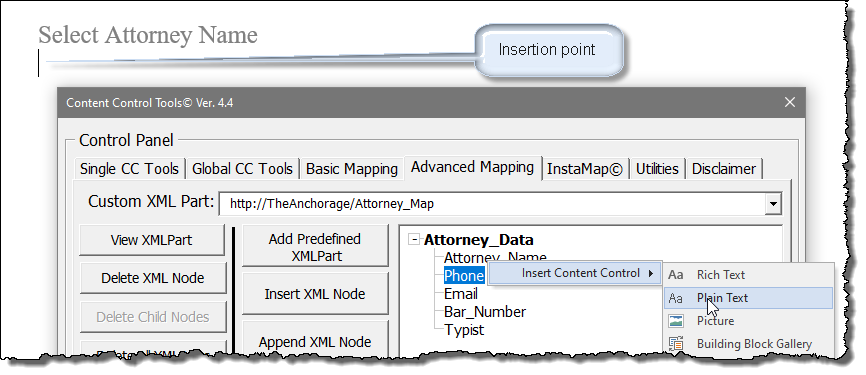
Now we will perform the steps to insert and map the content control dropdown list and dependent plain text controls and link those controls to a CustomXMLPart data store.
![]() For these steps, I am going to be using the fictitious law firm data file
presented previously. That file is include in the addin download package.
You can use it for this exercise or create your own file.
For these steps, I am going to be using the fictitious law firm data file
presented previously. That file is include in the addin download package.
You can use it for this exercise or create your own file.
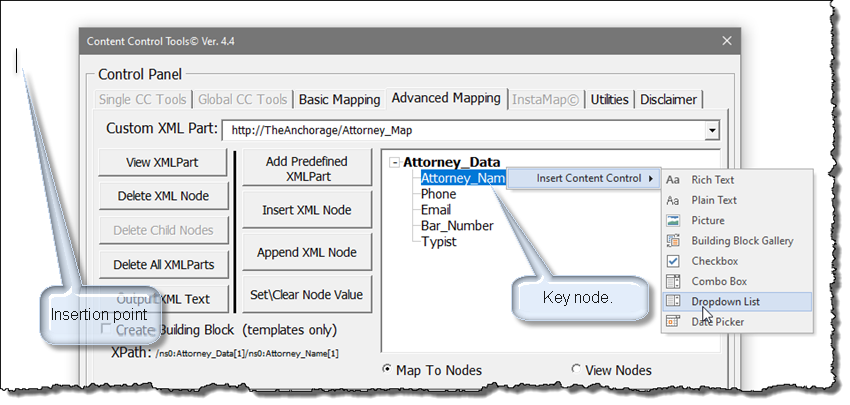
While all of these steps can be done with the Word 2013 or higher XML Mapping
Pane, I'm going to use my Content Control
Tools AddIn (because it is better).
![]() Note:
The element node names in the XML script MUST NOT contain spaces. If your column headings\field names contain space, those space must be
substituted using the underscore "_" character in the XML element node names as I have illustrated
for "Attorney_Name" and "Bar_Number" above.
Note:
The element node names in the XML script MUST NOT contain spaces. If your column headings\field names contain space, those space must be
substituted using the underscore "_" character in the XML element node names as I have illustrated
for "Attorney_Name" and "Bar_Number" above.
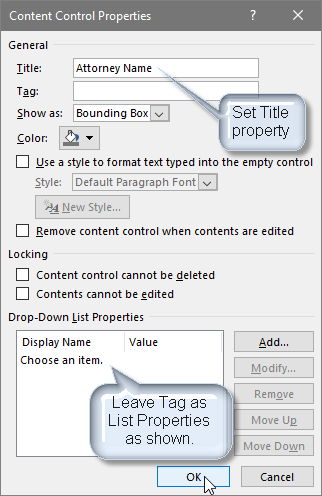
![]() Note:
If using the built-in XML Mapping Pane, the option to title the inserted control
is not presented. Content control titles and other properties can be set
later.
Note:
If using the built-in XML Mapping Pane, the option to title the inserted control
is not presented. Content control titles and other properties can be set
later.
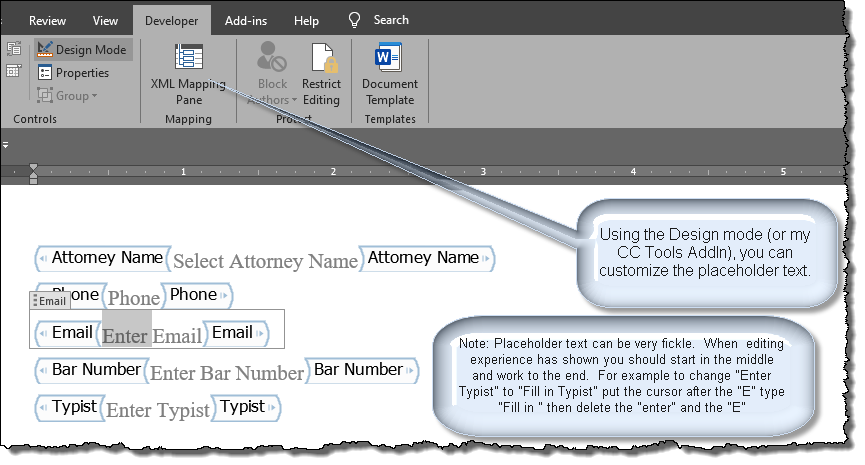
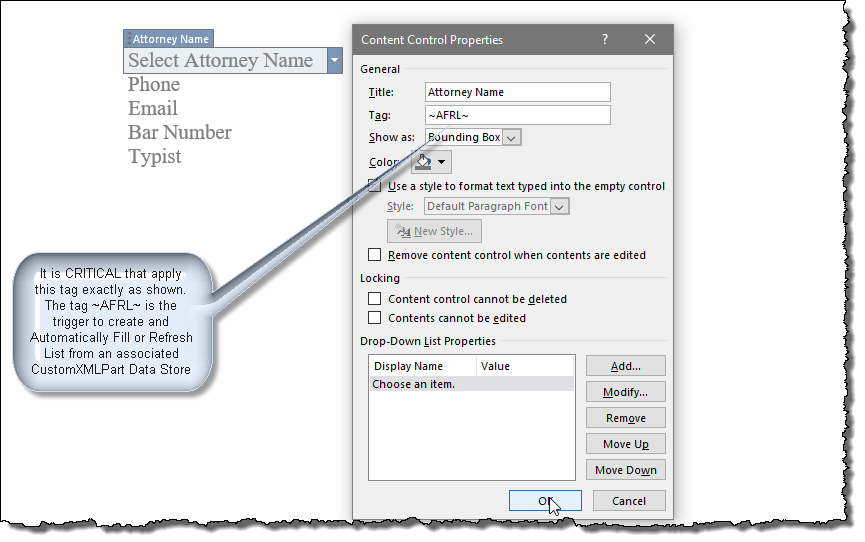
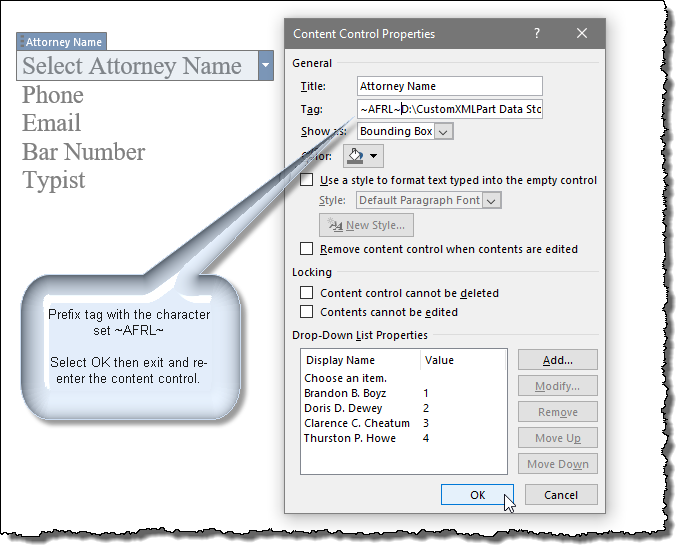
![]() Note: This
action triggers the document ThisDocument class DocummentContentControl_OnEnter event.
That event, and the specific content control tag ~AFRL~ initiates the
CustomXMLParts form class prompting you to identify and associate an external
data source. There is nothing magical about (~AFRL~). It symbolizes
"Auto-Fill\Refresh List" and just my idea of a unique way to represent it.
Note: This
action triggers the document ThisDocument class DocummentContentControl_OnEnter event.
That event, and the specific content control tag ~AFRL~ initiates the
CustomXMLParts form class prompting you to identify and associate an external
data source. There is nothing magical about (~AFRL~). It symbolizes
"Auto-Fill\Refresh List" and just my idea of a unique way to represent it.
That is it. Your mapped content control dropdown list and associated dependent plain text content controls are now linked to a new CustomXMLPart data store embedded in the document.
If you look at the tag property of the content control dropdown list, you will see that it has been changed to reflect the namespace of the associate CustomXMLPart data store. You will also see the list properties have be auto populated:
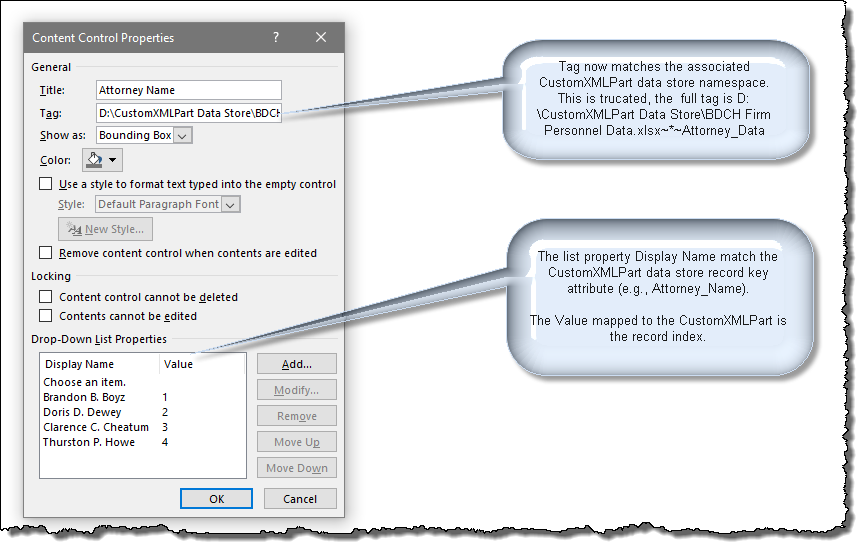
All the mapping and work is done. As long as the the content control dropdown list tag is unchanged and the CustomXMLPart data store remains present, the dropdown list and associated dependent controls will continue to function as shown in the demonstration video.
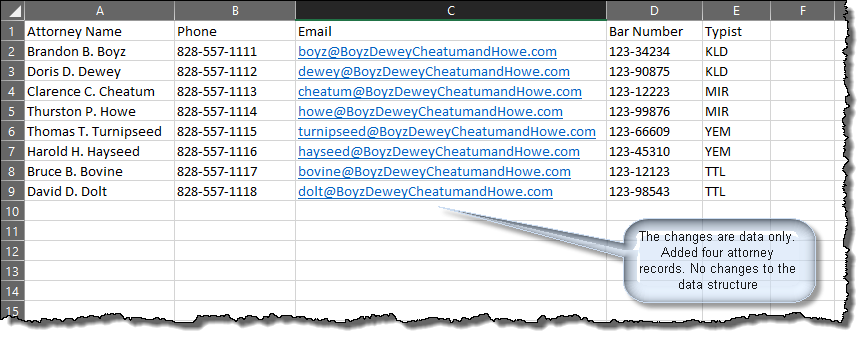
If the changes are made or required to the external data source, the associated CustomXMLPart data store will need to be synched (refreshed) with the external data file. This change could be a simple change such as adding records or modifying an existing record. Here, our fictitious law firm has completed a hostile take over of another firm and hired on four new attorneys and two typist.
![]() Note:
If you delete data (a record) from an Excel data source file, it is best to
physically select and delete the sheet row. Not just the data a row contains.
Note:
If you delete data (a record) from an Excel data source file, it is best to
physically select and delete the sheet row. Not just the data a row contains.
Synching and refreshing the associated CustomXMPL data store in the document with these changes is a simple matter of prefixing the content control dropdown list tag with the ~AFRL~ character set. Then exiting and re-entering the control.

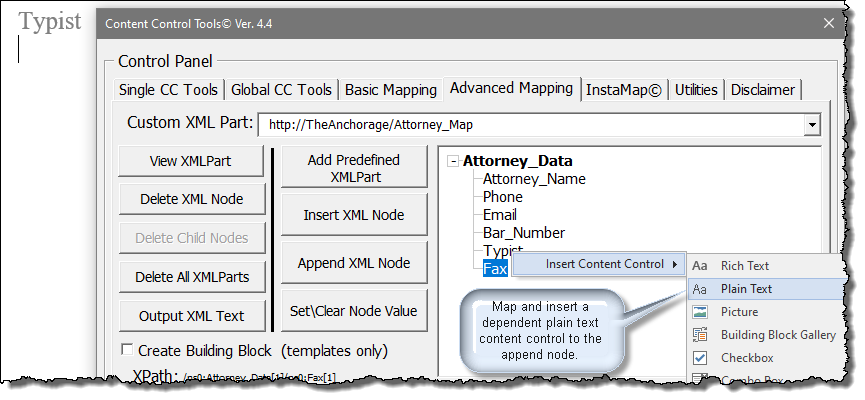
Changes to the data structure requires a bit more effort. Here our firm has decided to include a Fax number with the attorney data.
![]() Note: The following steps are performed using my Content Control Tools AddIn.
Microsoft hasn't mustered the gumption to beef up the built-in XML Mapping
Pane for these purposes.
Note: The following steps are performed using my Content Control Tools AddIn.
Microsoft hasn't mustered the gumption to beef up the built-in XML Mapping
Pane for these purposes.

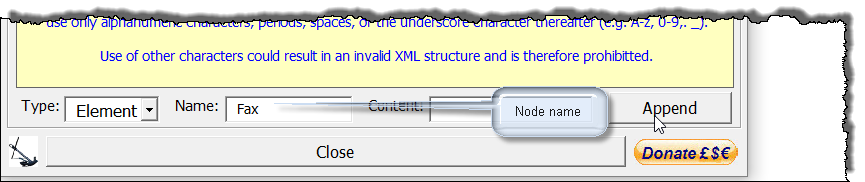
![]() Note: If changes to the data structure are more complex than illustrated above
(e.g., changes to column heading\field names, inserting columns or fields
between existing columns or fields) then without some complex customized VBA
routine, you are probably better off to simply edit your original .txt\.xlm
file, recreate your mapping CustomXMLPart and remap the content controls.
Note: If changes to the data structure are more complex than illustrated above
(e.g., changes to column heading\field names, inserting columns or fields
between existing columns or fields) then without some complex customized VBA
routine, you are probably better off to simply edit your original .txt\.xlm
file, recreate your mapping CustomXMLPart and remap the content controls.
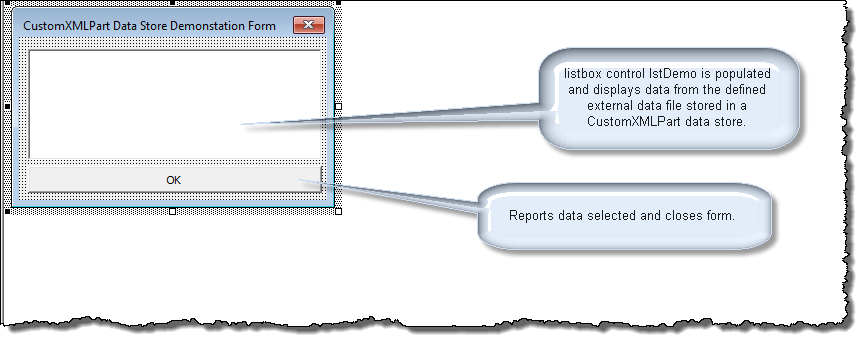
Linking a userform listbox to a CustomXMLPart Data store is much less involved than the method for content controls. But not quite as CLEAN. The custom template you created earlier includes a demonstration userform "frmDemo"
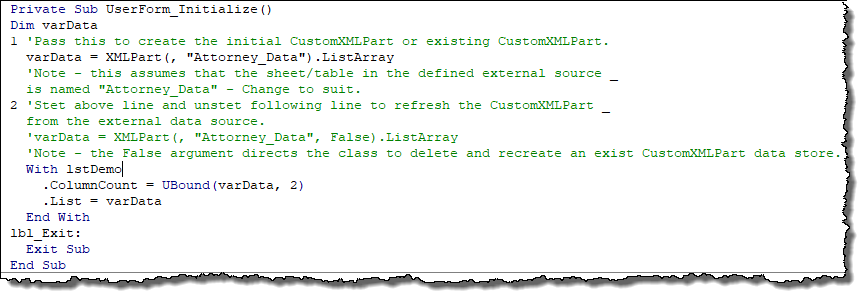
The following code in the userform initialization event is used to query the CustomXMLPart form class initialization procedure in the project standard module modMain.
When the frmDemo is initialized, the prompt to select and associate an external data file is presented and processing continues as shown below.
To synch and refresh the CustomXMLPart data store with the external data source, see the line notes 1 and 2 in the code.
![]() Note:
By not quite as CLEAN, I mean using the CustomXMLPart form class with a userform
requires a bit of interaction with the template VB Project and you must identify
your sheet or table name in the calling procedure.
Note:
By not quite as CLEAN, I mean using the CustomXMLPart form class with a userform
requires a bit of interaction with the template VB Project and you must identify
your sheet or table name in the calling procedure.
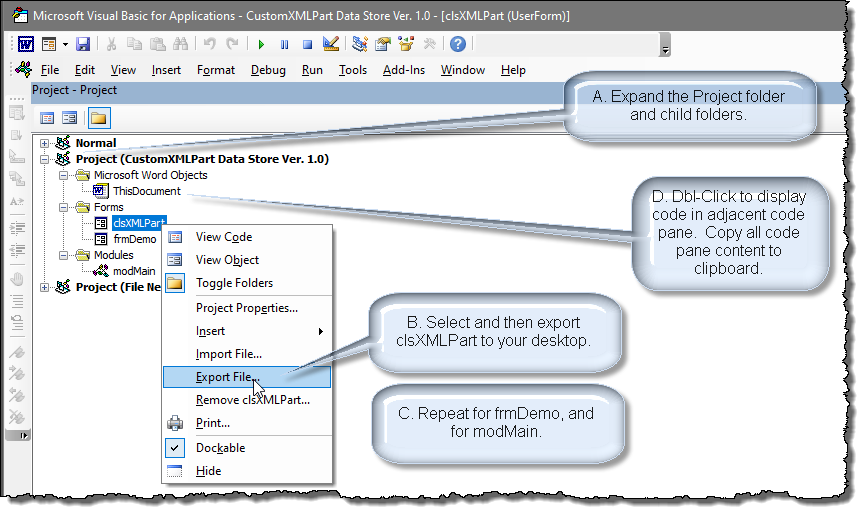
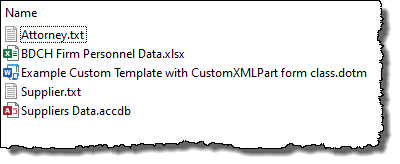
You can download the addin template file and supporting files here: CustomXMLPart Form Class. The download is in .zip format and includes the following files:
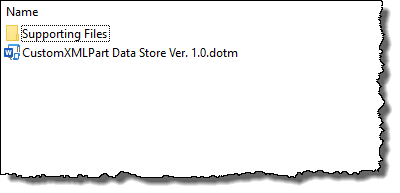 The zip folder content |
 The Supporting Files folder content |
![]() For more on template add-ins and how to load them, see:
Organizing Your Macros/Template Add-ins at:
Installing Macros
For more on template add-ins and how to load them, see:
Organizing Your Macros/Template Add-ins at:
Installing Macros
![]() This tips page, illustrations and examples were developed using Word 2019.
The addin should be compatible with all previous Ribbon versions of Word for PC.
This tips page, illustrations and examples were developed using Word 2019.
The addin should be compatible with all previous Ribbon versions of Word for PC.
That's it! I hope you have found this tips page useful and informative.
The information, illustrations and code contained in my "Microsoft Word Tips" are provided free and without risk or obligation.
However, the work is mine. If you use it for commercial purposes or benefit from my efforts through income earned or time saved then a donation, however small, will help to ensure the continued availability of this resource.
If you would like to donate, please use the appropriate donate button to access PayPal. Thank you!
This page was last updated on
March 09, 2021
Website
Privacy Statement
Back to top
![]() Back to
Word Tips
Back to
Word Tips