The Anchorage
Personal website of Gregory K. Maxey, Commander USN (Retired)

The Anchorage
Personal website of Gregory K. Maxey, Commander USN (Retired)
The information, illustrations and code contained in my "Microsoft Word Tips" are provided free and without risk or obligation.


However, the work is mine. If you use it for commercial purposes or benefit from my efforts through income earned or time saved then a donation, however small, will help to ensure the continued availability of this resource.
If you would like to donate, please use the appropriate donate button to access PayPal. Thank you!
The purpose of this Microsoft Word Help & Microsoft Word Tips page is to publish and provide examples of functional ribbon menu controls (i.e., menu, splitButton and dynamicMenu controls.)
All three controls are similar as they all provide the user a compact defined list of options/commands to choose from. Menu controls are primary building blocks of the Ribbon UI and many custom Ribbon applications.
The illustrations presented in this tips page are from a Word template add-in I created for the purpose of testing and demonstrating the menu controls mentioned above and several requird child elements of the controls. In addition to menu controls, the add-in contains and provides a demonstration of:
You can download the template add-in which contains the associated ribbon, custom XML and VBA callbacks using this link: Menu Control Demonstration
The custom ribbon created with the add-in appears as shown below:

![]() For more on template add-ins and how to load them, see: Organizing Your Macros/Template Add-ins at: Installing Macros
For more on template add-ins and how to load them, see: Organizing Your Macros/Template Add-ins at: Installing Macros
The first group "Macro Call Buttons" illustrates single button controls. Each executes a single VBA procedure stored in the VBA project module "Main" of the template. They are all perfectly functional but the individual controls take up lots of the limited space available on the ribbon.
Menu controls can minimize busy, overcrowded groups and help you overcome space limitations on the ribbon.
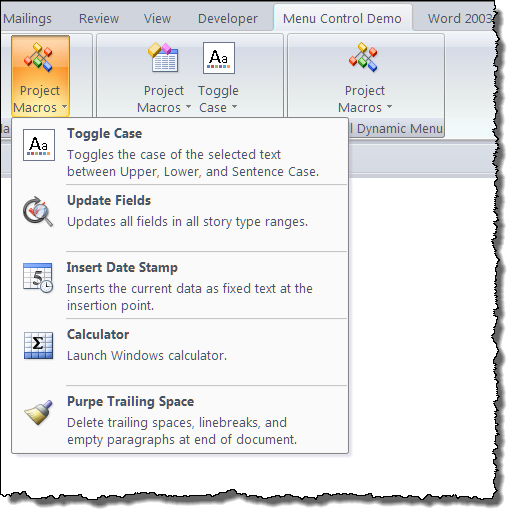
Group 2, the "Macro Call Menu" group, illustrates a single menu control where individual button controls are arranged in a compact menu options list.
The menu control consists of collection of simple list of button controls separated by the menuSeparator control (a formatting tool).
In addition to button and menuSeparator controls, the menu can act as the parent container for several other child elements including checkBox controls, controls, gallery controls, dynamicMenu controls, other menu controls, splitButton controls and toggleButton controls.
To create this menu I used:
The third group illustrates two splitButton controls. Like the menu control the splitButton is useful for listing and arranging user commands.
On the surface a splitButton control looks almost identical to a menu control. In the ribbon the splitButton is distinguished from a menu control by a horizontal line through the middle of the control (seen when you click on the control).

There is an advantage and disadvantage of using the spiltButton control in place of a menu.
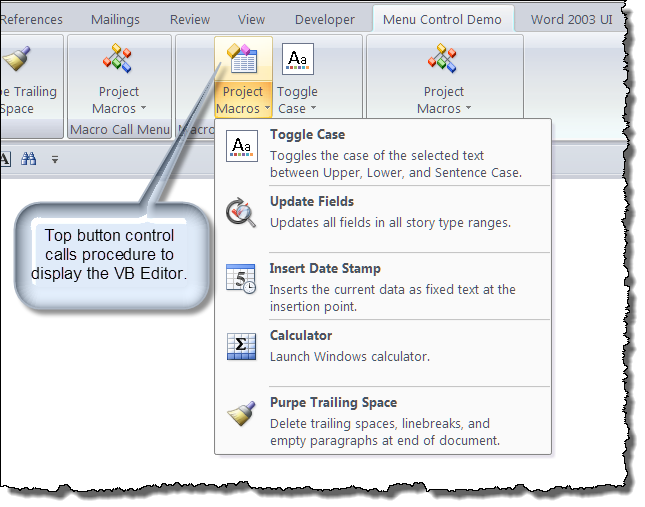
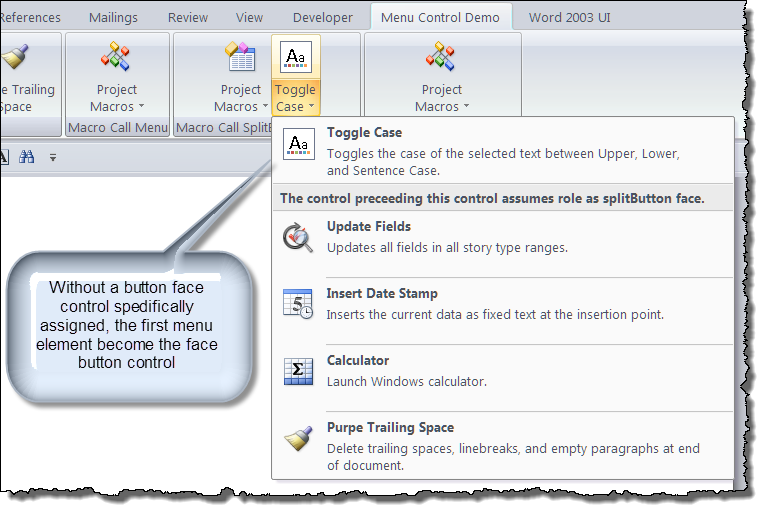
![]() Note: If the top button or toggleButton is not defined for the splitButton control in the RibbonXML then the first qualifying control in the splitButton menu becomes the face item of the splitButton.
Note: If the top button or toggleButton is not defined for the splitButton control in the RibbonXML then the first qualifying control in the splitButton menu becomes the face item of the splitButton.
This is shown in the second splitButton where I intentionally omitted the Visual Basic editor command button in the RibbonXML defining the control. I highlighted this using the "title" attribute of the menuSeparator control.
The Static and Dynamic Macro galleries were presented first just to show you how a basic gallery can be constructed using static and dynamic attributes. Other than showing some plain old controls horizontally across the screen or grouped in columns and rows, there really wasn't anything these galleries offered over a menu.
The great feature of a gallery is that it can display user options graphically.
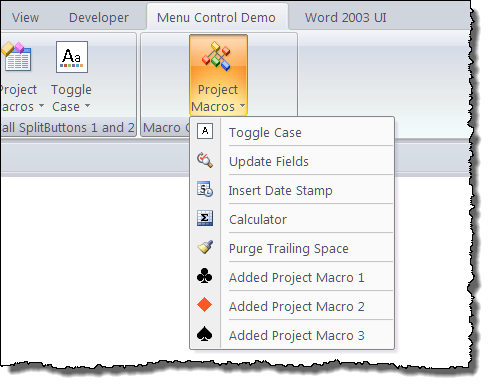
The final group in the demonstration template provides an example of the extremely versatile dynamicMenu control.
This control can be used to build ribbon controls "on the fly" and minimize laborious crafting of repetitive static RibbonXML with the Custom UI editor.
In the menu control presented earlier I defined and built the menu one control at a time using the Custom UI editor, RibbonXML statements, and the static and dynamic attributes of the control and its child elements. When you look at the RibbonXML associated with this template you will easily appreciate the work involved.
With a dynamicMenu, the RibbonXML statement defined with Custom UI editor is very simple:
<group id="Grp3" label="Macro Call Dynamic Menu">
<dynamicMenu id="Grp3DMenu1" label="Project Macros" imageMso="CreateModule" size="large"
getContent="RibbonControl.GetContent"/>
</group>
The bulk of the RibbonXML for a dymamicMenu control is determined at runtime and returned by the dynamic attribute "getContent" and its associated VBA callback.
In the dynamic menu, rather than include just 5 fixed procedures in my Project Macros menu, I want to list all qualifying macros in the project module. If I later add or delete procedures I want my menu to reflect those changes when I save and reopen my document without having to manually edit the RibbonXML.
Writing required XML script in the VBA getContent callback can be a little tricky. A straightforward Ribbon XML script to define an indexed button control using the Custom UI editor shown below:
<button id="Grp1Btn1" label="Toggle Case" imageMso="SlideThemesGallery" size="large"
onAction="RibbonControl.ButtonOnAcion"/>
Requires the more complicated VBA script shown here:
sXML = sXML & _
  "<button id=""Grp3Btn" & i + 1 & Chr(34) & " " & _
  "label=" & Chr(34) + pLabel + Chr(34) & " " & _
  "imageMso=" & Chr(34) + pImage + Chr(34) & " " & _
  "tag=" & Chr(34) + pLabel + Chr(34) & " " & _
  "onAction=""RibbonControl.ButtonOnAction""/>" & vbCrLf & _
  "<menuSeparator id=""Grp3MS" & i + 1 & Chr(34) & "/>
While admittedly daunting, a simple loop like:
For i = 1 to 20
  pLabel = arrLabels(i)
  pImage = arrImages(i)
  sXML = sXML & _
    "<button id=""Grp3Btn" & i + 1 & Chr(34) & " " & _
    "label=" & Chr(34) + pLabel + Chr(34) & " " & _
    "imageMso=" & Chr(34) + pImage + Chr(34) & " " & _
    "tag=" & Chr(34) + pLabel + Chr(34) & " " & _
    "onAction=""RibbonControl.ButtonOnAction""/>" & vbCrLf & _
    "<menuSeparator id=""Grp3MS" & i + 1 & Chr(34) & "/>"
Next i
Can produce 20 functional button controls in the blink of an eye!!
The onAction callbacks also take considerable effort to craft. Hopefully the example I provide in this tips page will let you get a feel for how it can be done and your skills will improve over time.
The dynamicMenu for this example is shown below.
The possibilities in ribbon customization using menu controls are practically endless. Many people still fret about the old menu and toolbar UI. With the right RibbonXML script you can almost have it back. Click on the Word2003 UI tab to see the old interface in most of its fading glory. This tab and group were built entirely using built-in controls with many of them being menu controls.

![]() Bonus Tip: Departing from my normal aversion to "giving a man a fish." I have prepared a global template add-in that contains the classic menu interface shown above. Download, unzip and store in your Word Startup Folder: Classic UI
Bonus Tip: Departing from my normal aversion to "giving a man a fish." I have prepared a global template add-in that contains the classic menu interface shown above. Download, unzip and store in your Word Startup Folder: Classic UI
![]() Notes:
Notes:
1. The VBA call back for the Dynamic Menu requires access to the VBA project code module in this template. As project code modules in template Add-Ins are "not viewable," an extra process is required in order to populate the dynamicMenu with a list of project module qualifying procedures if the template is loaded as a template add-in.![]() This step involves temporarily opening the template as a document, extracting the data from the project, and then closing the document. This results in a slight processing delay as the template is loaded.
This step involves temporarily opening the template as a document, extracting the data from the project, and then closing the document. This results in a slight processing delay as the template is loaded.
2. The controls in this template call macro procedures located in the template. To facilitate their use set the following user options Word>Options>Trust Center>Trust Center Settings and check "Trust access to VBA project module."
3. For an introduction to ribbon customization and lots of information on other controls including static and dynamic attributes, parent and child controls, and VBA callbacks see my: Customize the Ribbon
That's it! I hope you have found this tips page useful and informative.
The information, illustrations and code contained in my "Microsoft Word Tips" are provided free and without risk or obligation.


However, the work is mine. If you use it for commercial purposes or benefit from my efforts through income earned or time saved then a donation, however small, will help to ensure the continued availability of this resource.
If you would like to donate, please use the appropriate donate button to access PayPal. Thank you!